


You are using an out of date browser. It may not display this or other websites correctly.
You should upgrade or use an alternative browser.
You should upgrade or use an alternative browser.
Thanks Everyone,
- Thread starter redwine300
- Start date
redwine300
Silly Rabbit
- Messages
- 308
Cheers ytre, Hope to have her finished by the summer. I will post photos. In the meantime I will post each stage as I go till then. The thought of driving her again makes it worth the effort. 0mph to 155mph in 29 seconds!!!

Hope to have her finished by the summer. I will post photos. In the meantime I will post each stage as I go till then. The thought of driving her again makes it worth the effort. 0mph to 155mph in 29 seconds!!!redwine300
Silly Rabbit
- Messages
- 308
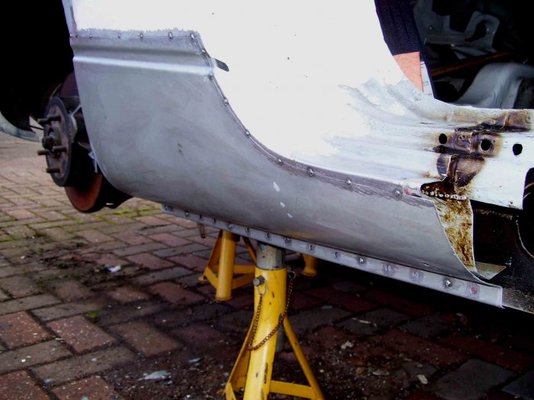
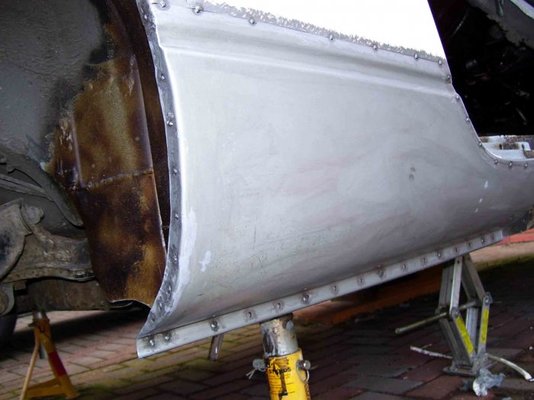
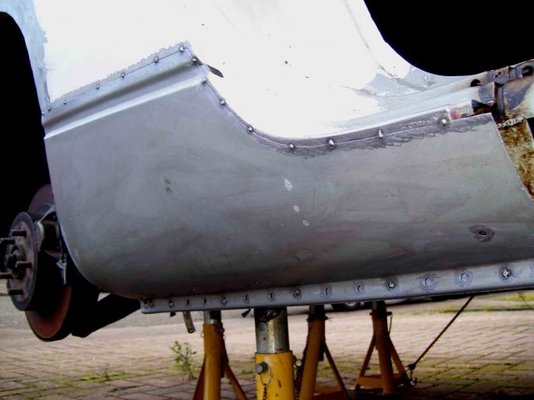
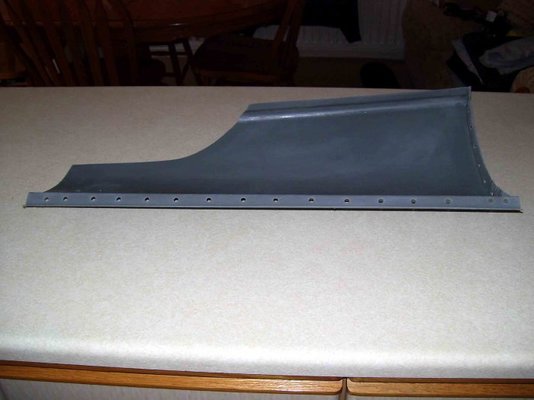
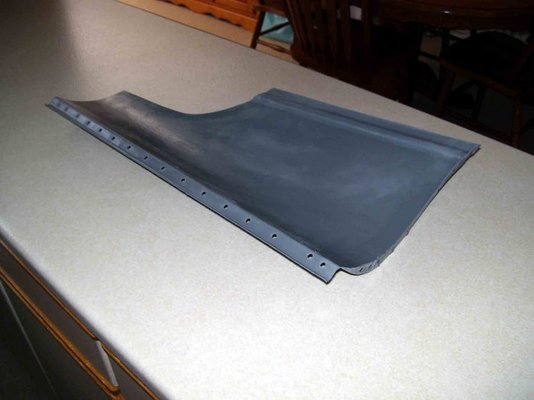
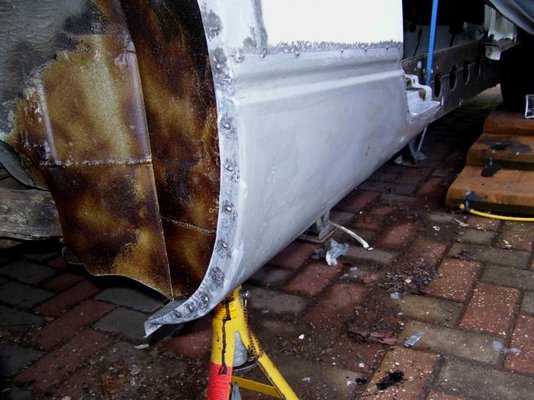
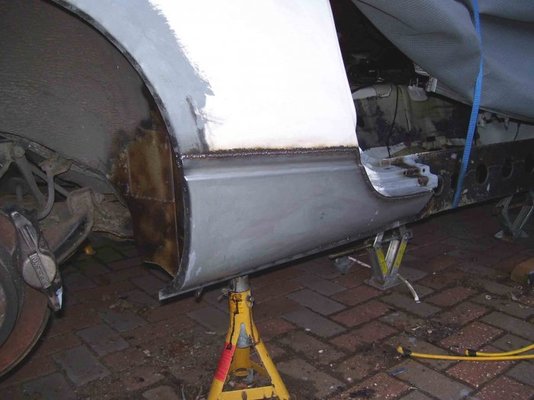
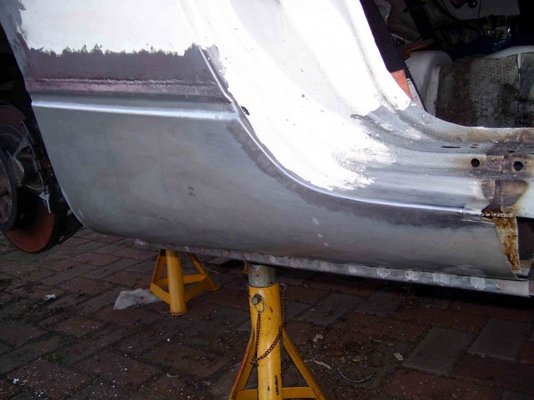
Well with the bad weather on it's way I thought I would make the most of today. Prepped all the internal areas with bilt hamber wax, (except the welded edges in case of fire) Primed the inside of panel with acid etch primer followed with 90% zinc primer and ground up all edges and plug weld areas (panel and mating faces.) No going back now so I spot welded panel into place.
 Next is the worrying part, I thought I might alternately add one single stitch at a time rather than a run of single stitches in one go so as to combat the dreaded heat and distortion. What do you guy's think? Hoping to finish off tomorrow.
Prepped all the internal areas with bilt hamber wax, (except the welded edges in case of fire) Primed the inside of panel with acid etch primer followed with 90% zinc primer and ground up all edges and plug weld areas (panel and mating faces.) No going back now so I spot welded panel into place. Next is the worrying part, I thought I might alternately add one single stitch at a time rather than a run of single stitches in one go so as to combat the dreaded heat and distortion. What do you guy's think? Hoping to finish off tomorrow.-
 27022010 a.jpg64.7 KB · Views: 1,403
 -
 27022010 b.jpg59.7 KB · Views: 1,404
 -
 27022010 c.jpg54.6 KB · Views: 1,407
 -
 27022010 d.jpg49 KB · Views: 1,389
 -
 27022010 e.jpg47.5 KB · Views: 1,381
 -
 27022010 f.jpg56.1 KB · Views: 1,391
 -
 27022010 g.jpg67.1 KB · Views: 1,379
 -
 27022010 h.jpg61 KB · Views: 1,394
 -
 27022010 i.jpg85.9 KB · Views: 1,381
Chickenjohn
Morris Minor and Porsche 944 fan
- Messages
- 1,283
- Location
- East Kent
I would keep adding tacks till they are about 1/2 " apart or 1cm if you prefer. Then run a bead between two tacks 1/3 in at one side of the panel, then do another 1/2' bead at the other side. let cool completely, and carry on joining the dots, a couple of spaced beads at a time.
However, as you are butt welding, I fear some distortion is inevitable, so you will have to grind down the weld bead and skin with filler. Do let us know how you get on, tis great seeing another (oldish) car being saved from the scrapper!.
personally, i would have swaged or joddled the repair section, left the original panel 1cm longer, punched holes in it, then plug welded the two together and skimmed with filler- less distortion that way.
redwine300
Silly Rabbit
- Messages
- 308
Many thanks for the advice Chickenjohn, weather(and er in doors) permitting I will try and finish the panel off today. Bathroom sprung a leak! so that might have to come first.
 I take your point about the ease and safety with regards to overlap joint but I am worried that no matter how good my handy work might be, there is a chance of water getting in the seam. Due to my handwork not the technique I hasten to add.
 By the way, bought some Axminster 1" G Cramps shown in Malcolm's wheel arch repair that you put me onto. Very nice.
weather(and er in doors) permitting I will try and finish the panel off today. Bathroom sprung a leak! so that might have to come first. I take your point about the ease and safety with regards to overlap joint but I am worried that no matter how good my handy work might be, there is a chance of water getting in the seam. Due to my handwork not the technique I hasten to add. By the way, bought some Axminster 1" G Cramps shown in Malcolm's wheel arch repair that you put me onto. Very nice.Chickenjohn
Morris Minor and Porsche 944 fan
- Messages
- 1,283
- Location
- East Kent
I hope you are having better weather up there in the Midlands than we are down here in kent. I admire folk who actually do major car restoration projects out in the open air! I chicken out if it is too cold in my garage!
Take your point about water getting in an overlap. However, modern cars are made of overlaps, spot welded together. If you can get to the seam from the back (such as removing rear quater trim panel, then you can seam seal, paint the inside of the repair and then add wax protection. of course, zinc weld through helps too on both faces of the overlap.
Regular application of wax treatment should make the repair a lasting one.
redwine300
Silly Rabbit
- Messages
- 308
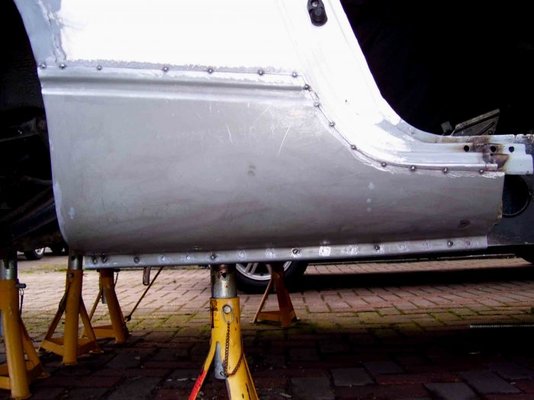
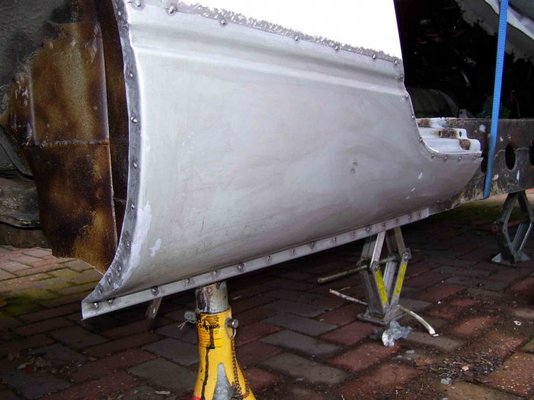
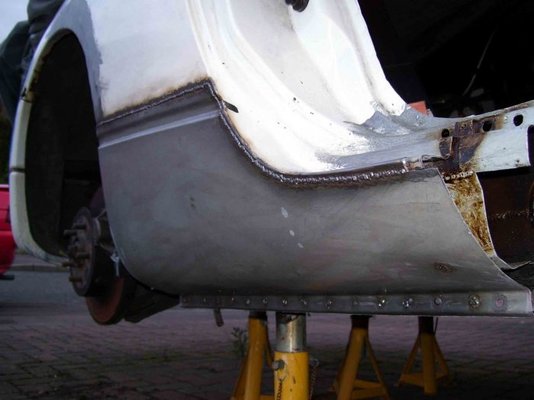
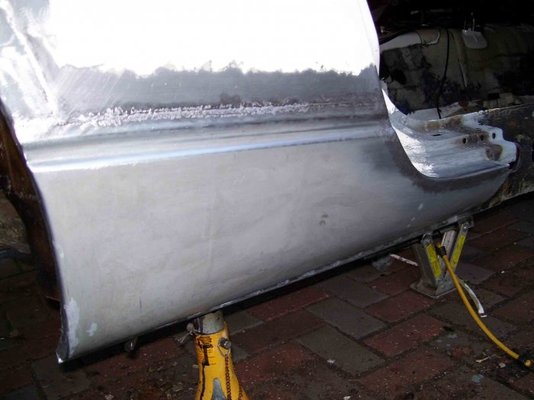
Pretty lucky with the weather today chickenjohn, couple of little showers, nothing to serious.Took your advice and I am glad to say all appears to have gone great. Big thanks. I see what you mean about looking from the inside, I took the seatbelt unit off and I can access the inner arch. I shall, as you say, wax from there as well. By the way, as you said, with but welding there is likely to be a little distortion. But what amazed me most was, so long as I followed your advice and was patient and letting everything cool down in between runs, most of the distortion came good.
nothing to serious.Took your advice and I am glad to say all appears to have gone great. Big thanks. I see what you mean about looking from the inside, I took the seatbelt unit off and I can access the inner arch. I shall, as you say, wax from there as well. By the way, as you said, with but welding there is likely to be a little distortion. But what amazed me most was, so long as I followed your advice and was patient and letting everything cool down in between runs, most of the distortion came good.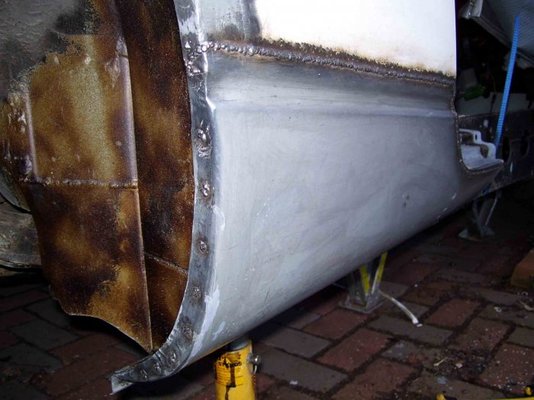

Iain Westland
Member
- Messages
- 1,115
- Location
- Bury
nice ")
Chickenjohn
Morris Minor and Porsche 944 fan
- Messages
- 1,283
- Location
- East Kent
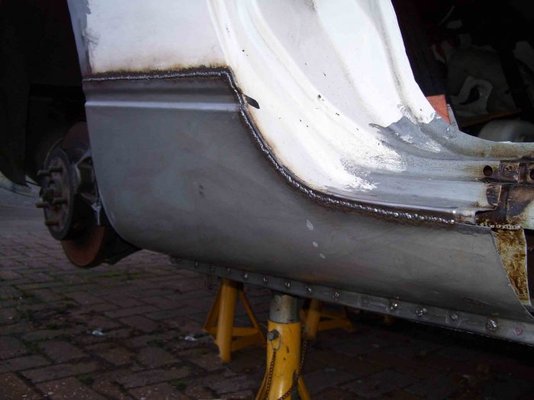
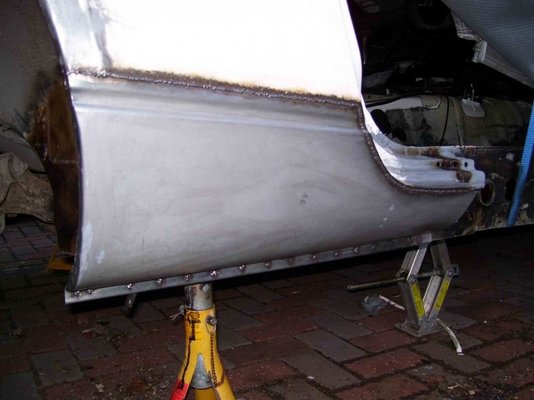
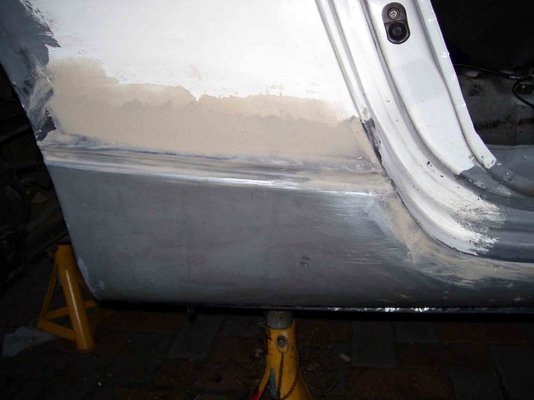
Agree, looks great! Just one observation though. The inner wheelarch area just behind the sill. It looks like waxoyl over paint over the welded repairs. these areas are high impact, stones, mud, driving rain, snow, road salt grit etc and I would use anti stonechip coating in these areas, then paint, then waxoyl.
I have just relied on waxoyl over paint in the past and found high impact areas need more protection.
I have just relied on waxoyl over paint in the past and found high impact areas need more protection.
Agree, looks great! Just one observation though. The inner wheelarch area just behind the sill. It looks like waxoyl over paint over the welded repairs. these areas are high impact, stones, mud, driving rain, snow, road salt grit etc and I would use anti stonechip coating in these areas, then paint, then waxoyl.
I have just relied on waxoyl over paint in the past and found high impact areas need more protection.
Some good advice there john
Fantastic work Redwine300
Im doing similar areas on my 91 200SX.
redwine300
Silly Rabbit
- Messages
- 308
Thanks for the comments guys. By the way chickenjohn, I have only wax-oyled temporarily so as to stop any moisture getting in. I plan to seam seal and Schultz gun stone chip later so as to allow me to concentrate on the metalwork, I do appreciate you pointing it out though. I have not done much homework regarding which type/brand of stone chip to go for so any tips would be most welcome. By the way Iky are you running a post on the 200sx?
By the way chickenjohn, I have only wax-oyled temporarily so as to stop any moisture getting in. I plan to seam seal and Schultz gun stone chip later so as to allow me to concentrate on the metalwork, I do appreciate you pointing it out though. I have not done much homework regarding which type/brand of stone chip to go for so any tips would be most welcome. By the way Iky are you running a post on the 200sx?
Last edited:
Thanks for the comments guys.
3M stonechip is pretty good. No sorry, it's sort of a long term project which i only work on when i have time also i don't really have as much patience as yourself
Keep up the good work with plenty of photos as its keeping me motivated. redwine300
Silly Rabbit
- Messages
- 308
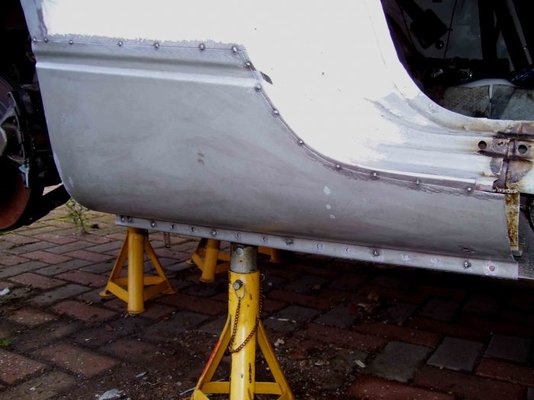
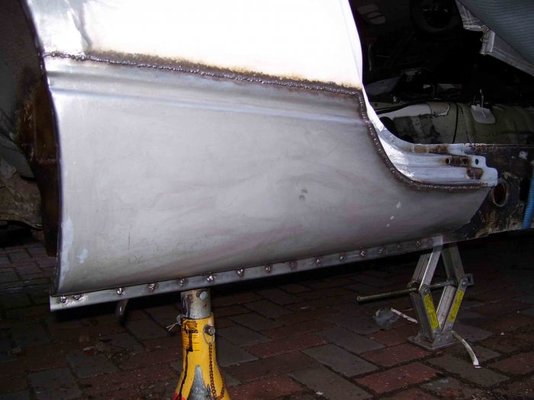
Not exactly welding I know, but I just needed to satisfy myself that what I had done so far would be OK after filler. So I ground back the welds so as to be flush, or just below the final contour and skimmed with filler. Time run out as to regards sanding though, which is not a bad thing as I am not sure how to smooth the surface and keep the profile, Any suggestions would be most welcome. Hope to tack in position the front outer sill next week. Mind you, it is Mothers Day so I might have to for go it. Not to mention F1 starts also.
but I just needed to satisfy myself that what I had done so far would be OK after filler. So I ground back the welds so as to be flush, or just below the final contour and skimmed with filler. Time run out as to regards sanding though, which is not a bad thing as I am not sure how to smooth the surface and keep the profile, Any suggestions would be most welcome. Hope to tack in position the front outer sill next week. Mind you, it is Mothers Day so I might have to for go it. Not to mention F1 starts also.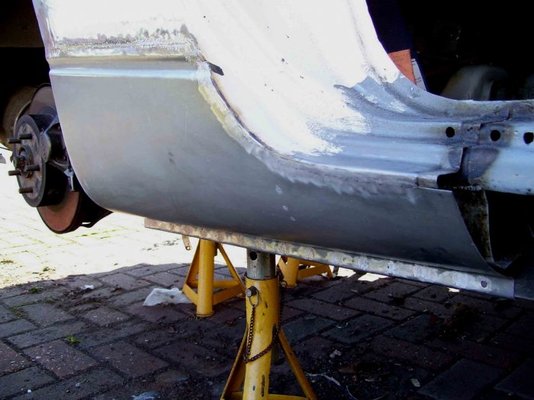


Chickenjohn
Morris Minor and Porsche 944 fan
- Messages
- 1,283
- Location
- East Kent
You need to use a block with sandpaper when flatting filler to make sure you sand the filler really flat.
I like to use the Abranet kit with a vacuum, sucks up all the dust and the perforated sandpaper lasts a lot longer as it does not clog. I start with 80 grit, then 120, then finish with 180 before priming.
http://www.screwfix.com/prods/93672...branet-Dust-Extraction-Sanding-Block-70x198mm
By using such a large block you will follow the contours of the panel and sand the filler to those contours, thus blending the repairs in.
The sheets last a lot longer than if you use normal sandpaper around a block and of course no dust! To knock any high bits off the filler use a DA sander with a 60 grit pad, then go to the hand sanding on a block. Best to sand the filler as soon as it has set, that way it is easier to sand than if you let it set rock hard.
You may need to make multiple passes of filler, and when down to the 180 grit sanding and you are "feathering" the edge of the filler into the panel, then spray a mist coat of black, let this dry then sand to see if there are any remaining low spots. The filler needs to be sanded until it is absolutely flat and smooth as felt by the palm of your hand. Better to spread filler over a larger area than you think you will need and then sand it off.
Also, read Malcoms excellent how to on filler: http://www.mig-welding.co.uk/body-filler.htm
Last edited:
redwine300
Silly Rabbit
- Messages
- 308
Hi Chickenjohn, I really appreciate you taking the time and effort to help me with your advice regarding filling and sanding. (as well as everything else I hasten to add) I feel a lot more confident in tackling it now, Bring on the weekend.  If, as I am sure I will, have to make multiple passes of filler, will I need to rough up the surface or can I just fill over smooth? I notice that you sand dry, Is that a preference or is it not advisable to sand wet so as to not encourage the dreaded rust? Again Many Thanks!! By the way, Links are great.
(as well as everything else I hasten to add) I feel a lot more confident in tackling it now, Bring on the weekend. If, as I am sure I will, have to make multiple passes of filler, will I need to rough up the surface or can I just fill over smooth? I notice that you sand dry, Is that a preference or is it not advisable to sand wet so as to not encourage the dreaded rust? Again Many Thanks!! By the way, Links are great.pedrobedro
Man at Matalan
- Messages
- 13,116
- Location
- CX near Chesterfield
Sand your first layers down with the 80 grit and it will key the following layers nicely, then finish your last layer with finer grades. I use aluminium oxide paper dry as it doesn't clog up, dust it before you prime with a rag with a bit of thinners on.
redwine300
Silly Rabbit
- Messages
- 308
Big thanks Pedrobedro, Appreciate your advice and will put it into practise this week end Hopefully. Mothers day permitting. Still not sure how to maintain the vertical profile though,( quite a subtle curve ) I can see how to keep the horizontal lines by way of a straight edge etc' I supose it may just come down to hand and eye with plenty of practice. Still, if it does not come right first time at least I can add more filler untill happy. CHEERS AGAIN GUY'S
Appreciate your advice and will put it into practise this week end Hopefully. Mothers day permitting. Still not sure how to maintain the vertical profile though,( quite a subtle curve ) I can see how to keep the horizontal lines by way of a straight edge etc' I supose it may just come down to hand and eye with plenty of practice. Still, if it does not come right first time at least I can add more filler untill happy. CHEERS AGAIN GUY'SI notice that you sand dry, Is that a preference or is it not advisable to sand wet so as to not encourage the dreaded rust? Again Many Thanks!! By the way, Links are great.[/QUOTE]
hello redwine300 in regards to the quote, it is best not to sand the filler wet as it will cause the surface to rust up almost straight away, wet sanding is best kept for flatting the primer down before painting. if you have any questions i do restorations and bodywork for a living and am always happy to help, ps the project looks really good.
[/QUOTE]hello redwine300 in regards to the quote, it is best not to sand the filler wet as it will cause the surface to rust up almost straight away, wet sanding is best kept for flatting the primer down before painting. if you have any questions i do restorations and bodywork for a living and am always happy to help, ps the project looks really good.
redwine300
Silly Rabbit
- Messages
- 308
Many thanks Mr Toasty, As for questions, How long have you got? Winding the clock forward to the primer stage, which type/brand would you recommend?. I was thinking of applying a high build primer after final sanding but I am not sure if it is OK on to bare metal. I have read that acid etch primers may eat underneath the feather edges of the filler, what would your thoughts be?
Chickenjohn
Morris Minor and Porsche 944 fan
- Messages
- 1,283
- Location
- East Kent
I agree, don't wet sand filler! It will encourage rust. I use etch primer over filler and bare metal areas and it seels to be fine as long as the filler has a good key to bind to , which will be the case if you have ground your welds down before filling.
I use Upol acid 8 etch primer from an aerosol and just dust/mist a coat over the bare metal and filler and have never had a problem with filler lifting. It isn a good idea to panel wipe the area before filling anf again before painting with etch, and if you have an air line, use a blow gun to blow the dust off.
I would go to a local paint factors to get your paints- they supply decent quality.


