You are using an out of date browser. It may not display this or other websites correctly.
You should upgrade or use an alternative browser.
You should upgrade or use an alternative browser.
Stuff you have made today
- Thread starter God mode restorations
- Start date
Nick DV
"That's the only name they ever gave me."
- Messages
- 1,733
- Location
- "A long time ago in a galaxy far, far away...."
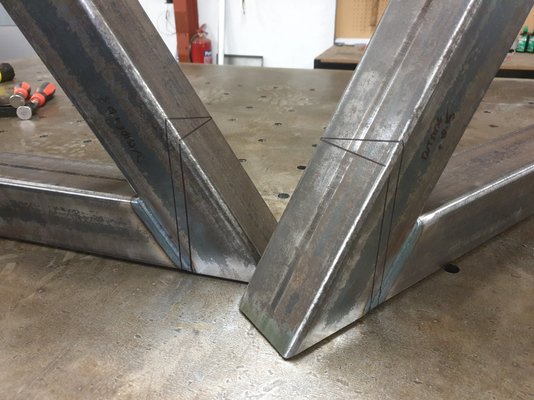
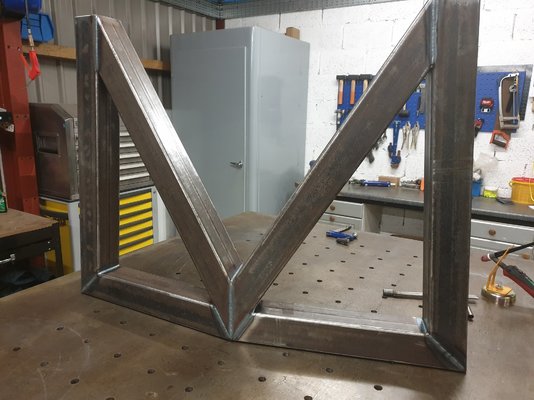
NiceMade a pair of triangles the other day, and cut and welded them together last night.
View attachment 256107 View attachment 256108
One more pair to do.
For a very chunky dining table!
 What size box section is that? Just wondered as someone has asked me if I would replace the legs on a heavy oak table with steel ones
Munkul
Jack of some trades, Master of none
- Messages
- 7,748
- Location
- Cumbria
75 x 3mm square. It's a nice compromise between 50mm and 100mmNiceWhat size box section is that? Just wondered as someone has asked me if I would replace the legs on a heavy oak table with steel ones


Nick DV
"That's the only name they ever gave me."
- Messages
- 1,733
- Location
- "A long time ago in a galaxy far, far away...."
Thanks, and I agree75 x 3mm square. It's a nice compromise between 50mm and 100mm

Nauticus
If l let my mind wander, its often gone for weeks!
- Messages
- 86
- Location
- Lincolnshire, UK.
Over the past few weeks I have been rationalising my 'small parts' storage - nuts, bolts washers, screws nails etc etc. Sizes range from very small nuts, washers, tacks etc to large nails, screws and so on.
I have four tower sets of eight plastic drawer towers each bought from Office world before their demise. This gave me 32 drawers (which could each house a ream of A4 paper), which clearly was not an economical use of 'segregated space"
After noting the internal dimensions of the drawers, I decided to create four basic box compartments in each drawer - and then make them either full height of half height. I used OpenScad for this since it is exceptionally quick and simple to produce all the box designs I wanted.
Then, various boxes were designed with varying numbers of internal compartments - to accommodate different sizes and quantities. I must now have around 20 different designs.
The STL file from OpenScad was sliced using the Prussa slicer.
The 3D printer was then put to work producing boxes. What a great way to use up spare filament!!! - I don't really mind what colour the boxes are.
So far I have printed about one hundred boxes - and I still have a some spare drawer spaces to fill.
Some drawers simply have four full height "one compartment" boxes, others have eight half height "multiple compartment" boxes - and others a combination.
Sticky labels on the drawer fronts will indicate what is stored inside.
If anybody wants the OpenScad code let me know.
bigegg
Scream Not Working Because Space Make Deaf
- Messages
- 9,663
- Location
- Leeds, West Yorkshire
Over the past few weeks I have been rationalising my 'small parts' storage - nuts, bolts washers, screws nails etc etc. Sizes range from very small nuts, washers, tacks etc to large nails, screws and so on.
I have four tower sets of eight plastic drawer towers each bought from Office world before their demise. This gave me 32 drawers (which could each house a ream of A4 paper), which clearly was not an economical use of 'segregated space"
After noting the internal dimensions of the drawers, I decided to create four basic box compartments in each drawer - and then make them either full height of half height. I used OpenScad for this since it is exceptionally quick and simple to produce all the box designs I wanted.
Then, various boxes were designed with varying numbers of internal compartments - to accommodate different sizes and quantities. I must now have around 20 different designs.
The STL file from OpenScad was sliced using the Prussa slicer.
The 3D printer was then put to work producing boxes. What a great way to use up spare filament!!! - I don't really mind what colour the boxes are.
So far I have printed about one hundred boxes - and I still have a some spare drawer spaces to fill.
Some drawers simply have four full height "one compartment" boxes, others have eight half height "multiple compartment" boxes - and others a combination.
Sticky labels on the drawer fronts will indicate what is stored inside.
If anybody wants the OpenScad code let me know.
View attachment 256119 View attachment 256120 View attachment 256121
Nice!
How long per box/batch?
Nauticus
If l let my mind wander, its often gone for weeks!
- Messages
- 86
- Location
- Lincolnshire, UK.
Nice!
How long per box/batch?
A 'half-height one compartment" takes a little over an hour. A full -height six compartment takes about 4 hours.
I can wind the speed up a bit if necessary but I usually just leave it alone and look in occasionally.
I try to do the longer prints at night, and then slow the printing down by as much as 50% - so at least it is "doing something" instead of just sitting idle with the power on.
I can get approx 10 full height or 15 half-height boxes to a 1kg roll of filament.
The first box had 1.5mm walls but that was too thick and took too long to print.
Next one was 1mm thick base and walls - very quick but a little flimsy.
Finally settled on 1.30mm for base and 1.25mm for the walls.
Malc
Last edited:
bigegg
Scream Not Working Because Space Make Deaf
- Messages
- 9,663
- Location
- Leeds, West Yorkshire
A 'half-height one compartment" takes a little over an hour. A full -height six compartment takes about 3 hours.
I can wind the speed up a bit if necessary but I usually just leave it alone and look in occasionally.
I try to do the longer prints at night, and then slow the printing down by as much as 50% - so at least it is "doing something" instead of just sitting idle with the power on.
I can get approx 10 full height or 15 half-height boxes to a 1kg roll of filament.
The first box had 1.5mm walls but that was too thick and took too long to print.
Next one was 1mm thick base and walls - very quick but a little flimsy.
Finally settled on 1.30mm for base and 1.25mm for the walls.
Malc
I bought a sheet of foamex sheet from the range, and glued it together with superglue, 20mm pvc angle to reinforce the corners...
But i like those boxes - its given me an idea for custom fitted tubs to go in my sortimo-style bits cases...

Nauticus
If l let my mind wander, its often gone for weeks!
- Messages
- 86
- Location
- Lincolnshire, UK.
I bought a sheet of foamex sheet from the range, and glued it together with superglue, 20mm pvc angle to reinforce the corners...
But i like those boxes - its given me an idea for custom fitted tubs to go in my sortimo-style bits cases...

If you want the code, let me know. It would be dead easy to alter the dimensions to suit your own requirements.
OpenScad is Open Source - so its a free program to download and available for almost every operating system.
Originally I did think of making boxes out of 4mm or 6mm ply but soon dismissed that as too time consuming and fiddly. They would probably be ok for large items, - but I'm trying to house small items, often low in numbers too, but all stored in one area. (4 tower drawer cabinets).
I will probably end up with around 150 boxes giving me around 200 to 400 individual compartments.
I'm still unpacking workshop tools and supplies from our house move a year ago, so now, when I find yet another stash of brand new screws, nuts, bolts, washers and nails or whatever, I just select the most appropriate box design on the 3D menu - and the box will be printed and completed with repeatable accuracy without any further input from me.
Now, I'm beginning to look at all these stored supplies, thinking "Will I ever use all of these??". I very much doubt it now!
Malc.
bigegg
Scream Not Working Because Space Make Deaf
- Messages
- 9,663
- Location
- Leeds, West Yorkshire
I think i burnt out my CB power supply.

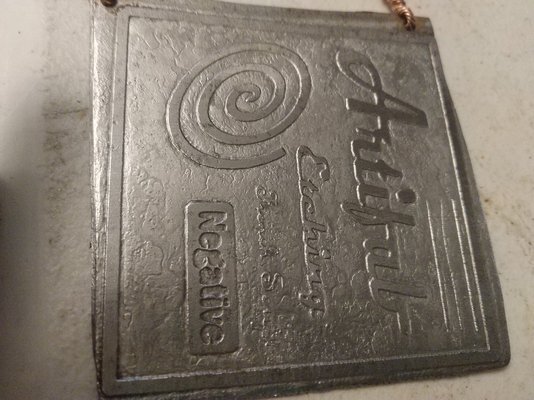
Trying to get a deep etch so i can pour a thin layer of coloured epoxy to simulate enamel, but it cut out after 30 minutes (i figured 60-90 minutes to get a 0.5mm deep etch)
I also experimented with thin lines to see how thin i could go before i get undercut.
It seems that the vinyl is the limiting factor, rather than the etching.
0.25mm comes off during weeding.
I also have my doubts about the 0.5mm if i etched for the complete hour
Between "etching" and the "negative", there is a bit of fine scriptwork that has just about disappeared.

Nauticus
If l let my mind wander, its often gone for weeks!
- Messages
- 86
- Location
- Lincolnshire, UK.
If you want to speed it up, use a 0.6 nozzle. Less travelling per wall thickness and less layers for a given height, quality is a slightly lower but I think the lower print times far outweighs that.
Good call. I may try that later. It sounds interesting. Thanks for the suggestion.
At present the base layer is 0.4mm - max for the nozzle, and the rest of the printing is done at 0.3mm layers.
I could go and tweak Mr Prussa's print settings - I've noticed that the edges of the walls are printed far more slowly than the middle layers for example.
I was using the Repetier slicer, but I noticed that the Prussa slicer was available in the Ubuntu store so downloaded and tried it. I found it MUCH better, with far more options.
Malc
bigegg
Scream Not Working Because Space Make Deaf
- Messages
- 9,663
- Location
- Leeds, West Yorkshire
Good call. I may try that later. It sounds interesting. Thanks for the suggestion.
At present the base layer is 0.4mm - max for the nozzle, and the rest of the printing is done at 0.3mm layers.
I could go and tweak Mr Prussa's print settings - I've noticed that the edges of the walls are printed far more slowly than the middle layers for example.
I was using the Repetier slicer, but I noticed that the Prussa slicer was available in the Ubuntu store so downloaded and tried it. I found it MUCH better, with far more options.
Malc
I bought myself a volcano(?) nozzle, and 3mm(?) filament for my anet A8(a6?)
It runs *much* faster, at the expense of resolution, but since i tend to use it for big lumps of solid plastic, rather than fine sculpture, it works much better for me.
I need to get it set up again for winter - its been in storage for the last 12 months, hence the brainfart over the numbers above.

Nauticus
If l let my mind wander, its often gone for weeks!
- Messages
- 86
- Location
- Lincolnshire, UK.
I think i burnt out my CB power supply.
Trying to get a deep etch so i can pour a thin layer of coloured epoxy to simulate enamel, but it cut out after 30 minutes (i figured 60-90 minutes to get a 0.5mm deep etch)
I also experimented with thin lines to see how thin i could go before i get undercut.
View attachment 256143
That looks interesting. What is the material you are using?
Malc.
Nauticus
If l let my mind wander, its often gone for weeks!
- Messages
- 86
- Location
- Lincolnshire, UK.
I bought myself a volcano(?) nozzle, and 3mm(?) filament for my anet A8(a6?)
3mm?? That's larger than the welding rods I use for PVC and ABS welding!!
My boxes would be done in less than 5 minutes!!!

Malc,
Nauticus
If l let my mind wander, its often gone for weeks!
- Messages
- 86
- Location
- Lincolnshire, UK.
Following on from the 'manger' style planters I made for the wife a few weeks ago, I finished the latest planter yesterday.
Octaginal, 1.2 meters across the flats.
As usual, a good coat of "Rust-Anode" cold galvanising paint followed by two coats of Palatine Hammer Finish paint.
The wood was soaked forcibly submerged for 24 hours in wood preservative and and the bottom boards had a further treatment of thinned down Black Jack painted on both sides.
7 bags of compost and 7 bags of horticultural sand were mixed in the cement mixer in order to fill it.
The Fairy Gardener is over the moon with it - now she has to decide what she is going to plant in there.

Above - the frame in galvanising paint.

Above - ready for filling.

Above - filled and ready for planting.
Malc.
Octaginal, 1.2 meters across the flats.
As usual, a good coat of "Rust-Anode" cold galvanising paint followed by two coats of Palatine Hammer Finish paint.
The wood was soaked forcibly submerged for 24 hours in wood preservative and and the bottom boards had a further treatment of thinned down Black Jack painted on both sides.
7 bags of compost and 7 bags of horticultural sand were mixed in the cement mixer in order to fill it.
The Fairy Gardener is over the moon with it - now she has to decide what she is going to plant in there.
Above - the frame in galvanising paint.
Above - ready for filling.
Above - filled and ready for planting.
Malc.
bigegg
Scream Not Working Because Space Make Deaf
- Messages
- 9,663
- Location
- Leeds, West Yorkshire
That looks interesting. What is the material you are using?
Malc.
Zintec offcuts from the big sheet i bought to line my trailer.
1.2mm, i think.
Etched in a saturated table salt solution.
Positive to the plate.
Negative to the "sacrificial" piece of mild steel.
(I say "sacrificial", - it is effectively being electrolytically de-rusted, but at too harsh a current for normal de-rusting.).
Nauticus
If l let my mind wander, its often gone for weeks!
- Messages
- 86
- Location
- Lincolnshire, UK.
Zintec offcuts from the big sheet i bought to line my trailer.
1.2mm, i think.
Etched in a saturated table salt solution.
Positive to the plate.
Negative to the "sacrificial" piece of mild steel.
(I say "sacrificial", - it is effectively being electrolytically de-rusted, but at too harsh a current for normal de-rusting.).
Is the use of ferric chloride workable? or is it too harsh?
I used to use that years ago in order to produce printed circuits for electronic projects - although electrolysis was not needed with the copper - it was just a passive reaction.
Malc.
bigegg
Scream Not Working Because Space Make Deaf
- Messages
- 9,663
- Location
- Leeds, West Yorkshire
Is the use of ferric chloride workable? or is it too harsh?
I used to use that years ago in order to produce printed circuits for electronic projects - although electrolysis was not needed with the copper - it was just a passive reaction.
Malc.
I have no idea.
I didnt have any ferric chloride, i had table salt, and a power supply.

northwest
Searching for the Holy Grail.........
- Messages
- 6,696
- Location
- Manchester UK
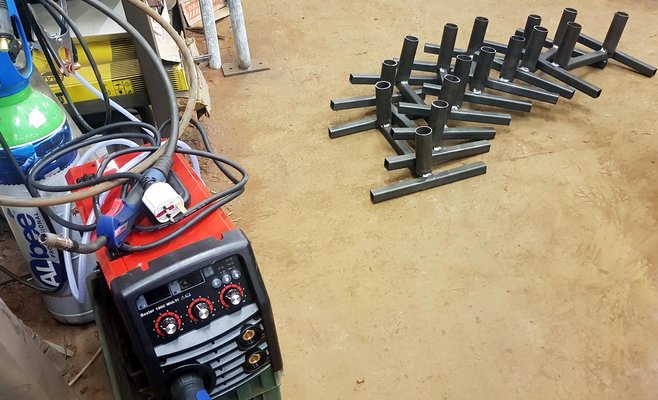
Finished the bases for the target stands. Really like the Bester, it is a really good welder, I am very impressed with it and my Mig welding, which I haven't been doing for very long, only a year or so, has come on leaps and bounds. I have no real issues whether the weld is horizontal, vertical or in any other direction, they are all acceptable (to me).

I am not sure whether or not an MB 25 torch would help me out. I have an MB15 Binzel Evo which I really like but almost all of my welding is on 3mm thick steel, once in a while I will use 2mm stuff but as a general rule everything I fabricate is 3mm. I now feel that I am keeping the speed down to allow the torch to keep up, anyone care to comment?

I am not sure whether or not an MB 25 torch would help me out. I have an MB15 Binzel Evo which I really like but almost all of my welding is on 3mm thick steel, once in a while I will use 2mm stuff but as a general rule everything I fabricate is 3mm. I now feel that I am keeping the speed down to allow the torch to keep up, anyone care to comment?


