


You are using an out of date browser. It may not display this or other websites correctly.
You should upgrade or use an alternative browser.
You should upgrade or use an alternative browser.
Widening scooter front forks
- Thread starter vino
- Start date
almost done
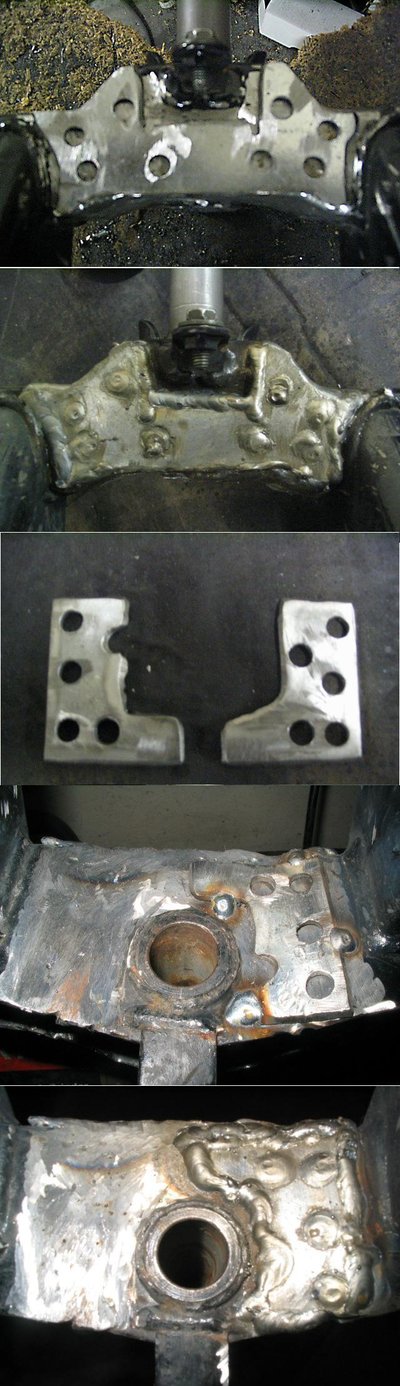
This is as much as I could do yesterday. It went slower than
I thoght, but the hardest (front part) is done.
Messed up one of the lower plates' plug holes. I read
that the holes should be 5-7mm, but the smallest useable
drill size I had was around 7.9-8mm. Also had to cut the
lower piece in two. It needed 2 bends and I wasn't confident
that they would both come out right at the same time.
The welder seems to work great at max output, it's a
small 110 unit. I seem to be consistently over beading. It's
hard to go faster, and at the same time make sure you've
completely pooled the seems together. Hard mental compromise
to do in real time.
Finishing up today
Morning! Hope to wrap things up today.
There's one more plate to weld in, apart from the back plate.
I would like to grind everything flush again, then paint. It
would look nicer, but I'm concerned about taking any
strength out of it at all. It's all covered by the front fender
anyway.
Also might not seal the whole back with a back plate. At
the sides of the cross pice is where the flimsy stamped
forks are welded. I would have to weld pretty much on top
of the original welds. This would really heat them up, and
I've had one warning about why that should be avoided...
might not be heat treated fom the factory... might become
brittle, etc. I'm thinking of just two vertical pieces, on the
open back, that straddle the butt welds.
Look forward to posting pics of the finished project.
Many thanks
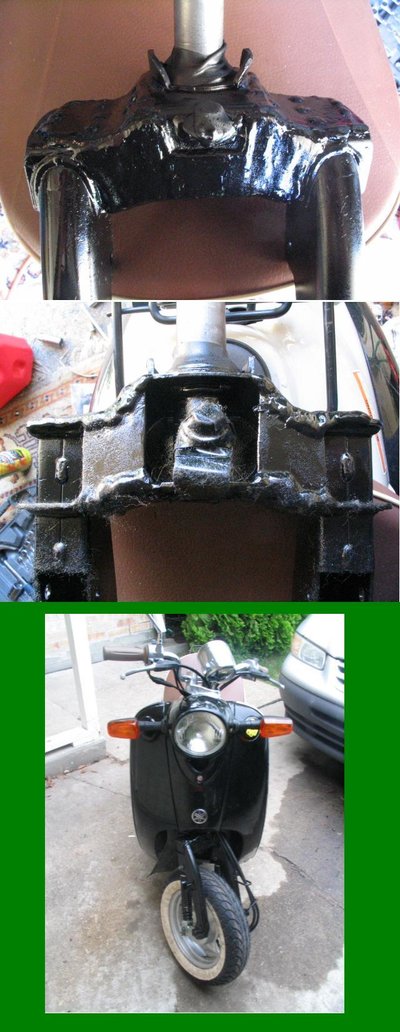
Hi Malcolm, and forum,
the forks are finished and installed. Without your input I couldn't have
done it, and had as much confidende in the finished product. Thanks!
Here's the pics of the completed forks, and the scooter put back
together. I'm leaving the front fender off for a while, so I can check
for any failures/cracks. After painting them I was in a rush to get home,
so the forks have a bit of fluff stuck on them from the trunk
carpeting.
malcolm
& Clementine the Cat
- Messages
- 9,828
- Location
- Bedford UK
Brilliant!
Have to say I'd wondered what to do when someone came on to the forum talking about welding front forks. They are under a lot of fatigue stress, and the failure mode would involve a wheel falling off, which when you only have two wheels is not so good.
My normal thought would be to say "noooo don't do it" but the thought you've put into the job is wonderful to see. A butt weld might not be quite enough, but a plate on top should spread the load and make it stronger than it was when it was new.
I think the finished job looks very good. I'd be surprised if you had any problems with it in the future.
Thanks Malcolm!
Just a few pointers in case this comes up again in the forum.
I was a great project, but as I found out after the install, it's not
quite the end of the story. A problem came up that, at first,
looked like would sink the whole project. Hadn't felt that low
over anything in a while, all that work for nothing!
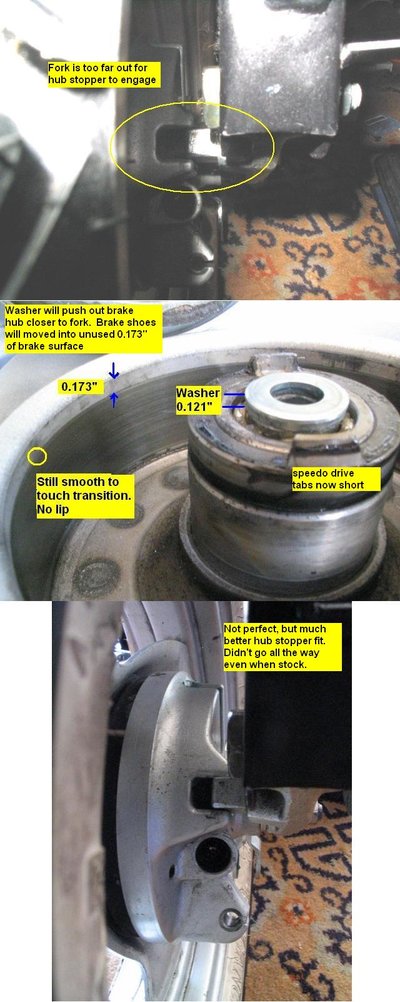
The brake hub has a groove in it, which locks into a "hub stopper"
lip on a suspension part. This stops the hub from spinning when the
brakes are applied. Moving out the fork by 1/4" resulted in the parts
not engaging anymore. Now what ?
?
After considering having to learn aluminum stick welding , to lengthen
the efected aparts, I got a better idea. The wider forks required spacer
washers on the axle, on both sides of the wheel. The solution was to
move one of the washers from the outside of the brake hub, to the inside,
between wheel bearing and brake hub, thus moving the hub further out.
This altered the brake shoe position relative to rim, but it turned out
(fortunately) ok.
So now I was happy again, at least till the test drive, when it turned
out that the speedometer was no longer working! Notice (in hindsight..)
the two verticlal tabs on the rim of the wheel bearing housing. These
engage the speedometer sending unit in the brake hub. Moving the hub
out, meant that these tabs were now too short. I discarded the idea of
welding a couple of beads along the top of them, because they look
like part of the cast iron bearing hub, and their proximity to the wheel
bearing. The solution was a spacer under the nylon gear that is driven
by these tabs. This raised it enough to engage.
Maybe I made this too long. The lesson here was that it is very easy
to overlook some of the wider cosequences of a mod. Make sure to
consider everything before starting, or you will set off a chain reaction
of quirks afterwards. If you get lucky, they can be dealt with. Of course,
there's another way of looking at it too... Ignorance is bliss, and if you
knew, upfront, everything that was involved, you might never start the
project
Just a few pointers in case this comes up again in the forum.
I was a great project, but as I found out after the install, it's not
quite the end of the story. A problem came up that, at first,
looked like would sink the whole project. Hadn't felt that low
over anything in a while, all that work for nothing!
The brake hub has a groove in it, which locks into a "hub stopper"
lip on a suspension part. This stops the hub from spinning when the
brakes are applied. Moving out the fork by 1/4" resulted in the parts
not engaging anymore. Now what
?After considering having to learn aluminum stick welding
, to lengthenthe efected aparts, I got a better idea. The wider forks required spacer
washers on the axle, on both sides of the wheel. The solution was to
move one of the washers from the outside of the brake hub, to the inside,
between wheel bearing and brake hub, thus moving the hub further out.
This altered the brake shoe position relative to rim, but it turned out
(fortunately) ok.
So now I was happy again, at least till the test drive, when it turned
out that the speedometer was no longer working! Notice (in hindsight..)
the two verticlal tabs on the rim of the wheel bearing housing. These
engage the speedometer sending unit in the brake hub. Moving the hub
out, meant that these tabs were now too short. I discarded the idea of
welding a couple of beads along the top of them, because they look
like part of the cast iron bearing hub, and their proximity to the wheel
bearing. The solution was a spacer under the nylon gear that is driven
by these tabs. This raised it enough to engage.
Maybe I made this too long. The lesson here was that it is very easy
to overlook some of the wider cosequences of a mod. Make sure to
consider everything before starting, or you will set off a chain reaction
of quirks afterwards. If you get lucky, they can be dealt with. Of course,
there's another way of looking at it too... Ignorance is bliss, and if you
knew, upfront, everything that was involved, you might never start the
project
Just an update
Hi Malcolm and forum,
Just wanted to give an update after probably 2K miles. Nothing
has fallen apart... still holding strong. Good thing, since the scooter
has gone through some tuning mods, and it's approaching 50mph
with more tweeks to come.
I am also updating some information on a Yamaha Vino forum. Put a
link to here, in case anyone else might need some valuable input on
welding. Would like to add a link to the Clementine-the-cat restoration
page (the wacky spoof one), but can't find it anymore.
cheers!
malcolm
& Clementine the Cat
- Messages
- 9,828
- Location
- Bedford UK
Clementine the Cat's guide to repairing car chassis can be found here: http://www.renault4.co.uk/rosalie_repair.htm
Thanks for the links. They help the website(s) a lot, and it's fun to meet the new people that turn up through them.
Those forks should last forever. Your welding looked pretty good, and I reckon your 'belt and braces' approach of welding the two bits together and then putting some reinforcements on is a good way to distribute the stress around the joint.
Pentawelder
Angle grinder operator
- Messages
- 41
Vino,
Thanks for the update, so often we follow the progress of a project ... then ... nothing. Good to hear of a successful project.
Oh yes, being bi-lingual, 'belt and braces' translates to 'belt and suspenders'
Gordon.
Thanks for the update, so often we follow the progress of a project ... then ... nothing. Good to hear of a successful project.
Oh yes, being bi-lingual, 'belt and braces' translates to 'belt and suspenders'
Gordon.


