


You are using an out of date browser. It may not display this or other websites correctly.
You should upgrade or use an alternative browser.
You should upgrade or use an alternative browser.
My new Atlas lathe purchase / project
- Thread starter bloobloo
- Start date
shenion
Tool Pack Rat
- Messages
- 7,582
- Location
- Stone Mountain, GA USA
Depends on the depth of the threads. You can do threads single pass but you have to be perfect. These light lathes tend to chatter on heavy cuts.
I do most with several passes. I'll do most in one pass then real small cuts until it is right. Last few passes I test fit the nut. I usually repeat the last pass with the depth unchanged; cleans up the thread.
It is one case you use the compound slide. Each pass is a little deeper but offset. Basically one side of the cutter follows the last cut. Think of placing a cutter at the peak of a thread and then sliding it into the thread along one face of a thread.
BTW, RH threads, you you use the power feed right to left. LH threads you use the power feed left to right. Spindle direction does not change.
Also, the metric threads are not perfect. You would need a 127 tooth gear (wont fit under the cover and are rare to find.) You use a 52 and 44 tooth gear in the drive (along with several others.). That is almost exactly a third of the 2.52:1 ratio needed. The error is something like 0.06%. Close enough")
The book: "Atlas Lathe Manual and Machinists Tables" has all the info on how to operate the Atlas/Craftsman lathes. Has complete thread tables including odd ones and setups for winding wire. Also all about grinding cutters, oil points, work speeds etc.
The books appear on ebay or can be ordered from Clausing (don't know if they ship to the Uk.) Clausing still has about half the parts. Be sitting down when they quote you a price . Some parts are not bad.
The book does not say what lathe it is for (6, 9, 10, 12"). The 6" is a bit different.
I found the metric thread tables in my book were all backwards. I needed to cut a 1.5 pitch metric thread. Instead of one thread every 1.5mm it was 1.5 threads per mm. I guess noone really noticed it back in 1941
I do most with several passes. I'll do most in one pass then real small cuts until it is right. Last few passes I test fit the nut. I usually repeat the last pass with the depth unchanged; cleans up the thread.
It is one case you use the compound slide. Each pass is a little deeper but offset. Basically one side of the cutter follows the last cut. Think of placing a cutter at the peak of a thread and then sliding it into the thread along one face of a thread.
BTW, RH threads, you you use the power feed right to left. LH threads you use the power feed left to right. Spindle direction does not change.
Also, the metric threads are not perfect. You would need a 127 tooth gear (wont fit under the cover and are rare to find.) You use a 52 and 44 tooth gear in the drive (along with several others.). That is almost exactly a third of the 2.52:1 ratio needed. The error is something like 0.06%. Close enough
The book: "Atlas Lathe Manual and Machinists Tables" has all the info on how to operate the Atlas/Craftsman lathes. Has complete thread tables including odd ones and setups for winding wire. Also all about grinding cutters, oil points, work speeds etc.
The books appear on ebay or can be ordered from Clausing (don't know if they ship to the Uk.) Clausing still has about half the parts. Be sitting down when they quote you a price
. Some parts are not bad.The book does not say what lathe it is for (6, 9, 10, 12"). The 6" is a bit different.
I found the metric thread tables in my book were all backwards. I needed to cut a 1.5 pitch metric thread. Instead of one thread every 1.5mm it was 1.5 threads per mm. I guess noone really noticed it back in 1941
Pete.
Forum Supporter
- Messages
- 15,104
- Location
- Kent, UK
bloobloo I just remembered I had scanned the threadcutting manual for that machine when I had it. The quality is not great but the information IS readable:
http://peterrimmer.myby.co.uk/files/atlas10fthreadcutting.pdf
http://peterrimmer.myby.co.uk/files/atlas10fthreadcutting.pdf
I hope I can use this thread to get my two Atlas 10"F's, bought as the original poster with the intention of making one good one out of two 'needs work' ones. One is a 36" bed, one is I think 42" and came with a stand. All that's stopping me is the need to strip and repaint most of the bits, a wife, 2 kids and a dog and seemingly no time to do anything these days!
bloobloo
Professional Tinkerer
- Messages
- 271
- Location
- Ashton in Makerfield, Wigan UK
Sorry Browser, only just seen this. If its any help to you I still havent restored either lathe as I said I was going to, mainly for the same reasons that are restricting you, a wife, 2 kids and 2 dogs, aswell as work and also trying to find time to teach the wife and son how to drive!
What I did do though was just use some parts from one and built the green one up so it would run. Now the green one has had all the nasty green paint taken off with a wire brush and all the gibs etc tightened up. It is now back to the original factory grey colour and is quite happily turning bits and bats that I need. The other one I think I am gonna break for parts as it seems silly to restore, especially with it having the faceplate welded on to the spindle. If you need any help just send me a pm or gimme a shout on here and I'll try my best.
What I did do though was just use some parts from one and built the green one up so it would run. Now the green one has had all the nasty green paint taken off with a wire brush and all the gibs etc tightened up. It is now back to the original factory grey colour and is quite happily turning bits and bats that I need. The other one I think I am gonna break for parts as it seems silly to restore, especially with it having the faceplate welded on to the spindle. If you need any help just send me a pm or gimme a shout on here and I'll try my best.
bloobloo
Professional Tinkerer
- Messages
- 271
- Location
- Ashton in Makerfield, Wigan UK
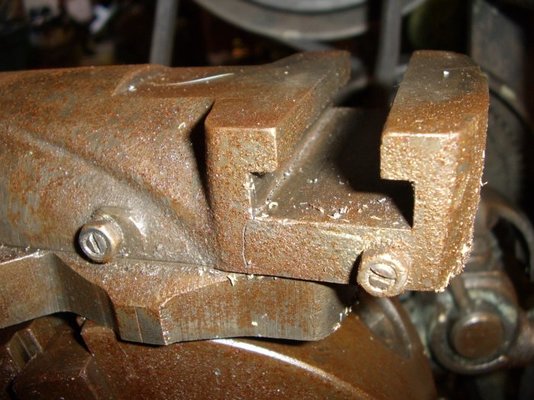
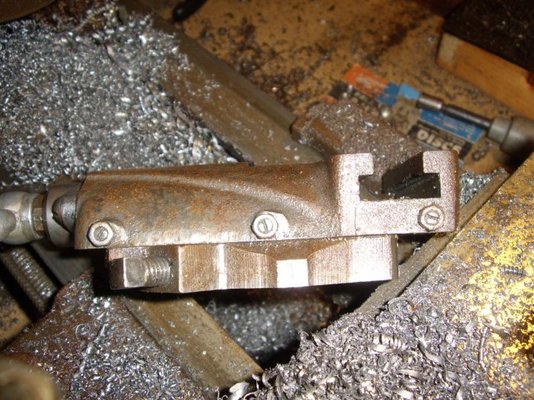
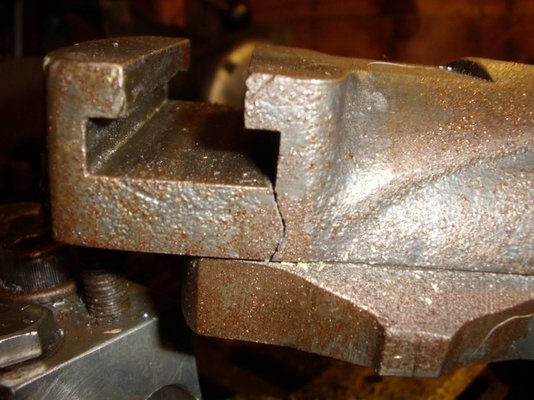
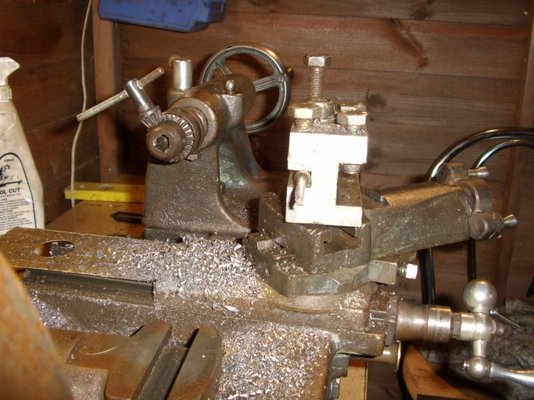
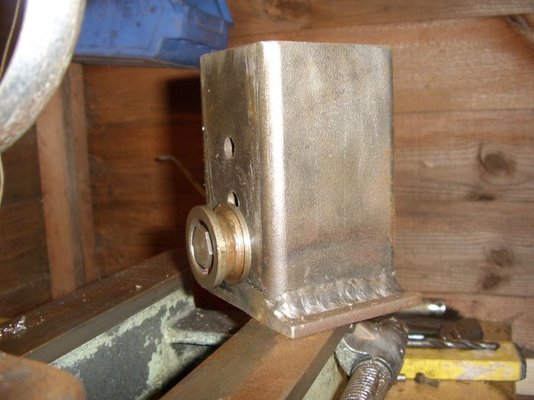
Ok, time for an update with pics, but also a cry for help! I have somehow managed to break the crosslide where the tee nut slides in for the toolpost 
I am wondering on the best way to repair this, I am not totally sure that it is made from cast iron, when i machined the flat on the top it didnt machine like cast iron, more like drop forged steel so first question is can someone confirm whether it is cast or steel?
I have Oxy propane so if it needs brazing I could do it, the only thing I would need to get is brazing rods and flux and I also have Arc or MIG.
I will post some more pics of the lathes as they are now shortly.
bloobloo
Professional Tinkerer
- Messages
- 271
- Location
- Ashton in Makerfield, Wigan UK
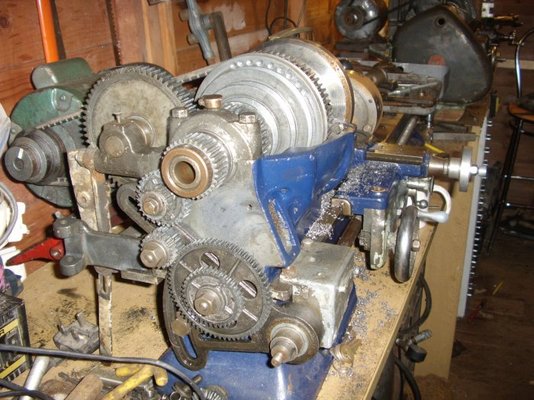
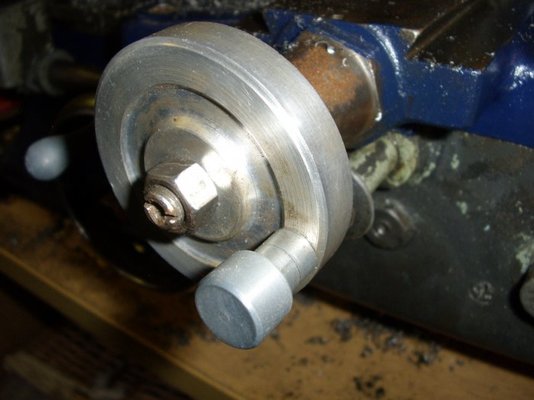
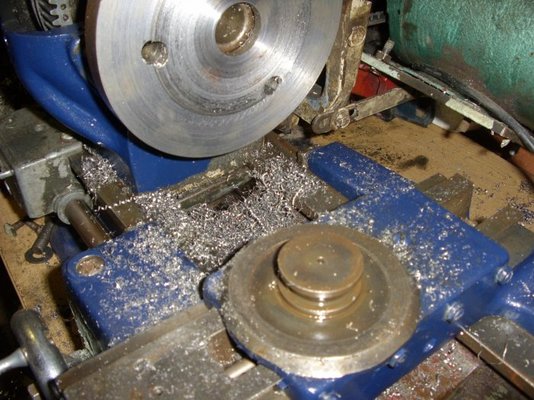
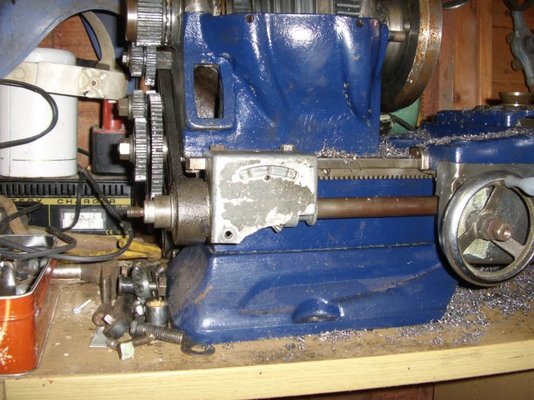
These are a couple of pics of how the what used to be green lathe is now. I still have'nt restored this, I have just made it useable so that I can do what I need to do. The last pics are of what was the white lathe on the stand, I have removed all the old paint etc ad gave it a quick coat of blue, and also made a new cross slide wheel which works great. I have attached a motor without a countershaft and although it works that way, to do any cutting the lathe needs to run in back gear mode to reduce the speed enough. The last pic is a home made milling attachment, take the toolpost off and bolt this in its place, use the other top slide attached to the little noggin thats bolted on and hey presto a milling attachment of some description was born. using this is how I managed to machine the flats on top of the top slides so that the toolpost clears the hump. I have come to a stumbling block now with the blue one, having robbed the top slide off it to replace the one I broke, also with it having no tailstock and that faceplate being welded to the spindle, I am thinking of stripping it and selling it for parts anyhow your thoughts please?
anyhow your thoughts please?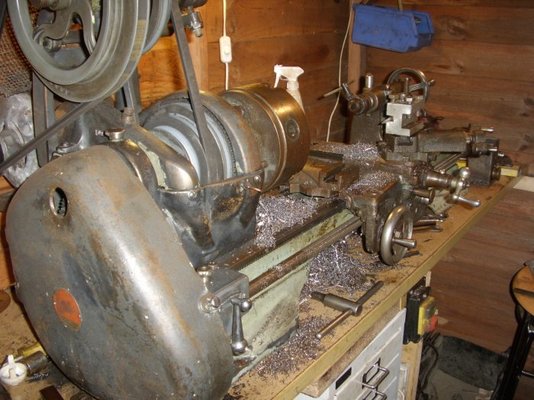
bloobloo
Professional Tinkerer
- Messages
- 271
- Location
- Ashton in Makerfield, Wigan UK
Did the bolt on the T-nut bottom out against the bottom of the slot? That will break it as you have.
No, I stupidly didnt check that my cutting bit was on centre, the workpiece grabbed and tried to roll up onto the toolpost, pushing the bit and the toolpost downwards onto the slide and it let go with a big thud before I could hit the kill switch.
shenion
Tool Pack Rat
- Messages
- 7,582
- Location
- Stone Mountain, GA USA
Ok, yeah i have done similar with my milling attachment. Usually the cutter breaks Could have been weakened by a previous owner misusing the T-nut/bolt.
Note: I fought the milling attachment turning on me. Would work for a while then just move. The angled pins were worn. The set screws were seating in the bottom of the threads, so not much force on the pins. Something to watch for.
Made some new pins that were longer and the problem was fixed. Easy 1/4" mild steel.
I like the milling attachment you made, simple.
That tranverse gearbox is commonly broken. They are hard to find.
bloobloo
Professional Tinkerer
- Messages
- 271
- Location
- Ashton in Makerfield, Wigan UK
I agree Scott, but the cutter was mounted in the large slot and is an inch thick! It was one of those numbskull moments when instead of looking at things properly, I just picked up the first roundnose cutter in the drawer and mounted it in the toolpost without even thinking.
Regarding the milling attachment, I had the same problem where it twists, it just depended on the length of the object that I was trying to cut. I fixed the twisting problem by putting a piece of drill rod into a hole against the side of the attachment, thus locking it in place, the same for the vertical bit thats what the extra 2 holes are for.
as for the gearbo I was thinking of having a go at melting some aluminium and casting one, just not been brave enough yet to have a go at making a furnace and crucible etc. If I did get off my backside and make a furnace I could make some copies of gears and another toolpost etc, the possibilites are endless. What would you do regarding the broken part, is it worth fixing? If I was to braze it I would probably drill thorough the front and tap into the rear and add some bolts for extra strength, sayin that though, I would probably do that anyway whether It was welded or brazed.. Do you think that could work?
shenion
Tool Pack Rat
- Messages
- 7,582
- Location
- Stone Mountain, GA USA
I'd probably try making gearbox out of sheet and TIG'ing it together.
I do want to try some casting.I have a big pile of aluminum but no time to work on a forge.
Brazing the part should work fine. I'd probably do some bolts to keep it in place so it does not move while heating and brazing.
I do want to try some casting.I have a big pile of aluminum but no time to work on a forge.
Brazing the part should work fine. I'd probably do some bolts to keep it in place so it does not move while heating and brazing.
iv'e just bought myself an Alas F10 and researching the internet as you do i came across this thread. makes a quite interesting read. (i have also been looking at this forum on and off anyway as i bought a welder recently as well)
i paid good money for a working one but was very pleasently suprised when i went to pick the lathe up. it came from an engineer who sadly passed on at the age of 91. anyway his daughter and son in law had sorted more parts to go with the lathe after the listing ended. i came away with boxes and boxes of accessories/bits to go with the lathe all thrown in including books, parts books and an Atlas handbook.
so basically i have been trying to work out what i have. the lathe has been modified from standard which threw me at first but the more reading i do the more it makes sence.
it came with mill posts, more cutting tools than you can shake a stick at, quick change tool post, gears etc. i'll post pictures when the snow goes so you can help to identify some of the bits i haven't worked out yet.
the thing that intreaged me the most is that the drive input pulley on the head stock (the one driven by the motor) has had a clutch made for it with a lever on the other end. also the on off switch has been removed and a forward/reverse electric switch added (everything removed for these mods has been kept, they came with all the spares/accessories). i have't tried to work the lathe yet as i want to take it to bits to set it all up properly and level before i start.
Pete.
Forum Supporter
- Messages
- 15,104
- Location
- Kent, UK
If the lever you are talking about loosens the belts by rotating the countershaft on an eccentric, that is a standard feature.
You paid quite a lot for that machine but the saving grace is the two Pratt Burnerd chucks which are good quality and the QC toolpost which is much better than fiddling with shims on a 4-way post. Looks like a tidy enough machine too.
Keep the reversing switch - you'll need it if you ever have cause to cut a metric thread since you can't use the threading dial like you can for imperial. Your handbook will have the changewheel setup for metric, but you MUST keep the leadscrew engaged at all times, stop the motor and reverse it back with the tool retracted to run the tool back for another pass.
Looks like you have a modified cross-feed engagement which is handy coz the original can be a bit of a pig to release under load. Also you have a larger cross-feed dial/handle which should give better control, though the original isn't bad.
Take care that the screws don't fall out of the carriage traverse bracket - it's on the back side of the apron behind the big handwheel and it holds the traverse gear. This is a spindly three-legged bracket that will soon break if one of the screws fall out or even come loose.
Lastly, even though the changegears are fiddly to set, they do a good job and allow you to run quite a wide range of feeds. Just make sure when you set them that you don't have any of the gears meshed without any backlash in them. A little loose is fine but too tight and the gears will break. You'll know if you got it badly wrong because you'll notice the noise change as soon as you start it up.
GeorgiePorgie
pre-moderated
- Messages
- 957
You paid quite a lot for that machine
but the saving grace is the two Pratt Burnerd chucks which are good quality
Are you selling that crystall ball,Pete?
Pete.
Forum Supporter
- Messages
- 15,104
- Location
- Kent, UK
GeorgiePorgie
pre-moderated
- Messages
- 957

rtbcomp
Moderator
- Messages
- 18,548
- Location
- Sheffield UK
If that reversing switch is a "Square D" (Schneider). Have a look here
http://products.schneider-electric.us/products-services/products/contactors-and-starters/manual-starters-protectors-and-switches/type-a-and-b-reversing-drum-switches/
I've got one on my pillar drill and I reckon I've sussed the wiring out for it.
http://products.schneider-electric.us/products-services/products/contactors-and-starters/manual-starters-protectors-and-switches/type-a-and-b-reversing-drum-switches/
I've got one on my pillar drill and I reckon I've sussed the wiring out for it.


