Not long joined the forum, so only just read your thread. Some fantastic work, really inspiring as Ill have to do some similar work to my Citroen AX GTi soon.
Today I worked on the passenger side rail....I basically did it in exactly the same way as the drivers side. The jig I made pulls on the lower part of the rail....I noticed that the sides of the rail were a little squiffy so I made up a quick jig to pull on the tops of the rail to even things out. Toyota handily put treaded bolts at the top of the rails so I just welded an m20 nut to the top of a bolt and screwed it into the standard hole. One side is treaded but on the other side I removed the threads so the bar would slide freely through the nut. I can then pull/push by placing nuts where I need along the bar. The digital angle thingy turned out to be very useful as I can measure movements to 1/10th of a degree....allowing me to check what is actually moving.
The wings are on as a trial fit...will take a few hours to line everything up I think. The upper bumper bar is off another car...I wanted one off a straight car so I could test that all was back where it should be. So far everything seems to be working which just means something will go wrong very soon!
I will carry on refitting the bumper and lights temporarily to check everything aligns...part of me thinks it might be a better repair if I were to cut the ends of the rails off (where they meet the cross member) and fit a set of rails from a donor. If anyone has an opinion please share. My thinking is the rails have already been bent and therefore weakened...I was planning to restrengthen then but I don't want to over strengthen them as I want them to perform as per their original design (i.e crumple on impact!). Any thoughts out there please let me know....these MR2s are fairly common so I reckon a set of rails from a donor could be had relatively easily (and cheaply).
Carried on with the temporary refit...am happy that the panels are back on where they should be. The bumper came off a donor car but I have a suspicion that the donor might have had a little knock as the the shape seems a bit off. Overall I'm happy so far...if I can be bothered I'll tweak the wings and lights etc to get the gaps a little straighter just to make sure I can do it when I come to refit everything properly.
My next job is to source a pair of replacement rails...I'll then strip everything off...weld in the new rails and refit. It is so tempting to just weld the sides of the existing rails back on and call it a day but I really want to do this properly.
Cheers....managed to find some information online for the correct panel gaps so when I get a chance I'm going to have another go at getting all the gaps right. For a first fit it actually came out quite well but of course the devil is in the detail as always. On the plus side I measured the door gaps to rear quarter today and they are spot on which is great news. Its hard to see in the pictures but the gap between the bonnet and bumper pinches in the middle...I'm going to try my original support bar to see if its better (think my replacement might have had a knock too!)
Spent some time on the alignment....actually spent a lot of time on the alignment!! The lights are a little off still but thats because all the bolts aren't yet in underneath. I still need to remove everything to fix the rails so this is still a trial fit hence the missing bolts....but I'm now happy it's all back in the right place. I managed to source a toyota manual online....it says the gaps for the doors and bonnet edges need to be 4mm which is handy as they make 4mm tile spacers :-) I glued them on with a heat glue gun so I'll be able to get them off easily....lot easier than faffing about with drill bits!
The manual shows the centre line passing through the wiper pivot and down to the bolt on the front bumper through a hole in the cross member..I drew this on the car (the blue tape) and then I drew a centre line on the bonnet to get it lined up. It was then a case of getting the wing spaces between the bonnet and the door to be 4mm which wasn't easy! If anyone else has to do this...I found it easier to attach the arch liner as it changes the shape of the wing a little! I fitted the wings first and then worked forwards to the front bumper.
I know it doesn't look like much progress but I'm a lot happier that it all seems to fit :-)
I think I've managed to source a good set of replacement rails so fingers crossed they work out OK...I've decided if I can I would like to replace them. The toyota manual I've sourced shows the cut points for replacing the front parts of the rails so I feel better now that this is the right way to go. I'll post some pics of the relevant pages of the manual just in case someone else is doing something similar.
In the ended I decided to just hack the rails off the car...the donor car that is! I actually went through this process twice...the first rail was unfortunately a bit damaged when I got it home so a second hunt was required. I need to clean it all up and will post a few pics but for now I wanted to demonstrate that it is possible to remove the rails and leave the front suspension in place....of course I'm not sure how it would handle. Might be a tad light on the front end I think :-). It took about 2 hours to get it off from a car with everything attached (bumpers etc). I managed to pull the bumper and wings off as one piece which was very nice!
Am not using all of it so a lot of cutting and cleaning up will be needed before I get anywhere. Here is the bit that I took off the donor. Notice the pink "30" writing on the side of the rails....my rails also have the same writing so maybe it's a good way to spot if the paint is original for anyone going through the same process. Yes that is sitting in my living room....but as I'm still waiting for my insurer to repair the hole in my house (yes it's been nearly a year!) I've become a little more relaxed about these things these days!
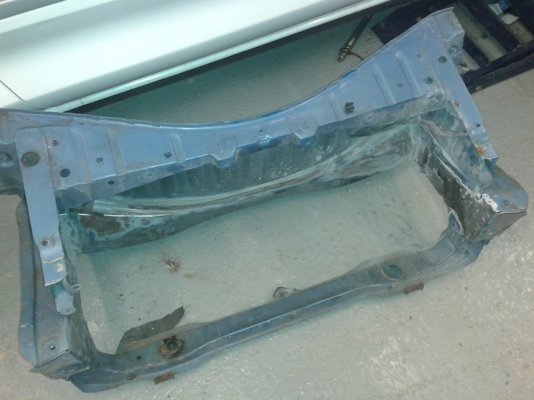
Funny....I searched for quite some time and then 2 came along within the space of 2 weeks! This blue one was the first rail I found...many many thanks to Paul who helped (did most of) the cutting to get this off. Paul is into MR2 racing (in a very big way) so this was a donor for a race engine that he needed....neither of us spotted the squashed rail because it was such a great job. Only when I started taking the paint off did I find a bunch of filler...at first I thought maybe it was from the factory but not....there were clear signs of the left rail (right in the pic) being a bit off....looks like they used a torch and pulled it out that way (torch is a no no on these rails according to the repair manual I found). Thanks to Mark for the second rail....both great guys and actually you live quite close to each other but you don't know it.
So it doesn't go to waste I'm going to disassemble the blue one to work out how they are put together....I'll post some pics of the various component parts being removed as I go along. I need to work this out anyway so it's actually handy to have the second rails to play around with.
Been working on a "repair kit" today using the junk blue front end - basically I want to set everything up so it can just go straight on the car....this is a trial run. Have stripped it down by drilling out all the spot welds and had a good look at how it's put together. I need to do a bit of head scratching in terms of deciding what stays on the car and what should come off...in terms of the kit it's easier if there is some cross support but as there is no damage to my cross member I'm inclined to leave that in place on the car.
Notice that the bolt that the suspension attaches to has sheared off....this is quite a common problem with MR2s....looking at the inner structure I think the easiest repair would be to cut a hole in the trunk (front trunk in mr2 speak) and access it from that side...the other side and the bottom have that reinforcement plate in the way.....hopefully this picture will help someone somewhere as it's a common problem.