- Forums
- Tools, Compressors and Metal Coatings
- Tools, Materials and Techniques
- Machining
- Lathes and other Machining Equipment
You are using an out of date browser. It may not display this or other websites correctly.
You should upgrade or use an alternative browser.
You should upgrade or use an alternative browser.
Harrison M300
- Thread starter daedalusminos
- Start date
daedalusminos
Member
- Messages
- 2,390
- Location
- Norwich
It's all metric.is it metric/imperial or just metric.
met/imperial have imperial screws, converting to metric via 127 hand wheels. A metric will be all metric. Not easy to cut none-metric threads on metric only machine
If I can't get a replacement nut for reasonable price I'll cut the thread on the lathe.
Dr.Al
Forum Supporter
- Messages
- 2,733
- Location
- Gloucestershire, UK
is it metric/imperial or just metric.
met/imperial have imperial screws, converting to metric via 127 hand wheels. A metric will be all metric. Not easy to cut none-metric threads on metric only machine
How come? Is that something specific to an M300? I cut imperial threads quite regularly (albeit grudgingly) on my metric only machine. I see it as no more difficult than cutting metric threads on an imperial machine. You've got to keep the half-nuts engaged rather than using the thread dial indicator, but that's true cutting metric on an imperial machine too.
Shox Dr
Chief Engineer to Carlos Fandango
- Messages
- 17,866
- Location
- East Yorkshire
How come? Is that something specific to an M300? I cut imperial threads quite regularly (albeit grudgingly) on my metric only machine. I see it as no more difficult than cutting metric threads on an imperial machine. You've got to keep the half-nuts engaged rather than using the thread dial indicator, but that's true cutting metric on an imperial machine too.
to be honest I cant remember the reason why
daedalusminos
Member
- Messages
- 2,390
- Location
- Norwich
With the correct change wheels or gearbox, no reaso why an imperial/metric lathe can't cut metric/imperial threads.
The conversion factor is 25.4....or 254 the prime factor is 127...which is why a 127T gearwheel is employed. Errors will occur if a 63T wheel is used.
The conversion factor is 25.4....or 254 the prime factor is 127...which is why a 127T gearwheel is employed. Errors will occur if a 63T wheel is used.
Pete.
Member
- Messages
- 14,967
- Location
- Kent, UK
You can do it either way round but it's a little more straightforward cutting metric with an imperial screw.
This is true, but it's usually possible to use a combination that gives an error far less than the pitch error of your average screw, and certainly much less than one with any amount of wear.
The conversion factor is 25.4....or 254 the prime factor is 127...which is why a 127T gearwheel is employed. Errors will occur if a 63T wheel is used.
This is true, but it's usually possible to use a combination that gives an error far less than the pitch error of your average screw, and certainly much less than one with any amount of wear.
Dr.Al
Forum Supporter
- Messages
- 2,733
- Location
- Gloucestershire, UK
You can do it either way round but it's a little more straightforward cutting metric with an imperial screw.
Out of curiosity, what makes it more straightforward? To cut imperial threads on my lathe (a metric one), I look at the thread cutting chart on the side, fit the change gears that are listed (the standard ones will do all metric threads but not imperial), choose the gearbox setting that's listed, then cut the thread keeping the half-nuts engaged. What's different with an imperial leadscrew cutting metric?
Pete.
Member
- Messages
- 14,967
- Location
- Kent, UK
Out of curiosity, what makes it more straightforward? To cut imperial threads on my lathe (a metric one), I look at the thread cutting chart on the side, fit the change gears that are listed (the standard ones will do all metric threads but not imperial), choose the gearbox setting that's listed, then cut the thread keeping the half-nuts engaged. What's different with an imperial leadscrew cutting metric?
When you have a chart and a gearbox and a selection of gears it's no different either way, you just follow instructions. Whe you have change-gears and have to do the working out, it's a little more involved cutting imperial from metric than it is metric from imperial. For the average person that is. It's clear from your website that you have better than average mathematical acumen.
Agroshield
Member
- Messages
- 6,248
Out of curiosity, what makes it more straightforward?
Maybe it would be better to qualify Pete's statement to say 'on a machine with a gearbox, it is more straightforward to cut the most popular metric threads on an imperial machine than it is to cut imperial threads on a metric machine'.
For an example, I will cite the Colchester Chipmaster, a typical gearbox-shod machine. On the imperial version, you just use a 55/65 translation gear to get your metric pitches. On the Continental (metric) version, you have a different change wheel set up for nearly every tpi.
It is to do with the way the threads are defined: there are more prime numbers hidden in imperial pitches (2, 3, 5, 7, 11, 13, 19), and native to the gearbox than there are in metric pitches (2, 5). So when you want metric from imperial, the numbers you need are already there. When you want imperial from metric, the numbers are not there and have to come from the change gears.
daedalusminos
Member
- Messages
- 2,390
- Location
- Norwich
daedalusminos
Member
- Messages
- 2,390
- Location
- Norwich
daedalusminos
Member
- Messages
- 2,390
- Location
- Norwich
The M300 has been keeping me busy. I stripped the apron and assessed wear - mostly moderate and confined to the saddle handwheel gear train. I investigated buying off the shelf gears and machining down since most of these are just pinned to shafts. Strangely the gears seem to be MOD 1.75 (not exactly common!) and then change to something neither imperial nor metric. The handwheel shaft is slightly worn where it passes through the apron - I'll take measurements since that should be relatively straightforward to remanufacture.
Whilst I wait for a replacement thrust bearing (the original was rusted solid) I decided to remove and clean the saddle, clean up the ways, chip tray and investigate the feed/threading gearbox.
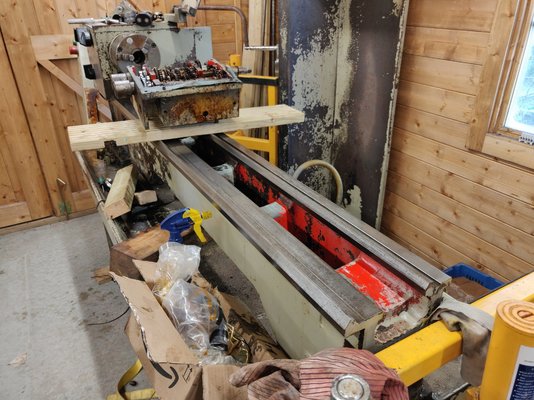
I'd noticed the 8 position selector knob at the bottom of the gearbox was jammed, so drained the 'oil' - more a mixture of water which came out first and runny grease.
On removing and inspection, plenty of rust, crap and sediment around the lower selector rods and drum but other than that doesn't look too bad.
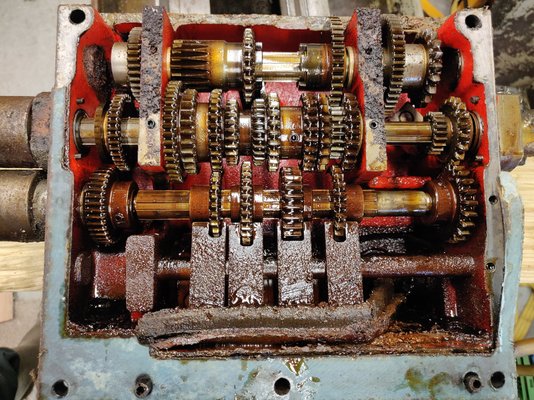
Now contemplating whether this needs a total strip down or whether I can get away with just the lower selector shaft/drum.
Whilst I wait for a replacement thrust bearing (the original was rusted solid) I decided to remove and clean the saddle, clean up the ways, chip tray and investigate the feed/threading gearbox.

I'd noticed the 8 position selector knob at the bottom of the gearbox was jammed, so drained the 'oil' - more a mixture of water which came out first and runny grease.
On removing and inspection, plenty of rust, crap and sediment around the lower selector rods and drum but other than that doesn't look too bad.

Now contemplating whether this needs a total strip down or whether I can get away with just the lower selector shaft/drum.
Agroshield
Member
- Messages
- 6,248
Strangely the gears seem to be MOD 1.75 (not exactly common!) and then change to something neither imperial nor metric.
With anything other than the change gears, it is purely luck if they match a standard pitch. Often the size is dictated by the shaft centres they have to run at and the ratios needed, especially in the main screwcutting gearbox. Add up the tooth counts of stuff that meshes in the gearbox and you start to appreciate how much skill goes into the design.
Pete.
Member
- Messages
- 14,967
- Location
- Kent, UK
The M300 has been keeping me busy. I stripped the apron and assessed wear - mostly moderate and confined to the saddle handwheel gear train. I investigated buying off the shelf gears and machining down since most of these are just pinned to shafts. Strangely the gears seem to be MOD 1.75 (not exactly common!) and then change to something neither imperial nor metric. The handwheel shaft is slightly worn where it passes through the apron - I'll take measurements since that should be relatively straightforward to remanufacture.
What gear are you measuring? If it's less than 20 teeth it's likely to be modified addendum so won't 'work out' by dividing teeth+2 by diameter.
daedalusminos
Member
- Messages
- 2,390
- Location
- Norwich
I've got pretty much all the replacement parts for the apron so I'll start reassembling that.
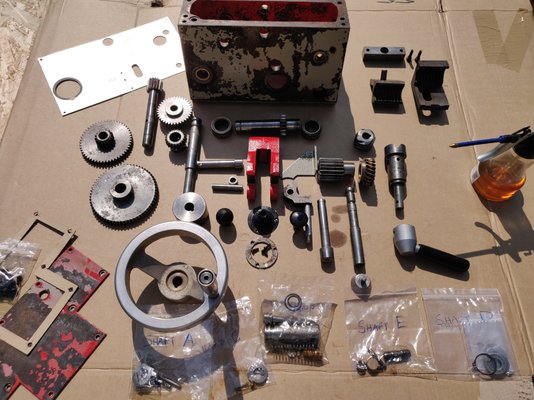
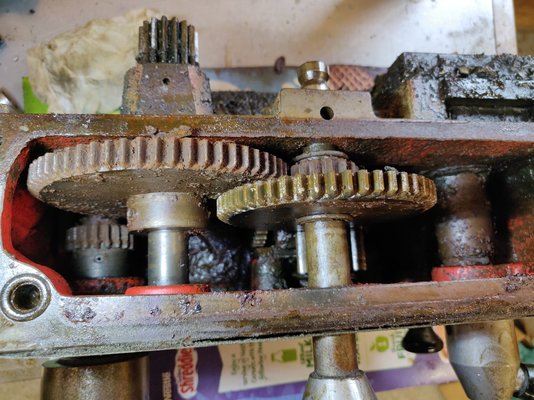
Some of the gears had wear compounded by excessive rust which after a dip in citric acid has left them looking pretty fragile...
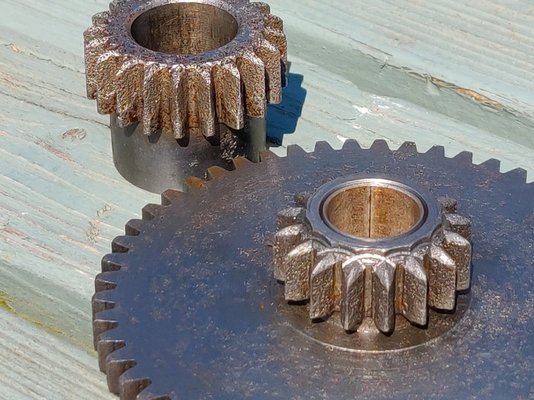
The one in the background calculates give or take to 1.75mod, the small spur in the foreground is more like 1.86mod.

Some of the gears had wear compounded by excessive rust which after a dip in citric acid has left them looking pretty fragile...

The one in the background calculates give or take to 1.75mod, the small spur in the foreground is more like 1.86mod.
daedalusminos
Member
- Messages
- 2,390
- Location
- Norwich
Apron reassembled and installed with no problems nor leaks.
After soaking the screw cutting gearbox in kerosene for several days it emerged in pretty much same state so stripped the selector fork, drum and 8 position indexed knob, thoroughly cleaned and reassembled with new o rings. After spending a good hour tweaking the change is very smooth...
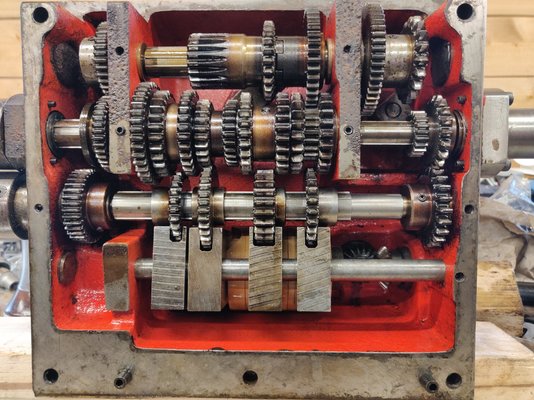
With the screw cutting gearbox reinstalled it was time to wire up the VFD. It's now I'm wishing I hadn't upgraded to a 4kW model - it's massive.
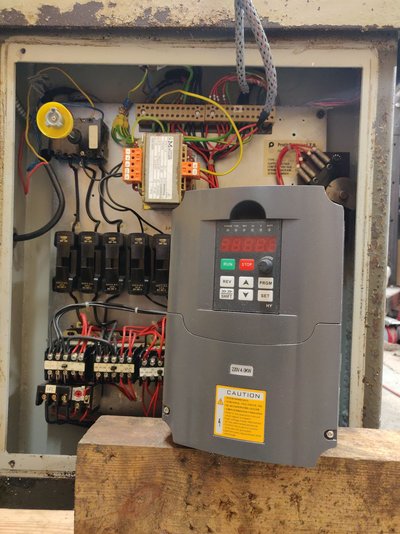
I don't want to mount it external to the lathe so I'm going to have to cut a hole in the pedestal wall inside the electrical compartment....a job for tomorrow.
After soaking the screw cutting gearbox in kerosene for several days it emerged in pretty much same state so stripped the selector fork, drum and 8 position indexed knob, thoroughly cleaned and reassembled with new o rings. After spending a good hour tweaking the change is very smooth...

With the screw cutting gearbox reinstalled it was time to wire up the VFD. It's now I'm wishing I hadn't upgraded to a 4kW model - it's massive.

I don't want to mount it external to the lathe so I'm going to have to cut a hole in the pedestal wall inside the electrical compartment....a job for tomorrow.

