


You are using an out of date browser. It may not display this or other websites correctly.
You should upgrade or use an alternative browser.
You should upgrade or use an alternative browser.
my mk5 cortina estate
- Thread starter ian f
- Start date


")

hi, done some more on the rear valance. used the remainig sheet to use as a straight edge to mark the first fold what a bitch! folder not deep enough
  have to do it this way
 clamed up for hammering in some "kinks" to rest the angle against
 then clamped up and knocked over with a flipper
 and test fit
 bent by hand then started tapping lower edge into shape
 made a template for shaping the ends as original
 like so!
 and that'll do for today still needs more work on the lower edge and holes drilling for wiring but that can wait for another day

")
what a bitch! folder not deep enough have to do it this way clamed up for hammering in some "kinks" to rest the angle against then clamped up and knocked over with a flipperand test fitbent by hand then started tapping lower edge into shape made a template for shaping the ends as original like so!and that'll do for today still needs more work on the lower edge and holes drilling for wiring but that can wait for another dayjpmillermatic
Member
- Messages
- 1,094
thanks for showing us the process you used to get that panel to start to fit into place...As I work more with metal....the beginning stages are key to getting the panel to fit ultimately....
JP
JP
This thread is inspiring me to try to fabricate a piece to weld into my Cortina Estate instead of buying a new panel and doing a lot more work, taking it apart and welding in a whole front panel as opposed to a small section.
I only need this bit replaced …

And the front valance straightened.
CheeRS,
Aaron.
I only need this bit replaced …
And the front valance straightened.
CheeRS,
Aaron.
if the rest of the panel is solid then a small repair piece is going to be the way to go but if theres holes in several places then your best cutting the lot out. the valance i reckon will straighten if you put a piece of wood behind where the upper and lower panels are welded together and hit it with a large plastic hammer, best of luck with it
Nice work. I recognise that folder, I have one just like it
Dave
 good design aint it? although the next one i build will be longer and a bit deeper
done some more today, trimmed the lower edge looks a bit more even
 and got the holes cut for the wiring
 clamped up and a bit of minor tweaking done


 now concerned that the neighbours might think they'd gone deaf and supposing that the panel above the valance might be worse than it looks......
 i thought i'd have a go at making one of these as well! if i dont need it i'll put it in the loft 'til i do!
looks a bit more even and got the holes cut for the wiring clamped up and a bit of minor tweaking donenow concerned that the neighbours might think they'd gone deaf and supposing that the panel above the valance might be worse than it looks...... i thought i'd have a go at making one of these as well! if i dont need it i'll put it in the loft 'til i do!


Springerdinger
memoirs of the mediocre diy mechanic
- Messages
- 435
- Location
- UK nr Southam
Hi Ian
just read through the thread and wanted to say how amazing your work is
it goes to show everything can be repaired by the right minded person.
inspiring workmenship
cheers
Chris
just read through the thread and wanted to say how amazing your work is
it goes to show everything can be repaired by the right minded person.
inspiring workmenship
cheers
Chris
 glad you said "THE right minded person" not "A right minded person"
hi quick update, not too much done due to welder finally giving up. bought a clarke 151en from mm on the last vat free day so back onto the car ,got the upper valance removed and as suspected it was quite heavily rusted on the inside and had taken most of the bumper mounts with it! [/ATTACH] just needed to make repair sections for the boot slam panel.
  so tap tap tap...
 [/ATTACH]
 will need some tweaking but hoping to get them welded in this week sometime
so back onto the car ,got the upper valance removed and as suspected it was quite heavily rusted on the inside and had taken most of the bumper mounts with it![/ATTACH] just needed to make repair sections for the boot slam panel. so tap tap tap...[/ATTACH]will need some tweaking but hoping to get them welded in this week sometime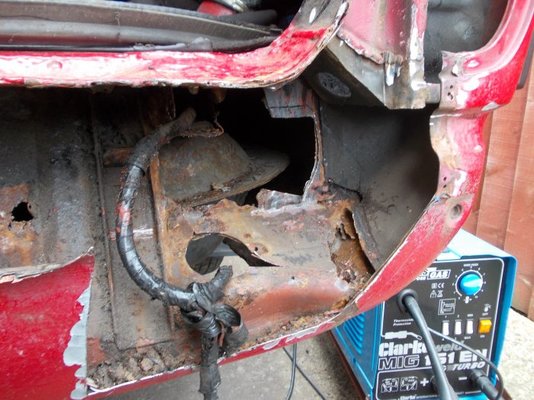
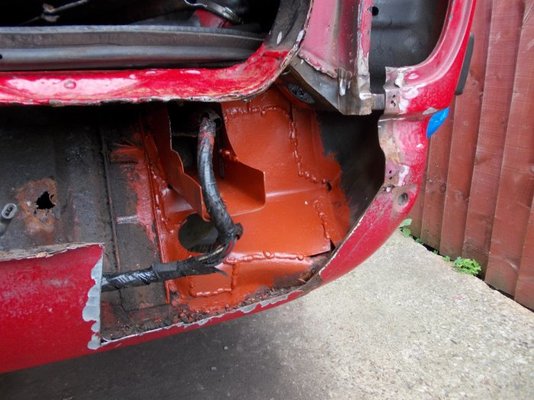
small patch butt welded into inner valance and slam panel repair sections welded in, apologies for lumpy welds i was only doing short sections at a time to avoid distortion

 then gave everything a holding coat of primer and got the upper valance drill screwed into place to check alignment

 not too bad
and slam panel repair sections welded in, apologies for lumpy welds i was only doing short sections at a time to avoid distortionthen gave everything a holding coat of primer and got the upper valance drill screwed into place to check alignmentnot too badjpmillermatic
Member
- Messages
- 1,094
great progress on this one!.....
looks like you have worked your way around the whole car?...whats left?
JP
looks like you have worked your way around the whole car?...whats left?
JP
great progress on this one!.....
looks like you have worked your way around the whole car?...whats left?
JP
not much actually
 i need to get these parts welded in then it's a little work on the doors nothing major, check in case i've missed anything then prep for the respray
drivers side inner valance repaired and passenger side
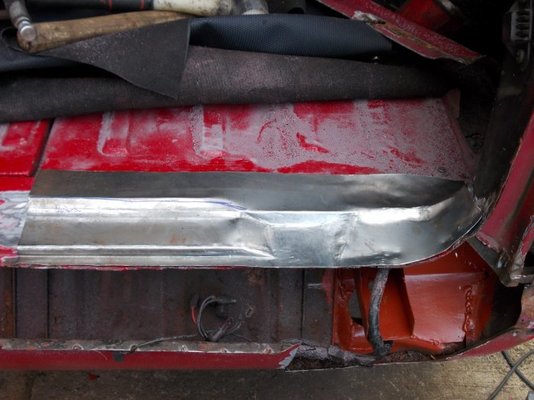
  just need to make a piece about five feet long to join the two! so in the mean time i got on with the drivers lower rear wing which needs to be done before the the valances go on as they go over it if you see what i mean, so onto the inner repair good job i REALLY like welding upside down
  then today the second half going in
  just needs painting inside then i can fit fit the outer repair panel i made seen here being test fitted
and passenger side just need to make a piece about five feet long to join the two! so in the mean time i got on with the drivers lower rear wing which needs to be done before the the valances go on as they go over it if you see what i mean, so onto the inner repair good job i REALLY like welding upside down then today the second half going in just needs painting inside then i can fit fit the outer repair panel i made seen here being test fitted 


