Thanks Pete. I was very pleasantly surprised how nicely the table performs after scraping. Maybe one day I'll get round to correcting the wear on my mill knee, if I'm feeling brave. 
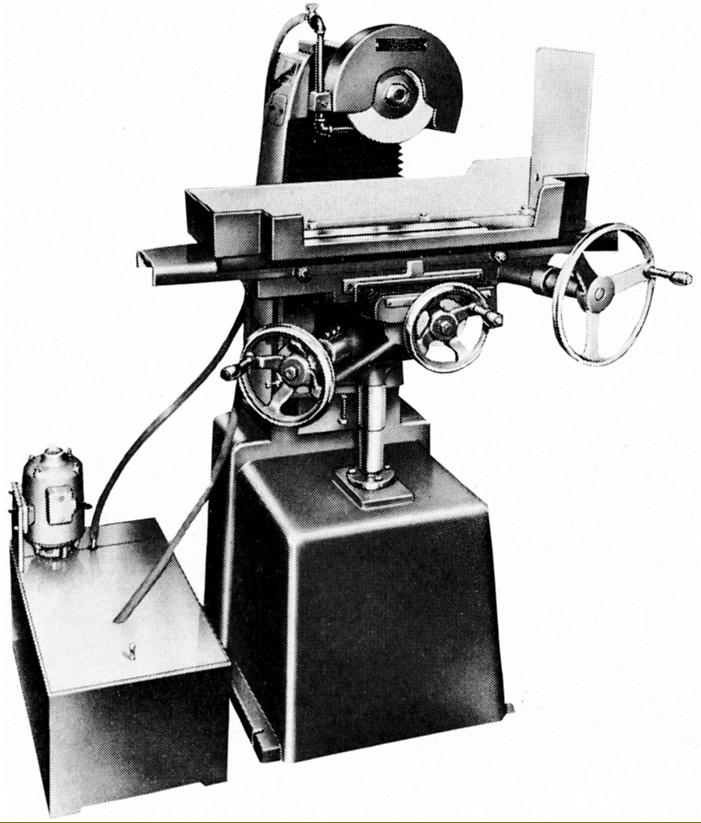
The nut that secures the wheel on shouldn't affect the preload on my spindle bearings. The preload is applied with a wave washer at the rear and a sort of piston arrangement presses on this washer and is adjusted with a bolt at the back. One of the earlier posts has a picture of the assembly. I replaced the bearings on mine as the rollers and centre parts were a tad rough.
It's been a while since I've posted anything on this grinder. It's nearly done, but progress has been a bit stop start. The enthusiasm level has subsided a bit, what with the current goings on and the garden needing attention. I've sorted out the electrics. I was going to use the WEG CFW300 VFD that I'd bought in error - it's a 1.5kW and the "300" model has extra bells and whistles that I don't need. Anyway, I tried it for fit in the base of the grinder only to discover that there's a lot less spare volume in there than I thought. Never mind, it'll power the shaper when that finally gets going, so I bought a CFW100 model, 0.75kW to match the motor, which is a bit smaller. These inverters mount onto DIN rail, so I bought a metre of the cheapest rail I could find from RS. The plan was to bolt a short length of this to the inside of the side panel and have the inveter facing into the base, but even with the smaller VFD there wasn't a whole lot of room so I ended up milling a V groove in the DIN rail so I could get a clean bend on it and mounted the VFD facing forwards: This has the advantage that when its all wired up, the top screws from the side panel can be removed, the lower ones loosened and the panel hinges out so the VFD display can be seen: I would have liked to reuse the original control box but the case is damaged and it's designed to switch 3 phase with an over-current trip so I ended up buying a cast aluminium box and some decent switches. I've mounted it on the front of the base where the original one would have been: The absence of paint just below the box is where I took a grinding disc to the front of the base casting to flatten out the undulations so the flat bottom of the box would sit flush. I looks like this with everything closed up:
Small point but I'd have mounted it with the display uppermost. Easier to view without getting down on your hands and knees. Great rebuild thread BTW.
And so on to sorting out the mag chuck. The maker's tag is missing but it looks like an original one for the machine and shall we say, it's had quite a life. Rust, dings and gloop in the screw holes. So I set about shaving 20 thou or so off all of the side surfaces and clearing out the screw holes so I can fit a fence if the fancy takes me. I thought I'd taken more pictures of the cleanup but it turns out this is all I have: Having cleaned up all the surfaces, this is what it came out like - much nicer: The handle is laying off to one side as it needed attention itself. The hole for the on/off spindle is wallowed out each side and despite the "pin" being really tight ( the pin was horribly abused too) the handle had play on the shaft. Before I got to that, I machined up some new mounting hardware to secure the chuck to the table, clamps, T nuts, threaded rod and nuts: And so to the handle. The plan was to turn a sleeve in brass to be a smooth fit on the shaft, then bore out the handle and press the sleeve in. The sleeve was no problem, a smooth fit on the shaft. The handle was clamped in the mill supported like this: A stud out of my mounting kit and a connector nut serve as a jack. I used a boring head with an inserted boring bar as it's what I have. Here's the boring: and an up close view of the insert, which wasn't designed for holes as small as this as there wasn't enough back rake. A quick wipe over the CBN wheel on the grinder sorted that out: I didn't bore all the way through so what's left of the chrome wouldn't get trashed: and the sleeve secured with some green loctite: The excess length of the sleeve was removed with the boring bar, at which point I took it out of the mill and tried it on the spindle and of course, I hadn't left enough allowance for the slight interference fit so had to carefully remove some material until it did. This took longer than boring the handle out. I was going to use a spring pin to hold it on, but the pins I've got wouldn't fit through the spindle. So I checked, and yes, it needs a taper pin - which I don't have. I was going to ream the handle plus spindle out with the one taper pin reamer that I've got, but on checking the spindle is hardened, so I only reamed one side of the handle, estimating the depth based on how far the reamer would go through the spindle hole. Then turned a pin on the lathe - this was a pain as the drill rod I used didn't turn to a good finish, as it stuck out 1 1/4" from the chuck and is only 3/16" at the thin end the material likes to bend away from the tool. But eventually, I got a pin made that fits. The handle doesn't wobble any more so I'm happy with it. So just some bushes for the wheel and a spindle nut to go, paint, and it's done!
Rebuild looking fantastic. On the topic of bellows, there is a UK company that makes all sorts, Beakbane. I have no affiliation other than a letter from the 1970’s where they were quoting for bellows for my K&T mill. I looked them up and they are still in business. I keep meaning to call them and see if they’ll honour the 45 year old quote. ;-)
Paint excluded, I've finally finished. I cleaned up the rear wheel bush and the locking nut - a skim on the lathe and mill to remove the pitting and abuse marks, a tickle with a file and polish up with some abrasive and here we are (nut in the first pic looks blurred as it's running): The wheel came with the grinder. It's filthy and I tried unsuccessfully to wash the muck off it with IPA. The wheel just drank it! When I started it up of course it all came back out PDQ. As it's had volatile liquid round it, I won't try grinding till it's had a while to dry out. With it running, no load, the motor drinks 2A according to the VFD: I found a couple of tags in amongst the collection of bits that came with the machine. The lower one fits on the front of the wheel guard and suggests at least I got the wheel rotation speed right - the wheel rotates in the direction that the spindle nut loosens, anticlockwise looking from the front, RH spindle thread. This way, any vibration / friction trying to slow the wheel down tightens the locknut, rather than letting it come loose during grinding. The brass plate belongs somewhere - I just can't find any mounting holes to suggest where! I'll post a final pic when it's looking pretty with a new paint job - if I can get the paint shipped to me in the current conditions! Till then, I've a Paramo bench vice and an Elliott shaper to keep me busy. Rob
Could be. Maybe the holes will reveal themselves when the paint comes off. Possibly the drive screws didn't want to come out so they may have been ground flush.
Small point maybe but the travel stops on the ones I have seen have a rubber sleeve to give a soft landing. The inner, aluminium bit would be a top hat shape with a bit of hose slipped over it. A sheet metal upstand on the right side of the table as Seadog's picture is a good addition as it catches the majority of the dust. Can hang a damp rag from it with magnets for easy clean up.
An update to where I've got with this grinder. I fabricated a guard for the end of the table. I had some 5mm thick plate which had been the base for a hi-fi speaker stand in its former life. I flycut the paint off of it, profiled the edge and drilled the mounting holes (slots, to allow for misalignment), then used a 90 degree cutter on the horizontal mill to cut some grooves to enable the sides to be bent at right angles: I put it in the vice and bent it. It got to 45 degrees ok, then broke! So I cleaned it up, clamped it together and silver brazed it, which worked really well After a cleanup, it fitted very nicely on the end of the table: Now came the time I wasn't looking forward to, taking the whole machine apart. Whilst in bits, there were a couple of things to sort out. First the drive screws for the machine tag, which was on the side of the headstock as suggested. The old rivets had been ground flush and painted over. As it was in bits, I clamped the headstock on the mill to make a decent job of it. The rivets turned out to be copper, as you can see from the swarf below: Then on to the more serious problem. The saddle didn't travel the full distance on the knee without binding up at the ends. Slackening off the gibs ends up with the saddle rocking a few thou when the table was moved to the ends of its travel, so not an option. As a start, I blued up the ways and scraped them in to make sure they were flat and the dovetails parallel (using the saddle as a measure). It wasn't bad but was out a little. The scraping will help lubrication compared to the ground finish anyway. After this, the saddle still bound up at the ends, which turned out to be some unworn parts of the saddle ways binding on to the ways of the knee which extended in a few thou at the ends. I found this by noticing that the saddle lifted by about 4 thou at the ends of the travel. Its difficult to see in the photo but the inside edge of the way curves in a touch: So the saddle was placed on the mill and the unworn areas milled away. Before, you can see the ridge on the inside edge of the ways... and after: After this, the table slid easily end to end without any play!
on the wear ridge did you also scrape them as well if its a wear point wouldnt it benefit being scraped as well for better movement as well as less wear on it ?
So on to rubbing down, cleaning, masking and painting: I made use of the mill to help with painting the panels: And so on to reassembly. All went OK until I got to fitting the table feed spindle. After all the effort to make the table slide smoothly on the knee it still bound up near the front! In case you're wondering, the full travel is needed to grind the mag chuck, which badly needed attention as my initial efforts revealed it wasn't grinding "perfectly" flat, but was a few thou out. The cause of this third table/knee problem was the misalignment of the leadscrew as I'd fitted a long bushing in the knee which didn't allow for any play. I ended up curing it by milling 20 thou off the bottom of the nut casting and shimming it for a nice fit: To get the full travel I also had to remove some of the bellows - I'd split the one I bought in two and used it for in front and behind the saddle, but it was a bit too generous and needed slimming down. Same for the bellows on the knee ways, when fully compressed it got in the way. Then after the whole machine was put back together, time to sort out the dust extraction. Last time I dressed the wheel, despite trying to use the vac to collect the debris, it still ended up 10ft down the workshop. I have a dust extractor designed for woodworking but which works very well for hoovering up grinding dust. I made a fixture to hold the end of the pipe in a DTI stand arm: There are two holes in the side of the headstock which I guess once held an on/off switch, so I made up a plate of steel to fit those, drilled in the middle to accept the thread on the bottom of the arm. The fitting screws were recessed to give me the option of clamping it on with a mag base. And so on to grinding the chuck flat. This was out by about 4 thou front to back and had a big hollow front centre. Here it is part way through - you can see the unground area at the front edge: And here it is with a nice shiny finish once I'd finished. I spent a day grinding this - it's a manual grinder and my arm was dropping off by the end! I ended up removing the guard and the table stops for the last passes. If you clonk the table into the stops, or the guard (which hangs down so it'll hit the end of the saddle) the table level shifts up a bit, causing the wheel to grind a bit more for a short distance. There must be some play somewhere (not the knee gibs - if you wind the knee down quickly it sometimes binds slightly and goes down in jerks. And so to the finished machine, minus it's brass tag which is still work in progress: The handle for the table feed needs changing. It's aluminium and had left a good amount of its outside on my hand after yesterday's marathon grinding session!
Only about 10 thou of that ridge touched the ways, and only at the extremes of travel. I didn't want to mess too much with the saddle as the ways, although worn, weren't too bad for flatness and as the knee ways had been scraped there's plenty of space for oil to sit. Most of the ridge never contacted anything, so I just milled it to the same level as the areas that had been relieved at manufacture.
That's why I put the plastic handles on mine. I had a machine before that used to make my hands black and it's the devil to get out of your skin pores.
looking really smart, ive got to regrind and do a little service on mine found a leak in the workshop roof ground bed is now very rusty
You should be very pleased, what a great bit of workmanship. It's been great to follow the progress on here. Thank you