Paul.
Moderator
- Messages
- 7,010
- Location
- Northampton. UK
And another little press tool used with a flattening tool for forming a joggle, see how its used here https://www.mig-welding.co.uk/forum...panel-repairs-and-how-to-form-a-joggle.77143/


I've just grabbed a load of thicker off-cuts but they're around 3mm, the blade in the photo is 5mm steel.
And another little press tool used with a flattening tool for forming a joggle, see how its used here https://www.mig-welding.co.uk/forum...panel-repairs-and-how-to-form-a-joggle.77143/
We have one set up full time as a corner notcher, another as a 6mm hole punch and this one gets changed for different thingsOh, interesting that you're using it to punch holes, I did wonder whether it would be up to doing some sort of basic cutting. I must walk before I can run though - even being able to fold on it is a major jump in usefulness for mine.
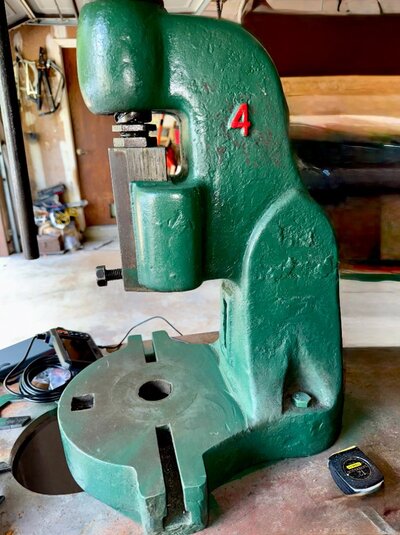
Hello,Just thought I would post up a few photos of my new fly press. As per wanted ad I had been browsing for a while and plan to use it for balcksmithing to save my arm and hand a bit from swinging the hammer.
Photos from eBay ad
View attachment 296897
View attachment 296898
I could see it was a big old lump and had a homemade die bolted on. These are supposed to have a 1" round hole to accept dies in the bottom of the ram. The press was up for £100 and I got it for £75 so I wasn't too bothered about the condition as I knew I would be going over it anyway.
Got it home and out of the car somehow and started stripping it to have a proper look.
I managed to slacken the lock nut and remove the split nut from the ram. The whole thing was covered in years old grease that had gone hard and attracted any and all dust, so I gave it a good gentle wire brush to remove and cleaned it all up. Inside the ram where the split nut threads in there is supposed to be a round slug which the base of the screw(?) would seat into. This wasn't there and there was nearly 1/4 of a turn play in the movement of the ram. So I machined up a lug from some en19, hardened it and popped it in, a little oil and seated the cleaned split nut and lock nut back in, backed it off a bit and then tightened it all down and managed to remove all play! Before refitting the ram I greased the slides and the ram and it all moves a lot smoother than it did.
View attachment 296901
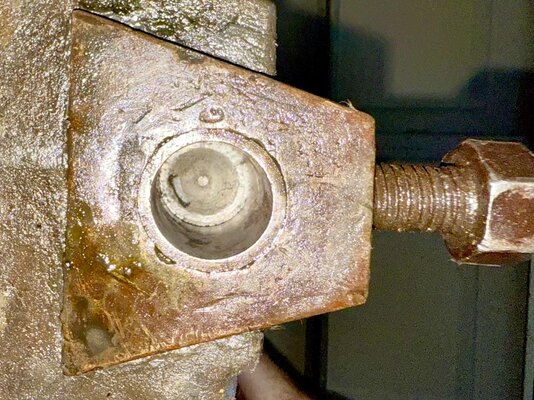
As I mentioned, the bottom of the ram should have had a 1" dia hole to fit 1" round tool shanks. This seemed to not exist so I got the wire wheel on the grinder and discovered there was one once, but clearly a tool had got stuck and had been cut off and ground flush. I knew I would need a new one so I proceeded to attempt to free up the stuck tool shank. As I'm sure most of you know anything like this never seems to go smoothly! My first attempt was to drill an 8.5mm hole in the old shank and tap to m10, screw a bolt in tight to try to twist it to free up the years of rust that had seized it. Drilling was easy, the steel was soft. But tapping the M10 thread my bottoming tap snapped in the hole and I knew the only back from this was to use heat and weld.
Having recently discovered stick welding I whacked a few blobs on the top of the shank. The heat I knew wouldn't hurt and by welding the heat mainly penetrated into the shank and not the surrounding areas of the ram. I could see the crack open up around the tool shank and I knew I was in business.
View attachment 296899A swift grab and twist with some channel locks and we were free! Cleaned up and ready for some new tooling to be made.
View attachment 296900
Finally a little wire wheeling to the base and it is all back together and ready to do its job. Apart from now I need to fab up a bench and figure out how I am going to lift it onto said bench.
View attachment 296902
And if anyone has any 1" diameter bolts lying around they want rid of, please let me know as I would like to use them to make the tooling. Nothing is going back in that home without a collar!
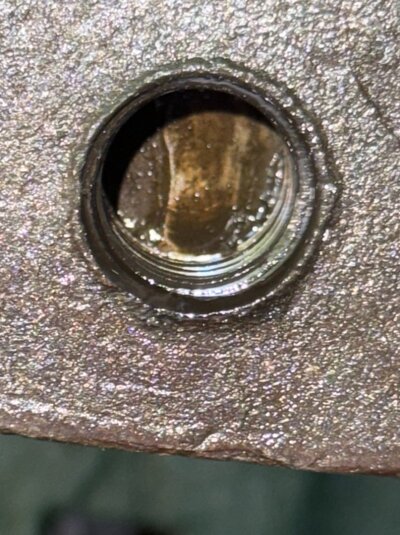
Screwdriver,I've not seen anything like that before on the anvil of a flypress. Also does look a bit like some weld around the sleeve. My guess is this was a 1-1/4" tool holder that has been sleeved down to 1". Also the retaining screw typically should press against the tool to hold it in place and usually aligns with a groove machined into the tool.
10-4 While deciding on buying a flypress, I became aware of the potential for mushrooming of the captured tooling, if there was no collar that would contact the flat base of the ram, just prior to the tooling "bottoming out" in the bore. I appreciate you taking the time to share this, as I'm sure there is no possible way to know the knowledge base of the person posting.No worries. Also I should have suggested, the tool or punch must reach the dead end of the retaining hole. All the pressure from the press should act on the end of the punch or fixture. The screw merely stops it from falling out though some fixtures like a large bending jig should shoulder up against the flat base of the anvil.

Thanks I’ll start my search later today. I’m assuming the reamer would still be a hand held/ hand controlled tool, even though we’re dealing with metal instead of wood, for the precision mentioned?eBay, used, lowest price + p&p.
We've not met have we...
 )
)Thanks I’ll start my search later today. I’m assuming the reamer would still be a hand held/ hand controlled tool, even though we’re dealing with metal instead of wood, for the precision mentioned?
Not that I’m aware. I have a few buddies in the UK, and I’ve been to London on a couple of occasions, but I’m more known for woodworking / guitar playing. (If we have met, I hope you and family are still well!
Lee
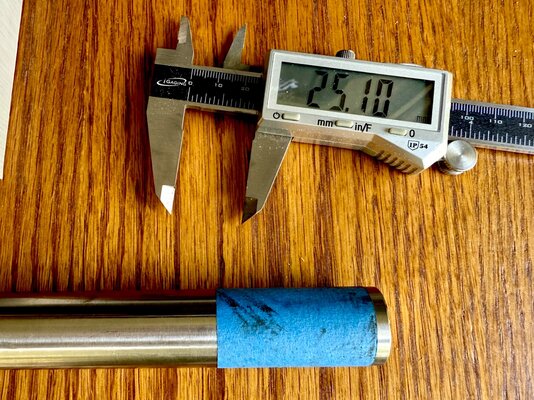
Thought I’d share some more info. I was actively searching to find a decent 1” reamer as you described, but nothing was setting the world on fire for me. I kept thinking about the flypress and something I saw flipped a different switch in me. Over here in the US, many use 1” =25mm, even though it is more accurately 25.4mm. As the actual 1” rod I had in hand, would not fit into the bore, and my Denbigh was made in the UK (duh, right), maybe it’s bore was actually 25mm and not 1”! When I did the conversion for 25mm, the decimal inch value was 0.984 and some change. I ordered some 25mm steel rod (thought it said precision, but didn’t play out that way). I had the lock screw loose, and fed the 25mm rod into the bore, tightened the lock screw, and it slipped right out. Measured the rod and dang if it wasn’t 24.92mm. I wrapped a piece of blue painters tape about 3/4 way around the rod, at the end going into the bore. It was a little tight going in, but the tape didn’t come loose or roll up. I tightened the lock screw again and it held the rod like a champ. I measured a second time (made a mistake in the photo below, so it wasn’t actually 25.10mm) , so I was only catching the tape on one side of the rod instead of both sides where I measured before, and the digital micrometer displayed 25.02mm. I’m gonna order a precision rod of 25mm and validate that it works, like this test did. I’ll probably look for a 25mm precision reamer, too, as I may at some point decide to drill through the sleeve, so the lock screw holds via direct contact, rather than just compressing the sleeve into the rod / shank.The bore really ought to be within a couple of thou at worst so you could probably spin a reamer by hand.
It was a (lame) joke. Whenever anyone asks where to get <anything> my answer is always "eBay, used, lowest price + p&p" but yes, anything 1" that's vaguely decent will do. You only want to get rid of any slight imperfections, galling, dings, deformation in the sleeve and you'll probably only use it once!
It will come in handy if you decide to drill and tap the sleeve later.