


You are using an out of date browser. It may not display this or other websites correctly.
You should upgrade or use an alternative browser.
You should upgrade or use an alternative browser.
1993 Kawasaki Mule UTV project
- Thread starter jpmillermatic
- Start date
jpmillermatic
Member
- Messages
- 1,094
Thanks, Dobbslc
Today I got some rust converter on fuel tank running board area...it looks funky now, but will dry matt black, then I can hit it with some satin black. I think Ill add some truck bedliner material to this area, and maybe even some undercoating, which Ill mask off and put just where the tank sits. there was plenty of rust on the under side of the tank, a couple of worrisome pits, but noting is wet or leaking......
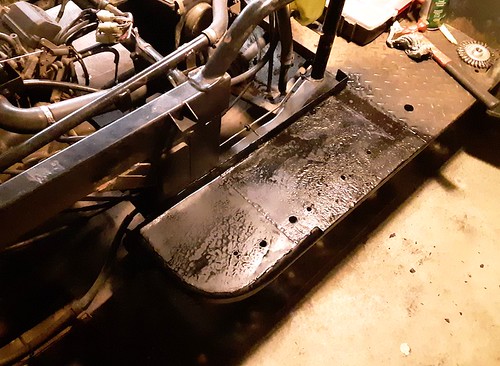
Heres the tank with primer on it. It looked a mess, but I wanted to get the primer on there a little while before shutting the garage door for the night. SWMBO is not fond of paint fumes!

I dont always sand rough pieces really smooth, but the paint had failed in several areas and was stuck for good in other places. I smoothed out all the edges and it really came up better than expected.

The cage insert got a few coats of paint
The roll bar is next to finish. with that done, I can bolt the roof back in place and get that wooden brace out of the way. I keep grabbing it by mistake!
")
thanks for lookin
JP
Today I got some rust converter on fuel tank running board area...it looks funky now, but will dry matt black, then I can hit it with some satin black. I think Ill add some truck bedliner material to this area, and maybe even some undercoating, which Ill mask off and put just where the tank sits. there was plenty of rust on the under side of the tank, a couple of worrisome pits, but noting is wet or leaking......
Heres the tank with primer on it. It looked a mess, but I wanted to get the primer on there a little while before shutting the garage door for the night. SWMBO is not fond of paint fumes!
I dont always sand rough pieces really smooth, but the paint had failed in several areas and was stuck for good in other places. I smoothed out all the edges and it really came up better than expected.
The cage insert got a few coats of paint
The roll bar is next to finish. with that done, I can bolt the roof back in place and get that wooden brace out of the way. I keep grabbing it by mistake!
thanks for lookin
JP
jpmillermatic
Member
- Messages
- 1,094
I was not going to paint this piece, but I figured what the heck. It was in pretty good shape except for a few spot that were beginning to rust a little........it goes at the top of the rear roll bar and bolts to both the roof and roll bar...

and the running board, gas tank side, is nearly finished. I got 2 coats of bedliner material on it and will put 2 more on there now that the cab support piece is back in place.

finally, the gas tank after a round of sanding and priming again. It came up pretty good. Not sure whether Im going red or black with this.

thats about it from NY!
thanks for lookin
JP
and the running board, gas tank side, is nearly finished. I got 2 coats of bedliner material on it and will put 2 more on there now that the cab support piece is back in place.
finally, the gas tank after a round of sanding and priming again. It came up pretty good. Not sure whether Im going red or black with this.
thats about it from NY!
thanks for lookin
JP
jpmillermatic
Member
- Messages
- 1,094
Today was a bit nicer out so I was able to get a few things painted, at least with the first coat....The roof frame for the back of the roll bar....

the fuel tank. I decided to go red on this with some bedliner around the bottom of the tank for good measure.

I did run out of paint, but got a good coat on there and will smooth it down with some wet sanding, then get 2 more coats on it if I can. I also discovered that the fuel level indicator seal was toast. So that came out and got cleaned up. Ill look for replacement parts or a new unit....Im hoping that seal is still available.

And the running boards are finally done with 3 coats of bedliner. Its starting to look pretty consistent in that area now.


and finally, the roll bar is done and will be ready to go back in place tomorrow.

hope you guys are staying well!
thanks for lookin
JP
the fuel tank. I decided to go red on this with some bedliner around the bottom of the tank for good measure.
I did run out of paint, but got a good coat on there and will smooth it down with some wet sanding, then get 2 more coats on it if I can. I also discovered that the fuel level indicator seal was toast. So that came out and got cleaned up. Ill look for replacement parts or a new unit....Im hoping that seal is still available.
And the running boards are finally done with 3 coats of bedliner. Its starting to look pretty consistent in that area now.
and finally, the roll bar is done and will be ready to go back in place tomorrow.
hope you guys are staying well!
thanks for lookin
JP
Pigeon_Droppings2
Member
- Messages
- 6,891
- Location
- london
Just came across this project....excellent work as always.
I think these types of fun projects are really enjoyable...
I think these types of fun projects are really enjoyable...
jpmillermatic
Member
- Messages
- 1,094
Thanks, PD2
Today was busy with work work, so only had a short time before dinner to work on the Mule. I did get the roll bar back in place and bolted in, the gas tank in place for fitment of the rubber pads underneath it and to be sure the straps will still fit. I designed a dash decal and will have it digitally printed once I confirm the dimensions and image placement, ect. I made a panel for the storage box too.
If anyone can recognize the graphic I chose for the mascot, you get the prize!

thanks for lookin
JP
Today was busy with work work, so only had a short time before dinner to work on the Mule. I did get the roll bar back in place and bolted in, the gas tank in place for fitment of the rubber pads underneath it and to be sure the straps will still fit. I designed a dash decal and will have it digitally printed once I confirm the dimensions and image placement, ect. I made a panel for the storage box too.
If anyone can recognize the graphic I chose for the mascot, you get the prize!
thanks for lookin
JP
slim_boy_fat
Member
- Messages
- 29,186
- Location
- Scottish Highlands
If anyone can recognize the graphic I chose for the mascot, you get the prize!
Middle?

jpmillermatic
Member
- Messages
- 1,094
yeah, the "Red Mule" would be what Im referring to , but is the wrong color for what I was referencing. Think 1970's movie about the corruption in the American trucking industry...
I did find a replacement fuel gauge complete with gasket for under 30.00 on ebay. The lens is clear, the gasket is good, comes with new hardware, whats not to like?
JP
I did find a replacement fuel gauge complete with gasket for under 30.00 on ebay. The lens is clear, the gasket is good, comes with new hardware, whats not to like?
JP
jpmillermatic
Member
- Messages
- 1,094
Today was a mixed bag....worked on hooking up some switches and troubleshooting one of the headlights. found the ground connection had failed inside the light housing. I just had a feeling it was not truly bad or burned out. I also cleaned up the light mount, which was getting a bit rusty. the wiring needed some new heat shrink tubing and a couple of new solder joints....
I also tried an experiment with all the rusty hardware that is coming off this thing. I put it all in a container with some sand and gravel and a bit of soapy water, then have been (caveman style) shaking it for a few minutes whenever I go past it!...I think its actually making a difference. Ill give it a few more shakes tomorrow, then check a couple of random washers, nuts and bolts to see if its all in my head or not.
Ill get some more pics up too......
thanks for lookin
JP
jpmillermatic
Member
- Messages
- 1,094
Continued with a few smaller details today and began cleaning up the frame, shock and leaf spring area on the passenger side...and took a few pics of stuff I did yesterday.....
heres the gas tank in place under the seat. Im making a mud flap just aft of the tank from an old BMW floor mat as there was a lot of debris in behind the tank when I took it out. Im sure it lead to rusting and corroding the running board, ect....

the roof panel at the top of the roll bar all painted and in place....

The drivers side light all put back together and working fine.....(just not in the pic.....) I used some galvanizing paint and then some satin silver for the bracket.

got the winch working again. Its a bit noisy...so Ill have to see if it needs some clean up and a refurbish, or just needs to be run a bit...

There are a few cracks like this one here and there. This is on the drivers side and connects the rear upright panel to the roof. its basically the upper corner...Its cracked almost all the way up to the top of that panel....

And I did manage to clean the windshield. wow, what a difference that made. changes the whole appearance of the front end it was so bad.
thanks for lookin
JP
heres the gas tank in place under the seat. Im making a mud flap just aft of the tank from an old BMW floor mat as there was a lot of debris in behind the tank when I took it out. Im sure it lead to rusting and corroding the running board, ect....
the roof panel at the top of the roll bar all painted and in place....
The drivers side light all put back together and working fine.....(just not in the pic.....) I used some galvanizing paint and then some satin silver for the bracket.
got the winch working again. Its a bit noisy...so Ill have to see if it needs some clean up and a refurbish, or just needs to be run a bit...
There are a few cracks like this one here and there. This is on the drivers side and connects the rear upright panel to the roof. its basically the upper corner...Its cracked almost all the way up to the top of that panel....
And I did manage to clean the windshield. wow, what a difference that made. changes the whole appearance of the front end it was so bad.
thanks for lookin
JP
jpmillermatic
Member
- Messages
- 1,094
thanks, ZX9, yeah, that is my hope, too. I do need to refurbish the drive axles, but that can be for the future....I am planning on making some doors for the cab from conduit and fabric with plexi panels. From what Ive read, I should make the doors easy to get off the hinges, or make the windows open or fold down. I guess it can get pretty warm in there....
anyway, here is the storage box all painted and in place. Once I got the cab back in place on the roll bar, it lifted the front windscreen frame just enough to slide the box in place

and, its tough to see, but I cleaned the windshield. I guess its a good sign you cant really see much of the glass. it took a while, especially around the gasket. A razor blade was used with soapy water to get all the baked on crud off the panel. not to mention someone was actually painting near it recently and got overspray and grinding dust all over it!

Im happy to report that I have a paying gig this week, and sad to report there will not be much time spent on the Mule.....
fair trade, I am very low on painting supplies!
thanks for lookin
JP
anyway, here is the storage box all painted and in place. Once I got the cab back in place on the roll bar, it lifted the front windscreen frame just enough to slide the box in place
and, its tough to see, but I cleaned the windshield. I guess its a good sign you cant really see much of the glass. it took a while, especially around the gasket. A razor blade was used with soapy water to get all the baked on crud off the panel. not to mention someone was actually painting near it recently and got overspray and grinding dust all over it!
Im happy to report that I have a paying gig this week, and sad to report there will not be much time spent on the Mule.....
fair trade, I am very low on painting supplies!
thanks for lookin
JP
jpmillermatic
Member
- Messages
- 1,094
Was able to work around the lockdown by alternating who was in the shop this week and (feeling very lucky) was able to work quite a bit. Today, after catching up on some sleep this morning, (yawn) I was able to put a few more things back on the mule. the final coat of gloss red on the fuel tank. bear with me, Ill stop taking pics of this thing, I promise...its just so shiny!......

and the new fuel gauge arrived...its of very good quality.....Im happy with that....

and the polished cap

The rubber pads that cushion and raise the tank off the running board. the red rectangles are 3M double sided tape...very strong stuff.

and finally, installed, albeit with only one strap so far....

And with the wheel off, I could paint the suspension and shock. The hub cleaned up nicely, too.

Ill get the wheel in place tomorrow and get some fuel back in it....time for some laps around the yard, if the weather cooperates.
thanks for lookin
JP
and the new fuel gauge arrived...its of very good quality.....Im happy with that....
and the polished cap
The rubber pads that cushion and raise the tank off the running board. the red rectangles are 3M double sided tape...very strong stuff.
and finally, installed, albeit with only one strap so far....
And with the wheel off, I could paint the suspension and shock. The hub cleaned up nicely, too.
Ill get the wheel in place tomorrow and get some fuel back in it....time for some laps around the yard, if the weather cooperates.
thanks for lookin
JP
jpmillermatic
Member
- Messages
- 1,094
Hey, all
I gave the seat belts a thorough wash down until they were rinsing clean...which took a while!....then saw that the buckles and inner steel bar were pretty rusty, especially that inner steel. I could not save either one of them, nor did I want to, so made a couple more from thick steel plate. ended up working quite well with a little shaping.

The rear wheel is back in place and cleaned up, along with the shock and shock bolts tightened back up.....

and now this side is pretty much done

So I guess its time to turn this beasty around and start patching up the bed...it is another project in and of itself!
thanks for lookin
JP
I gave the seat belts a thorough wash down until they were rinsing clean...which took a while!....then saw that the buckles and inner steel bar were pretty rusty, especially that inner steel. I could not save either one of them, nor did I want to, so made a couple more from thick steel plate. ended up working quite well with a little shaping.
The rear wheel is back in place and cleaned up, along with the shock and shock bolts tightened back up.....
and now this side is pretty much done
So I guess its time to turn this beasty around and start patching up the bed...it is another project in and of itself!
thanks for lookin
JP
jpmillermatic
Member
- Messages
- 1,094
I got the idle/governor adjusted today and it made a big difference. It would not idle down properly, but tweaking the governor arm and re-positioning it on the shaft, I eventually figured it out.
I took it for a drive around the yard a few times and am impressed with how well it rides. it is a bit of a beast compared to the garden tractor and should do very well this winter. I have been drawing up plans to convert the plow I have on the tractor to this machine. we shall see. I saw a video of a DIY plow that had a quick connect/disconnect feature and looked pretty nice.
ttfn
JP
slim_boy_fat
Member
- Messages
- 29,186
- Location
- Scottish Highlands
I have seen the future....
https://www.google.com/imgres?imgur...hUKEwjX-7nwnI3pAhVC_4UKHTJaBQUQMygIegUIARDJAQ
https://www.google.com/imgres?imgur...hUKEwjX-7nwnI3pAhVC_4UKHTJaBQUQMygIegUIARDJAQ
HopefullySoon
Member
- Messages
- 783
- Location
- Heywood
Hi JP
Really nice restoration ...
How much was it to buy in USD ?
Interesting bit of kit ... does it go fast enough to need roll cage and a governor?
Malc
Really nice restoration ...
How much was it to buy in USD ?
Interesting bit of kit ... does it go fast enough to need roll cage and a governor?
Malc
jpmillermatic
Member
- Messages
- 1,094
Hey, Slim, yeah, that is its future for sure...but it does not have cup holders. YET. (doh!)
Malc, I got a fair deal on it as it had most of the cab, 4wd and a winch already in place. 1,000.00 US. which sounds like a lot, but they are going for 3-4 times that in really good condition. amazing. add a plow, and add more value.
Top speed on this one is governed to 25 mph. Ive heard of them going 35mph ungoverned. (not gonna do that!)
The roll cage is more for the type of terrain these things are used on...farms, military, snow ops (with tracks like a snow cat), ect.
New Mules are in the 10,000 range!
JP
jpmillermatic
Member
- Messages
- 1,094
Heres a pic from 2011 of my garden tractor with a home made cab and snow plow attached. I made the plow lift mechanism from convertible top pistons and pump set up. It provides downforce, which I really like. Its slow to move up and down, but still works great to this day. limit switches keep it from going too high and hitting the frame of the tractor. I have that thing exactly where I want it, which means its time to tear it all apart and make something new, I guess!

We used to get a lot of snow, as you can see by the amount on top of the stone pillar behind the tractor...
This set up has limitations. the tractor will get pushed around by the snow if there is a lot of it, or if its wet snow.....Im hoping the Mule with its 4wd and weight will be able to push more snow
JP


