doubleboost
Member
- Messages
- 3,940
- Location
- Newcastle upon Tyne England
Having spent some time etching various things on a DIY basis I would say the best thing you can do is to get your etching solution as strong and bitey as possible. Salt is not going to be that aggressive and so you have to spend ages applying power and the result is lost detail and fuzziness of lines. As suggested FeCl3 is good, when hot even better, but try looking up "Edinburgh Etchant" and some of the recipes used by the modern electronics hackers, there's a lot of things to try nowadays.I have no idea.
I didnt have any ferric chloride, i had table salt, and a power supply.
a locomotive water tank for a little steam loco, 112 years old so needs some tlc...What IS that thing?! looks big and awesome. A locomotive boiler?
Having spent some time etching various things on a DIY basis I would say the best thing you can do is to get your etching solution as strong and bitey as possible. Salt is not going to be that aggressive and so you have to spend ages applying power and the result is lost detail and fuzziness of lines. As suggested FeCl3 is good, when hot even better, but try looking up "Edinburgh Etchant" and some of the recipes used by the modern electronics hackers, there's a lot of things to try nowadays.
TLDR;
Make etchant as strong and corrosive as possible to reduce time etching which is what loses detail.

Finished the bases for the target stands. Really like the Bester, it is a really good welder, I am very impressed with it and my Mig welding, which I haven't been doing for very long, only a year or so, has come on leaps and bounds. I have no real issues whether the weld is horizontal, vertical or in any other direction, they are all acceptable (to me).
View attachment 256201
I am not sure whether or not an MB 25 torch would help me out. I have an MB15 Binzel Evo which I really like but almost all of my welding is on 3mm thick steel, once in a while I will use 2mm stuff but as a general rule everything I fabricate is 3mm. I now feel that I am keeping the speed down to allow the torch to keep up, anyone care to comment?
I use an MB 25 evo pro with my bester and find a good match for slightly thicker stuff and its got the nicest grip I've ever used


I did try, broke a expensive trepanning tool for my troubleNeed like a big trepanning or coring drill
don't be .had them 3 days in a row
 very nice but only once a week
3 times once a week loldon't be .had them 3 days in a rowvery nice but only once a week


I built my work/welding table a few months ago. It is 2m long by 1m wide. The frame is all 50mm x 3mm hollow section with 50mm hollow 'cross slats' at approx 30mm intervals.
The top is 'framed' with the 50mm hollow all the way round the edge, and it is covered by a single 2m x 1m steel sheet 4mm thick (about the maximum weight I could handle on my own without resorting to mechanically assisted maneuvering).
I plan to mag drill, tap and use countersunk machine screws to secure the sheet to the frame. (But for the moment it;s just held in place by two or three tack welds at just one corner - plus it's weight - 62.8kg).
Being a 'multi purpose; bench, there are tines when I need a vice - and there are times where a vice could get in the way. Also, I didn't really want to start drilling holes in the bench only to find I need to change location and leave vacant holes.
I decided to build a vice holder that I could clamp to almost any part of the table surround, and quickly remove when not needed.
I had some short left-over sections of 50mm x 3mm angle, and also some 50mm x 3mm flat.
The 3mm thick angle was doubled up to give 6mm thick jaws. The 50mm flat was used both as a side stiffener and also to fill in the top plate. With a couple of hefty nuts welded to the jaws and I had a very strong and secure mount for a vice.
I think the nuts and bolts were for a tow ball hitch.
View attachment 256338
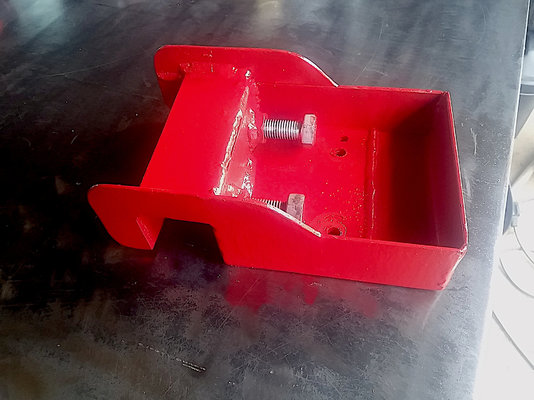
The above image shows the mount upside down. The clamping bolts can be clearly seen.
View attachment 256339
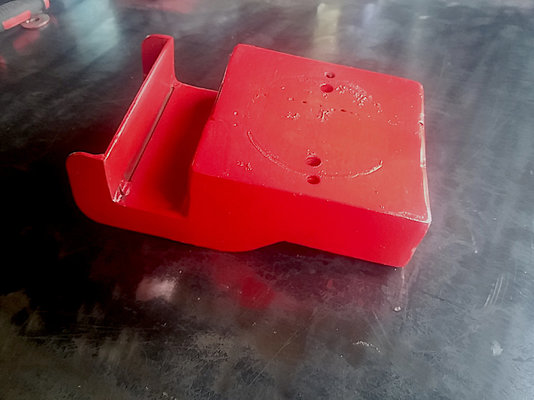
The above image shows the mount the right way up. Two lots of holes are for two different vices - I had a small swivel vice on first, then found a fixed vice.
View attachment 256340
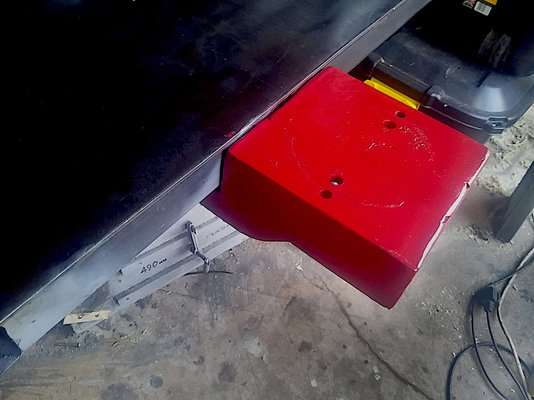
Here it is clamped to the bench. There is no perceptible flexing or distortion when tightening the clamp bolts. Its already been on and off the bench several times and is still a tight fit to lift it into place.
View attachment 256341
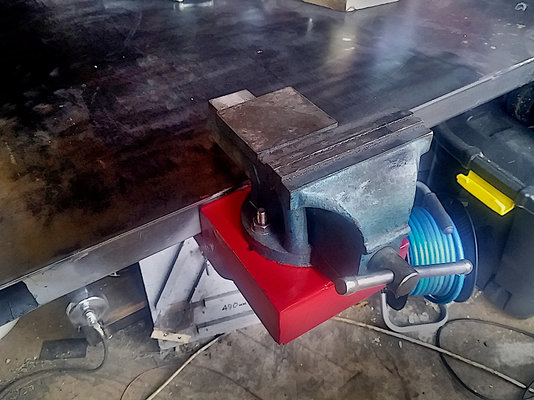
And now (above) with a smallish fixed vice bolted in place.
Surprisingly, it is absolutely solid with no movement or flexing. It has now been well tested by pulling and hammering bends into 50mm flat in the vice jaws, and then hammering the bends out of said 50mm flat on the 'anvil' plate.
Reaching underneath with a ring spanner can quickly slacken the two bolts to either remove the vice completely, or mount it to another section of the table.
This afternoon it got its final coat of paint.
Malc.
Thats going on my "to do" list.


