


You are using an out of date browser. It may not display this or other websites correctly.
You should upgrade or use an alternative browser.
You should upgrade or use an alternative browser.
Thanks Everyone,
- Thread starter redwine300
- Start date
redwine300
Silly Rabbit
- Messages
- 308
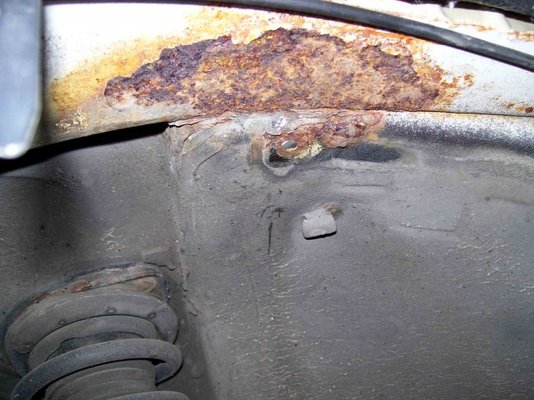
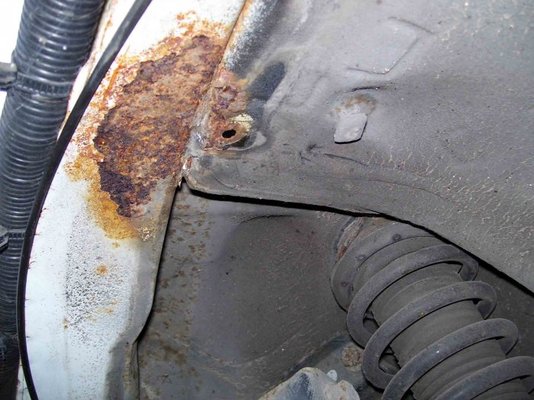
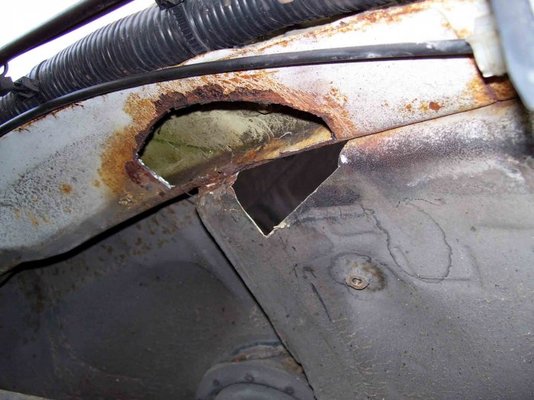
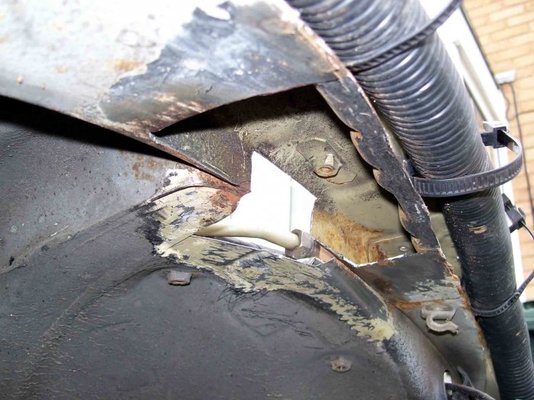
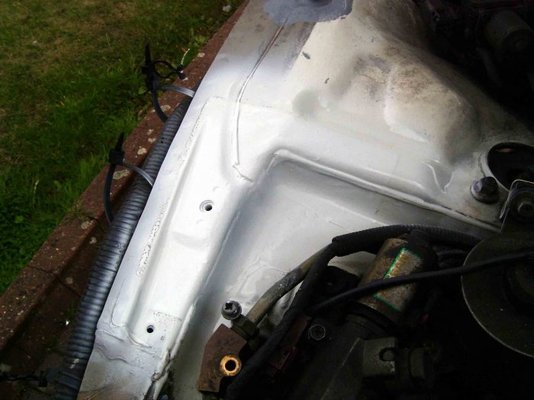
As I have been refitting the interior of late, I have had to drag myself back to some of the outstanding areas of the dreaded tin worm.
 Below are a couple of photo's of one of the more advanced rusty areas on the underside of the nearside wing.
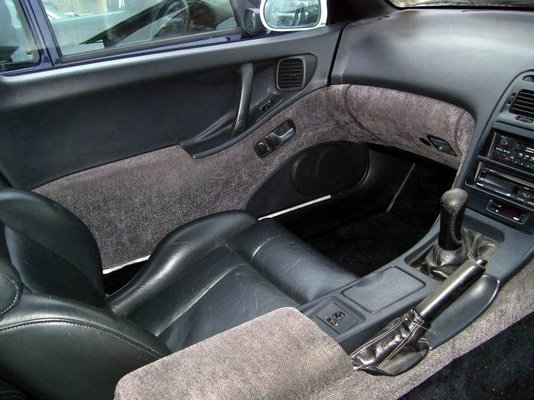
 I will clean right back to surrounding bare metal and hopefully avoid having to remove to many obstructions, I hope to just remove fixing etc' and just push any offending items out of the way, Fingers Crossed. Oh, By the way, a picture of my latest interior fitting just happened to find it's way into this post.

I have had to drag myself back to some of the outstanding areas of the dreaded tin worm. Below are a couple of photo's of one of the more advanced rusty areas on the underside of the nearside wing. I will clean right back to surrounding bare metal and hopefully avoid having to remove to many obstructions, I hope to just remove fixing etc' and just push any offending items out of the way, Fingers Crossed. Oh, By the way, a picture of my latest interior fitting just happened to find it's way into this post.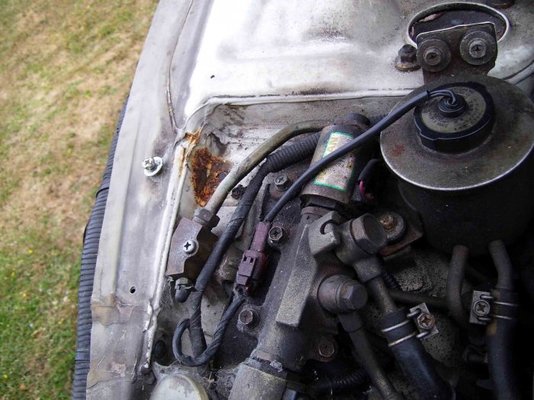
Sphinx
Member
- Messages
- 198
Oh I do love 300TT's!! especially manual ones!!! 
I'm still shocked at how badly they seem to rust, I should have figured really what with my run-ins with 200's but for some reason I had these pegged as more resistant. Still, looks like you're doing a top job of rectifying that!
I'm still shocked at how badly they seem to rust, I should have figured really what with my run-ins with 200's but for some reason I had these pegged as more resistant. Still, looks like you're doing a top job of rectifying that!
WindWalker
Member
- Messages
- 44
That is a classy interior; like that a lot. Only really took note of the 240z and a few 260z’s as they were new when I did my apprenticeship
Hope the weathers not holding you up…we need more pics
Hope the weathers not holding you up…we need more pics
Chickenjohn
Morris Minor and Porsche 944 fan
- Messages
- 1,283
- Location
- East Kent
-snip-
I'm still shocked at how badly they seem to rust, I should have figured really what with my run-ins with 200's but for some reason I had these pegged as more resistant. Still, looks like you're doing a top job of rectifying that!
yes, i am quite surprised too. I have a 944S2 from the same era- that has some rust, but really nothing compared to this 300ZX and my car is a seaside car and has been used through many winters driving to scotland so it has suffered much more rust than average. Will soon get fixed and I will post the thread here.
Looking forward to seeing some more excellent Redwine quality work on his motor!
redwine300
Silly Rabbit
- Messages
- 308
Thanks again guy's. I know what you mean Sphinx, I did expect a certain amount of corrosion but not the amount I found when I cut her open. Hi WindWalker, I too had a liking for the 240's in the 80's but went for a 280 Capri for a while instead. Not in the same league though. Looking forward to seeing your post on the 944s2 Chickenjohn by the way.
 How far are you planning go with regards to repair, tidy up or more in depth?
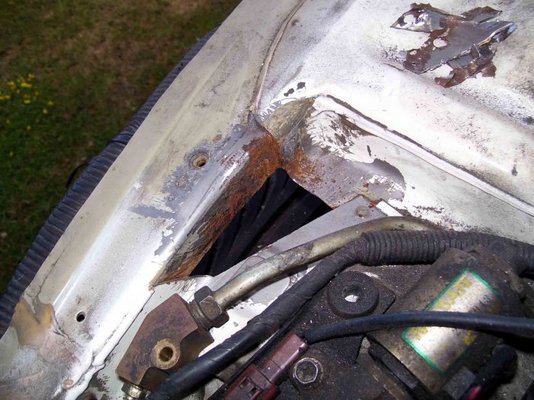
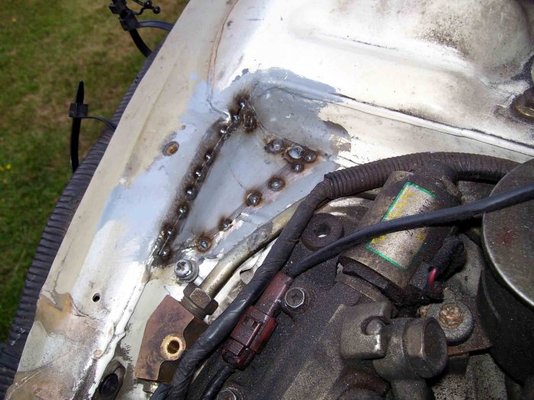
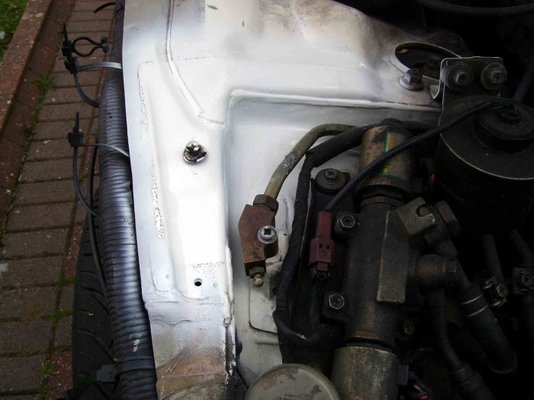
Came back down with a bump today, After the euphoria of fitting most of the interior I got to work on the front wing. Cleaned and cut some away to get an idea of what needs to be done. I am going to have to think about how to approach this one so may be a while. Any suggestions would be most welcome
Hi WindWalker, I too had a liking for the 240's in the 80's but went for a 280 Capri for a while instead. Not in the same league though. Looking forward to seeing your post on the 944s2 Chickenjohn by the way. How far are you planning go with regards to repair, tidy up or more in depth?Came back down with a bump today,
After the euphoria of fitting most of the interior I got to work on the front wing. Cleaned and cut some away to get an idea of what needs to be done. I am going to have to think about how to approach this one so may be a while. Any suggestions would be most welcome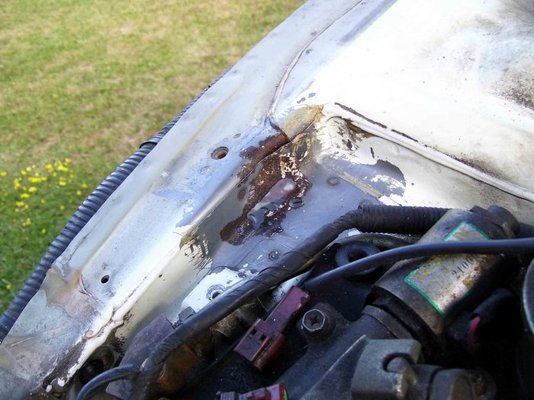
redwine300
Silly Rabbit
- Messages
- 308
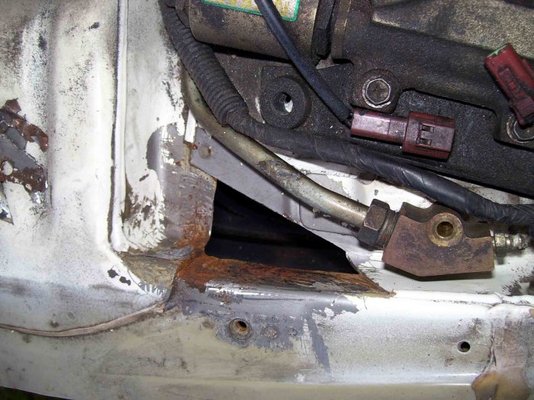
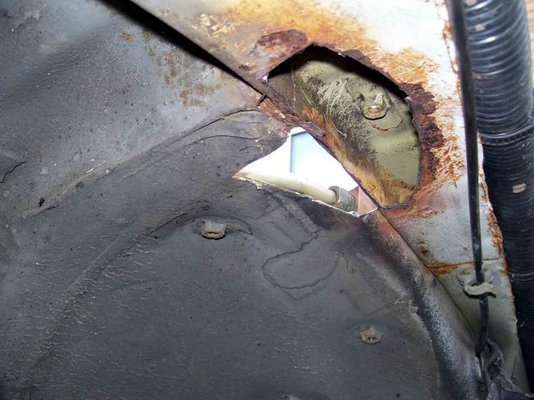
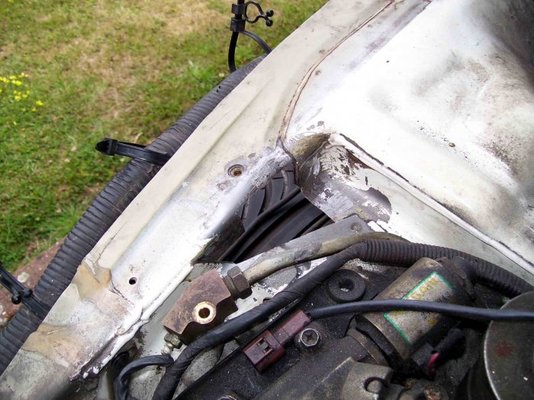
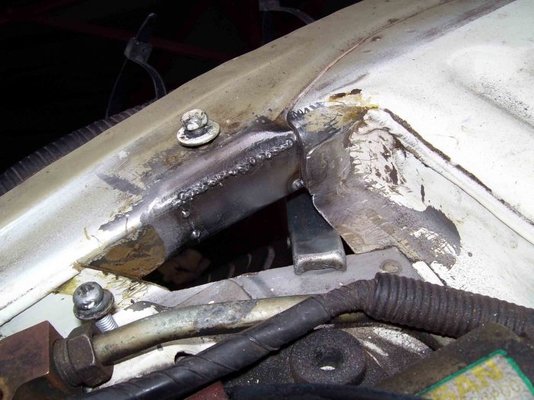
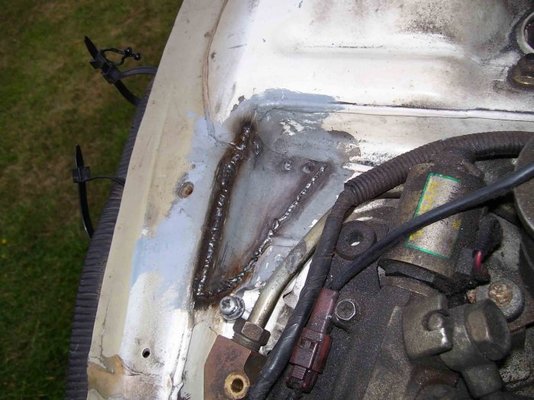
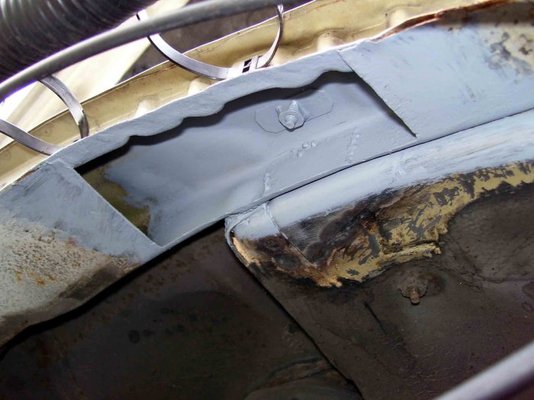
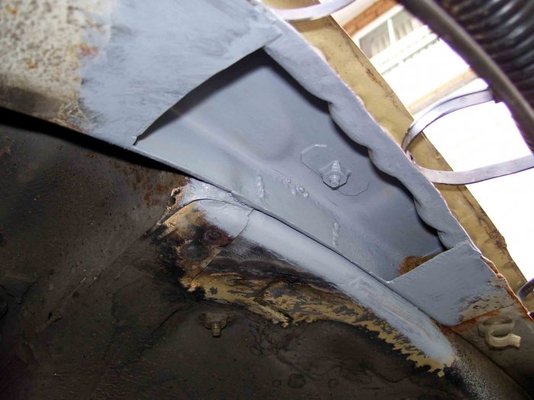
Well decided to delve a little further today and i think i have got virtually all the tin worm. Little more work than i first thought but if a jobs worth doing you might as well do it right. I think i have figured out my plan of attack as well. firstly i will patch in the small vertical section from above leaving a lip on the underside. Secondly i will cover the top section in leaving the underside until the end. Some of the existing lip has fell away but hopefully i will be able to weld up to the vertical section. But guy's, please feel free to offer alternatives.
Little more work than i first thought but if a jobs worth doing you might as well do it right. I think i have figured out my plan of attack as well. firstly i will patch in the small vertical section from above leaving a lip on the underside. Secondly i will cover the top section in leaving the underside until the end. Some of the existing lip has fell away but hopefully i will be able to weld up to the vertical section. But guy's, please feel free to offer alternatives.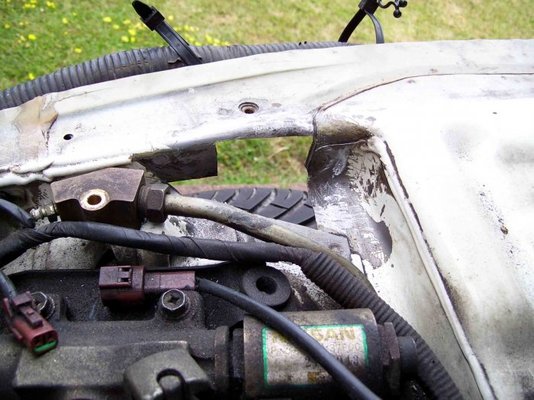
W4yne
Member
- Messages
- 289
Nice work redwine, I have viewed your work on many occasions for some inspiration. What are you using to cut the rot out on your latest photo's, have you a dremmel or are you using an air powered cutting tool? it all looks very tidy. At the moment I only have a 115mm grinder but I don't think I would be able to get into some of those tight corners to cut out such small pieces as you have.
Keep up the good work and keep the photo's coming.
Keep up the good work and keep the photo's coming.
redwine300
Silly Rabbit
- Messages
- 308
Cheers W4yne, As you said, the trusty Dremmel has been a god send, I am on my 3rd, Luckily Homebase talked me into taking out some cheap insurance and I have never looked back, Can't say the same for Homebase though. Also I use a single handled open ended hacksaw, Tedious but gets in those awkward tight spots.
As you said, the trusty Dremmel has been a god send, I am on my 3rd, Luckily Homebase talked me into taking out some cheap insurance and I have never looked back, Can't say the same for Homebase though. Also I use a single handled open ended hacksaw, Tedious but gets in those awkward tight spots.Chickenjohn
Morris Minor and Porsche 944 fan
- Messages
- 1,283
- Location
- East Kent
You're doing the right thing! Cut out all the rust and replace with new metal. It is very hard to clean up rusted pitted steel unless you acid dip it or blast it. Wire brushes have limited success here. Cut out the rot and replace with sound!
redwine300
Silly Rabbit
- Messages
- 308
I would move there tomorrow if I could, and work on cars as well? I can but dream. Nice thought though.
I can but dream. Nice thought though.redwine300
Silly Rabbit
- Messages
- 308
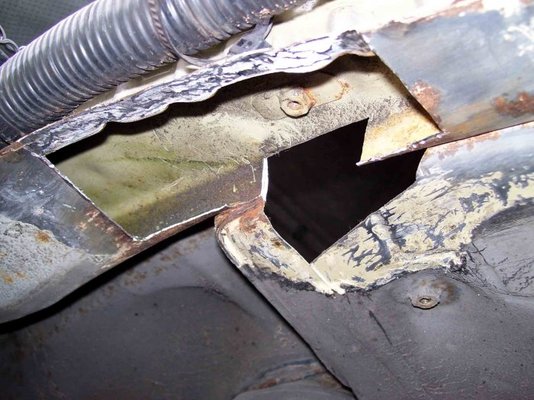
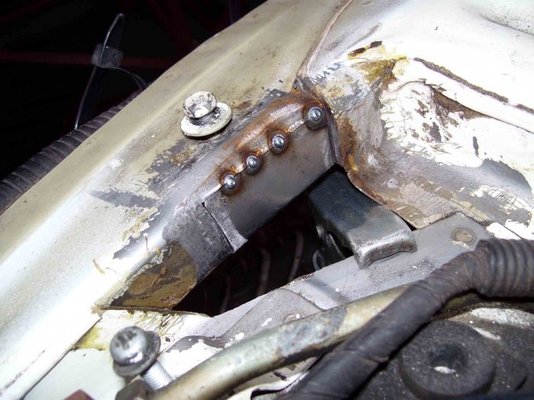
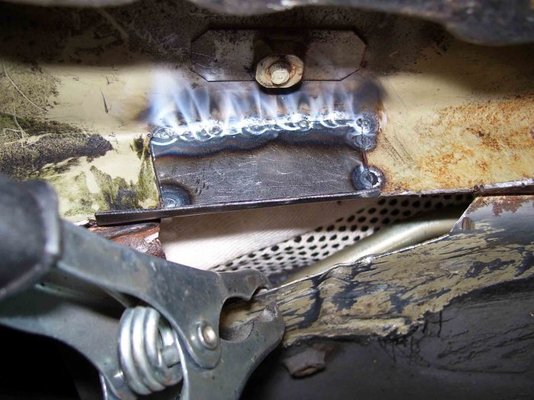
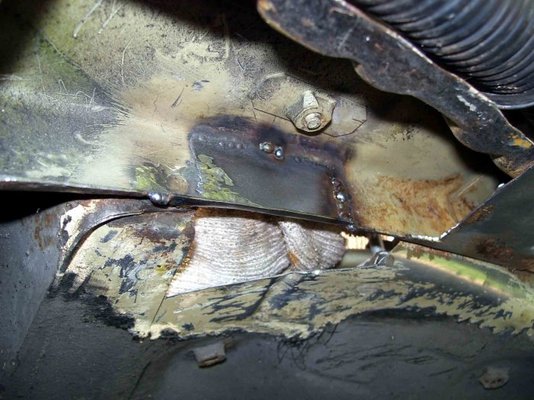
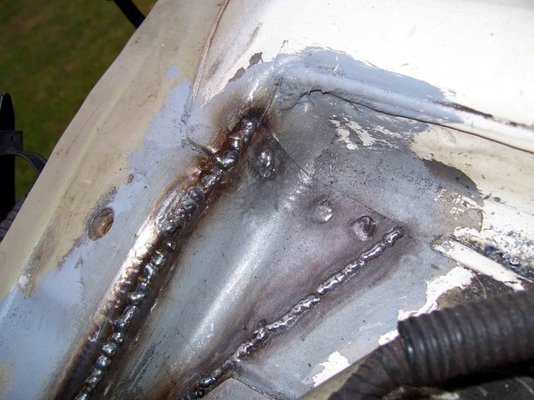
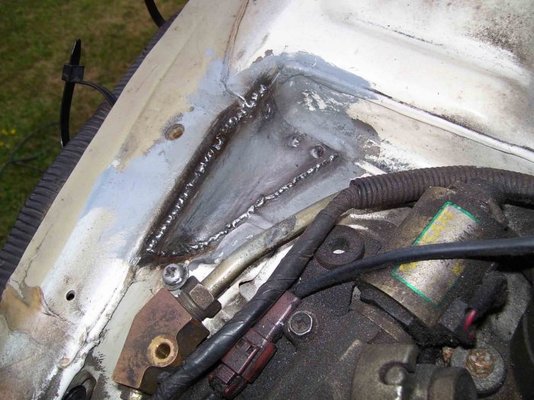
I thought I would tackle my first of 3 repair patches today on the drivers side wheel arch. After cutting out several attempts I finally got somewhere close, Who ever said welding is 90% preparation and 10% welding was not far wrong. I did not get as much penetration as I would have liked but hopefully I got enough. That said, I thought I would weld the underside, BAD IDEA!! still getting the dreaded buzzing blob affect. I may leave it or have another go tomorrow.
After cutting out several attempts I finally got somewhere close, Who ever said welding is 90% preparation and 10% welding was not far wrong. I did not get as much penetration as I would have liked but hopefully I got enough. That said, I thought I would weld the underside, BAD IDEA!! still getting the dreaded buzzing blob affect. I may leave it or have another go tomorrow.-
 23072010 A.jpg79.6 KB · Views: 1,020
 -
 23072010 B.jpg78.3 KB · Views: 1,024
 -
 23072010 C.jpg83.1 KB · Views: 1,017
 -
 23072010 D.jpg78 KB · Views: 1,036
 -
 23072010 E.jpg84.2 KB · Views: 1,037
 -
 23072010 F.jpg80.3 KB · Views: 1,029
 -
 23072010 G.jpg89.5 KB · Views: 1,031
 -
 23072010 H.jpg76.4 KB · Views: 1,035
redwine300
Silly Rabbit
- Messages
- 308
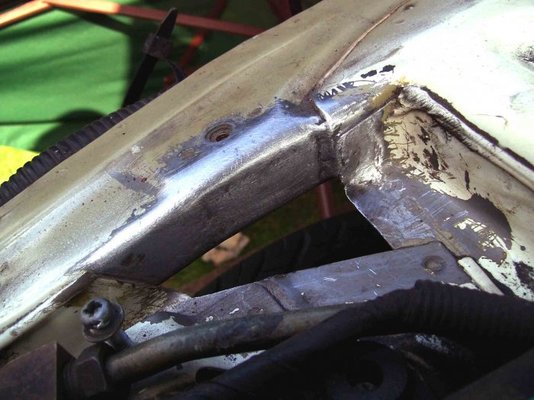
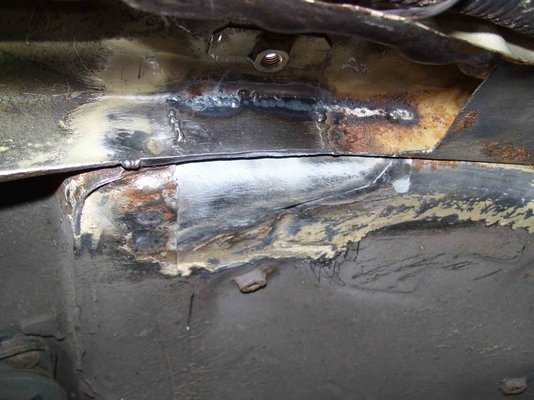
Moved on to the second of three repair patches today, took fewer attempts at cutting out and shaping due to a couple of templates in thin aluminium foil. One thing I have noticed along the way is, as I have been gradually lowering the wire speed to the point of burning back i have noticed that I have been burning through much less. Also the whole process seams to be more controllable and I am able to see more of whats going on. A down side of this could be the cause of the poor penetration or maybe i am not letting the weld pool form completely before move the torch along the joint. Which ever it is certainly helps with welding thin material, but i will have to improve the penetration somehow.
took fewer attempts at cutting out and shaping due to a couple of templates in thin aluminium foil. One thing I have noticed along the way is, as I have been gradually lowering the wire speed to the point of burning back i have noticed that I have been burning through much less. Also the whole process seams to be more controllable and I am able to see more of whats going on. A down side of this could be the cause of the poor penetration or maybe i am not letting the weld pool form completely before move the torch along the joint. Which ever it is certainly helps with welding thin material, but i will have to improve the penetration somehow.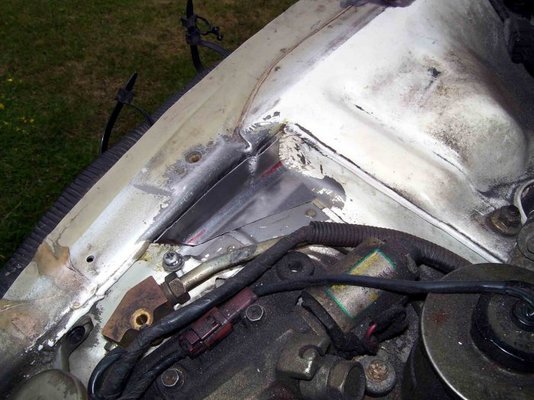

redwine300
Silly Rabbit
- Messages
- 308
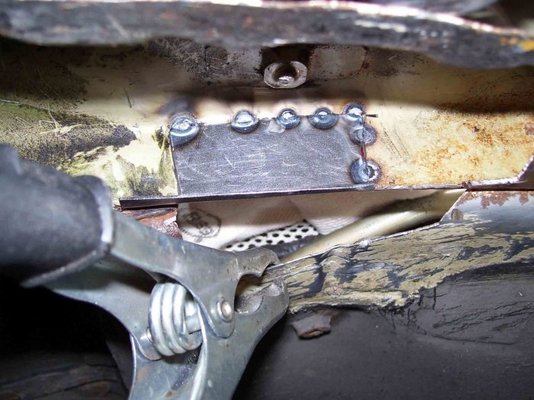
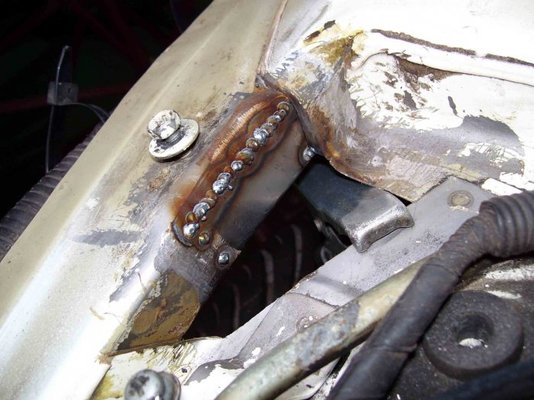
Sorry about the lack of posts, I have been away narrow boating up the Ashby canal. So as you can imagine, could not wait to get back to the job in hand. Finished off the grinding back of the weld then added a acid etch primer and base primer for now. I have tided up the underside also and the repair panel is ready and waiting. I have just got to do a little more practising with regards to welding underneath before I go for it.
By the way Sphinx, Your recent welding looks great, What setting were you using?
So as you can imagine, could not wait to get back to the job in hand. Finished off the grinding back of the weld then added a acid etch primer and base primer for now. I have tided up the underside also and the repair panel is ready and waiting. I have just got to do a little more practising with regards to welding underneath before I go for it.By the way Sphinx, Your recent welding looks great,
What setting were you using?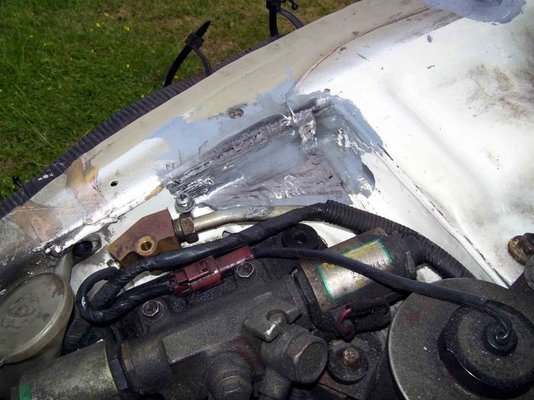

Sphinx
Member
- Messages
- 198
Oooo very neat! What etch primer are you using? I wasn't able to find a brush on one when I last looked.
As for the setting, it's a SIP....something or other (i forget lol), for the overhead with 0.6 wire I was using setting 2 with wire speed around 3.6. Was just enough to get good penetration but not vapourise the sill when I went near it.
What etch primer are you using? I wasn't able to find a brush on one when I last looked.As for the setting, it's a SIP....something or other (i forget lol), for the overhead with 0.6 wire I was using setting 2 with wire speed around 3.6. Was just enough to get good penetration but not vapourise the sill when I went near it.
redwine300
Silly Rabbit
- Messages
- 308
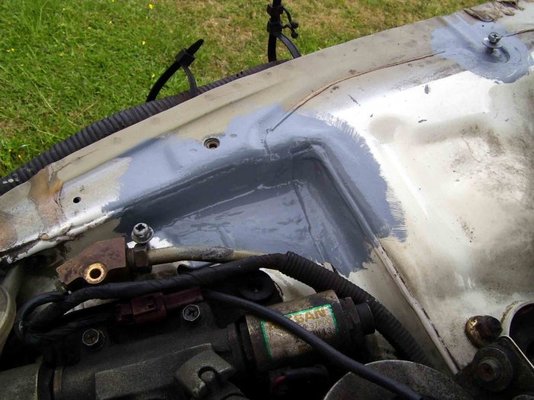
Thanks Sphinx, I hope to achieve the same level of underneath welding as yours today,weather permitting. Thanks for the settings by the way. As for the brush on primer, I got it on line from Bilt Hamber, some might say a bit on the expensive side but you only want to put etch primer on once so it may as well be the best. They also do a 90% Zinc brush-able primer which I use over the etch for those more vulnerable areas. So if all goes well I hope to be posting later on today, fingers crossed.
weather permitting. Thanks for the settings by the way. As for the brush on primer, I got it on line from Bilt Hamber, some might say a bit on the expensive side but you only want to put etch primer on once so it may as well be the best. They also do a 90% Zinc brush-able primer which I use over the etch for those more vulnerable areas. So if all goes well I hope to be posting later on today, fingers crossed.Sphinx
Member
- Messages
- 198
I might pick your brains about some of the bilt hamber products! I'm dead chuffed with the Dynax and have only every heard good reports on the rest of their range, I'd just like a little advice on which to use and when etc
As for the overhead welding, honestly fella going by this thread you are well ahead of me in terms of 'torch time' so you're bound to get it spot on in no time!
As for the overhead welding, honestly fella going by this thread you are well ahead of me in terms of 'torch time' so you're bound to get it spot on in no time!


