


Ton-up
Member
- Messages
- 2,369
- Location
- Essex, England.
I think I remember a question on here, quite a while ago, about masticing around a bath and as I had to do it today, I took a few photos how I do it, as it may help someone.
To me it's annoying when I see mastic thats been done with a radius tool, as it will lift within a short while. I see why bathroom fitters, etc do it as it looks good and is easy and quick to do.
If you do it like this, it will not lift and will last a long time.
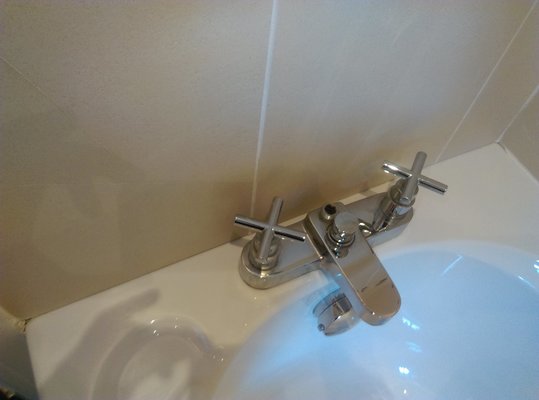
1) This is part of the bath I had to do in my bosses house, as you can see, this is a bit harder because the taps are really close to the wall. Here I have removed the old lifted sealer using a combination of stanley blade, screwdriver, etc. Be careful to push tools in towards the wall so you don't scratch the bath. Fill the bath half full with water.

2) Now heres the trick, lay masking tape along the bath and wall. You must use masking tape that is clean on the sides! Lay the tape to giva a gap as wide as you want the sealer, I like about 8mm for baths. Lay it as straight as possible. It was tight behind the taps here.

3) Now this is the important bit, find the correct tool to use for a radius. If you look at the photo, there is a gap at the edge of the bolt head above the edge of the tape. The bolt head is touching the tape about 2mm in from the tape edge. This is what you want.
In this instance I used a m8 gutter type bolt joined to a 8" length of studding to reach behind the taps. A silicon tool is ok, a washer, whatever, it doesnt matter.

4) Cut your silicon nozzle as big as the tool you are going to use. Squirt your silicone along the tape, making sure the gap is filled between tiles and bath. Again, it was difficult getting the nozzle behind taps, I did it but nearly had to find an extension!

5) run your tool along the seam, it will loook something like this.

6) pull the tape off straight away, pulling away from the sealer like in pic.

7) And you should end up with this, a curve with two flat edges on the sides. A bit like a scotia wood moulding. No feathering and no lifting. The sides can be as high as you like, here they are about half a mm, but I have made them 1.5 mm on sinks in commercial toilets.

I dont know if this a common way of doing it, I worked it out many years ago, but as I said, it may help someone!
I dont know what that pics doing here, V , its not on my draft!!!
To me it's annoying when I see mastic thats been done with a radius tool, as it will lift within a short while. I see why bathroom fitters, etc do it as it looks good and is easy and quick to do.
If you do it like this, it will not lift and will last a long time.
1) This is part of the bath I had to do in my bosses house, as you can see, this is a bit harder because the taps are really close to the wall. Here I have removed the old lifted sealer using a combination of stanley blade, screwdriver, etc. Be careful to push tools in towards the wall so you don't scratch the bath. Fill the bath half full with water.
2) Now heres the trick, lay masking tape along the bath and wall. You must use masking tape that is clean on the sides! Lay the tape to giva a gap as wide as you want the sealer, I like about 8mm for baths. Lay it as straight as possible. It was tight behind the taps here.
3) Now this is the important bit, find the correct tool to use for a radius. If you look at the photo, there is a gap at the edge of the bolt head above the edge of the tape. The bolt head is touching the tape about 2mm in from the tape edge. This is what you want.
In this instance I used a m8 gutter type bolt joined to a 8" length of studding to reach behind the taps. A silicon tool is ok, a washer, whatever, it doesnt matter.
4) Cut your silicon nozzle as big as the tool you are going to use. Squirt your silicone along the tape, making sure the gap is filled between tiles and bath. Again, it was difficult getting the nozzle behind taps, I did it but nearly had to find an extension!
5) run your tool along the seam, it will loook something like this.
6) pull the tape off straight away, pulling away from the sealer like in pic.
7) And you should end up with this, a curve with two flat edges on the sides. A bit like a scotia wood moulding. No feathering and no lifting. The sides can be as high as you like, here they are about half a mm, but I have made them 1.5 mm on sinks in commercial toilets.
I dont know if this a common way of doing it, I worked it out many years ago, but as I said, it may help someone!
I dont know what that pics doing here, V , its not on my draft!!!

 it's just one of those jobs, I can almost be guaranteed to make a right royal erse of ...


