


You are using an out of date browser. It may not display this or other websites correctly.
You should upgrade or use an alternative browser.
You should upgrade or use an alternative browser.
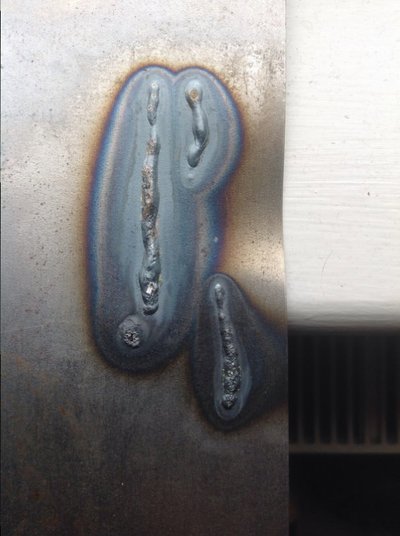
Fist couple weld lines on new gys 162
- Thread starter T2RESTO
- Start date

Wendelspanswick
Member
- Messages
- 6,471
Your travel speed is inconsistent and it looks like your torch was too high at the ends as the weld is porous.
Keep the torch close to the work, maintain the 70 deg angle and be consistent with your travel speed, draw a line with chalk or a marker and try and follow it.
Your wire speed looks ok as there is minimal spatter.
Persevere and you will get there!
Keep the torch close to the work, maintain the 70 deg angle and be consistent with your travel speed, draw a line with chalk or a marker and try and follow it.
Your wire speed looks ok as there is minimal spatter.
Persevere and you will get there!
pedrobedro
Man at Matalan
- Messages
- 13,117
- Location
- CX near Chesterfield
Push your torch forwards and use your spare hand to steady the swan neck or lean your gun hand on and it will help you keep a consistent speed and torch distance. People call it point and squirt welding but it's not a water pistol and it does take a bit of practise to get the hang of it. Lean round so you can see what the weld is doing as well.
norlander
Member
- Messages
- 3,385
- Location
- Europe, mocycling paradise
is that plate or sheet? looks like its warped?-but anyway, not bad,
Use two hands.
Go forwards (push) with gas and angle your head to see the pool
do a dry run-move the torch along the line without squeezing the trigger-with your mask up
draw a line on the steel and follow it, when you have cracked that, write some letters and numbers-this will teach you about angling your head and the torch to get the bead in
look at the leading edge of the pool and keep your eye on the line just in front of it
check that you can see clearly-in low light conditions- ie looking thru a welding mask- some peoples vision is impaired, you might need a corrective lens in your mask
the Gys is deceptive-its a powerful little beggar-but I reckon you will be ok from looking at the pics
keep doing the the runs on the flat and posting pics for the moment.
other stuff: clean the steel up before welding, including where you put the earth clamp.Look at the contacts on the earth clamp to make sure it has not been arcing if the welder plays up, the juice will fluctuate if you have a dodgy earth.
Nice job-you will be glad you got the Gys.
Tell us what mask you have and what brand of wire, and what gas you are usin
pedrobedro
Man at Matalan
- Messages
- 13,117
- Location
- CX near Chesterfield
I've bought 0.8 copper wire 5kg's made by super6. Using BOC argonsheild
The wire will be steel, it only has a thing coating of copper to preserve it. Argoshield is as good as it gets. Auto shields are good you can see clearer before you arc up for positioning and anything to make life easier is a boon.
I'm not quite sure I understand about using both hands on torch? I thought or at least remember only ever using one hand to work the torch then the other hand is available if needed to hold work if needed especially laying on my back underneath the side of my van ?
fixerupper
Member
- Messages
- 1,681
- Location
- Crete Greece
Each to his own, but if I need to hold some thing in place 'cos I cant get a clamp on it ,I do a few one handed tack welds then get get in a good position and do the actuall weld two handed right hand on the trigger with left hand to steady the torchat the swan neck ...jeff
norlander
Member
- Messages
- 3,385
- Location
- Europe, mocycling paradise
With MIG, the wire is only a diddy size electrode so any shake or a less than steady hand can set you wandering, ie, with MMA, rods under 2.5mm can be tricky to use, so its the norm to prop your MIG torch hand with your other hand.
Holding the workpiece with the other hand is ok for tacking up, but holding the job in position whilst laying a bead could see your holding hand getting a bit warm.
You will be more accurate, steadier and produce better welds using two hands.
Holding the workpiece with the other hand is ok for tacking up, but holding the job in position whilst laying a bead could see your holding hand getting a bit warm.
You will be more accurate, steadier and produce better welds using two hands.
Richard.
Member
- Messages
- 18,043
- Location
- Cambridgeshire
Consistency is your biggest enemy here. You've got varying travel speed, stick out, and direction all going on. In order to get things looking nice the above conditions all controlled by your arm need to be consistent. Get your self comfortable and support the torch in such a way that you can move it from (a) to (b) keeping a short stick out a steady and consistant speed and in a straight line. Do it without the arc over and over then flip the lid and do it with. Don't worry about torch angle for now or pushing/pulling. It's not important at this level. You need to master the a to b stuff straight and steady. Then move on to your angles and more indepth technique.


