Have you seen this link what e21resto put up on another thread on here ? http://www.2002tii-restoration.org/index.htm


You are using an out of date browser. It may not display this or other websites correctly.
You should upgrade or use an alternative browser.
You should upgrade or use an alternative browser.
1975 Bmw 2002
- Thread starter Satsuma
- Start date
hi, I should have posted that here too but it seems like you know what you are doing!
There is another too, an absolutely no expense spared 3 year resto (cant find the link I think the site is down) and some guys from bmw built a "new" one from a "spare" shell that survived unbuilt, its on youtube, easy to find.
The 2002 restoration site above is very helpful, most of the body is very similar to my e21 that I am having a go at. Will be even more helpful for you I'm sure!
I had a quick look for the other 2002 sites that I liked but instead found this which has more links than I could ever post here:
http://www.bmw2002faq.com/content/view/49/0/
This guy has a nice e12 resto project too:
www.tonybmw.co.uk/index.html
I just watched the 3 parts of the restoration of the 2002 on Youtube.Must have cost a fortune to build it.Interesting that on part 2 the man says that you can still buy spare parts for them.When the new seats and door cards were made they took templates so that they can supply them new again.I think it was only the headlining that they didnt have from stock by the end of the build. ")
At the end it says the price, over 6 figures it cost, though that is in euros. At least enough for a £70k well specced M5!
Those were the only items they didnt get from "stock" but they did start with a complete unused body shell (minus doors, trunk, bonnet and wings).
Those were the only items they didnt get from "stock" but they did start with a complete unused body shell (minus doors, trunk, bonnet and wings).
Hi All
I have made some progress on the drivers foot well and I did the front section of the inner sill today. Now there is some more rigidity on the drivers side I can hack out what is left of the inner sill and start on the rear wheel arch.
I removed the last owners patches and made some repairs on the support member than runs under the foot well and into the engine bay. Cleaning the metal and doing the plug welds near the firewall was a pain but well worth it.
Note the DIY "instergrip" I made up as a test and used on the sill, it works well so I'm going to make a set") beats buying them! £29.99 on ebay for four!! I will post a thread on how I made it if anyone is interested?
beats buying them! £29.99 on ebay for four!! I will post a thread on how I made it if anyone is interested?
Cheers
Ben
I have made some progress on the drivers foot well and I did the front section of the inner sill today. Now there is some more rigidity on the drivers side I can hack out what is left of the inner sill and start on the rear wheel arch.
I removed the last owners patches and made some repairs on the support member than runs under the foot well and into the engine bay. Cleaning the metal and doing the plug welds near the firewall was a pain but well worth it.
Note the DIY "instergrip" I made up as a test and used on the sill, it works well so I'm going to make a set
beats buying them! £29.99 on ebay for four!! I will post a thread on how I made it if anyone is interested?Cheers
Ben
Welding in a repair on the drivers side inner sill. I think I'm starting to get the hang of the welders power settings and my welds are gradually improving.
Ben
Ben

rusty69bus
moving to the goldcoast
- Messages
- 2,704
- Location
- limbo
I will post a thread on how I made it if anyone is interested?
cool post it in the projects thread, nice work by the way
I have a good M10 tii engine which I will be putting in the car. I have seen lots of cars with M3 engines and think they are cool but I prefer the M10 engine, it is solid, they can crank out a lot of HP and they sound great.
Besides if I up the HP I would need to upgrade the brakes, suspension etc which I can't afford.
Ben
Besides if I up the HP I would need to upgrade the brakes, suspension etc which I can't afford.
Ben
It’s been a while since I have got any work done on the BMW, but lately I have had the time to start work again. 
For those who have not read the thread and can't be bothered to read it:
I brought a 1975 BMW 2002 tii off a guy that started to restore it about 8 years ago, he made a real bodge of all the welding he did. Which included, foot wells, inner and outer sills, inner and outer rear wheel arches, rear sub frame mounts etc
I assumed the welding was done to a fair standard but as you can see from the images I posted at the start of the thread, it was very crap. :full
So I had no choice but to start from scratch!
I have so far been working on the driver side and have fixed the front inner wing, front foot well and part of the inner sill. I have now started on the rear wheel arch...
post to follow shortly...
The rear wheel arch...
The last owner fitted a repair panel, he also tried to replace the inner arch using a fabricated part. On the outside the repair looked ok...

But hidden behind was a nightmare of bad dirty welds, I thought long and hard about how I was going to put it right and it wasn't something I was looking forward to. To gain access to the rot I cut out the repair...

Some of the horror!


The last owner fitted a repair panel, he also tried to replace the inner arch using a fabricated part. On the outside the repair looked ok...
But hidden behind was a nightmare of bad dirty welds, I thought long and hard about how I was going to put it right and it wasn't something I was looking forward to. To gain access to the rot I cut out the repair...
Some of the horror!
(First new post is #52)
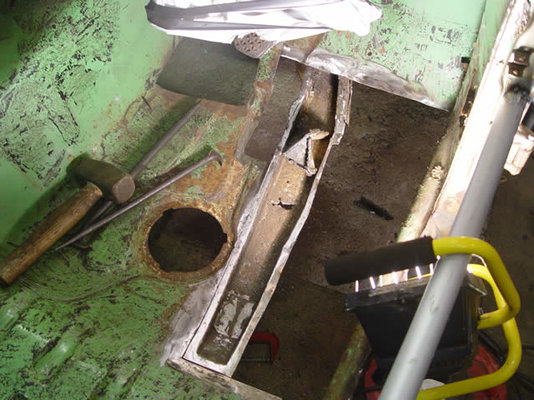
After the wheel arch was out of the way I was able to remove the outer sill, which took a lot of cutting discs, sweat and swearing.
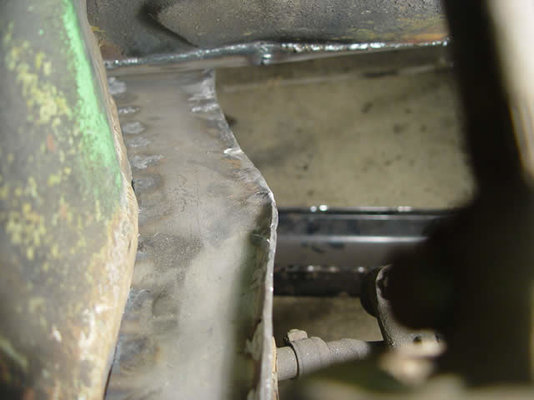
This then exposed the rear sub frame mount which the last owner had replaced, as with the rest it was a mess of weld and rust. He had also managed to weld the mount in wonky, look for the pipe piece in the photo it should be vertical but it’s at an angle. This took lots more grinding discs and labour to remove as he had made sure he welded this part on proper!


The new peice tacked in place.


I then turned my attention back to the arch, which is where I'm currently working. I will post again tomorrow to bring it up to date!
Cheers
Ben
After the wheel arch was out of the way I was able to remove the outer sill, which took a lot of cutting discs, sweat and swearing.
This then exposed the rear sub frame mount which the last owner had replaced, as with the rest it was a mess of weld and rust. He had also managed to weld the mount in wonky, look for the pipe piece in the photo it should be vertical but it’s at an angle. This took lots more grinding discs and labour to remove as he had made sure he welded this part on proper!
The new peice tacked in place.
I then turned my attention back to the arch, which is where I'm currently working. I will post again tomorrow to bring it up to date!
Cheers
Ben
rusty69bus
moving to the goldcoast
- Messages
- 2,704
- Location
- limbo
good work there, prep time is well spent
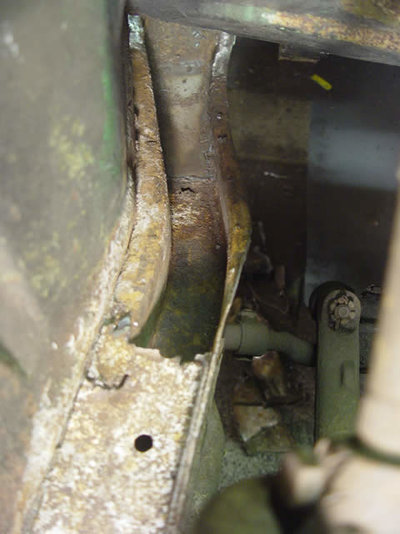
The inner wheel arch on the '02s has a tube which runs from front to back, for some reason part of this has been cut out. I'm not sure why as they don't normally rust there?
Half of the inner arch was also missing since I pulled out the bodged repair. Now with a gaping hole I had a choice of trying to patch the 'tube' and buy an inner arch repair panel, although I'm not sure they cover the entire area that was missing. Or turn to the other 2002 I brought, I poked the arches which seemed solid, with a bit of rot at the bottom of each side.
My first plan was to remove the entire quarter panel and cut out the inner arch, thinking that I could sell the panel, they are just under £500 to buy new. That plan soon changed as I decided to use the panel to replace the wheel arch.
Enough waffle...
Note the missing 1/4 of the tube.

3/4 of a 1973 2002tii :'(


umm... a bunch of discs later


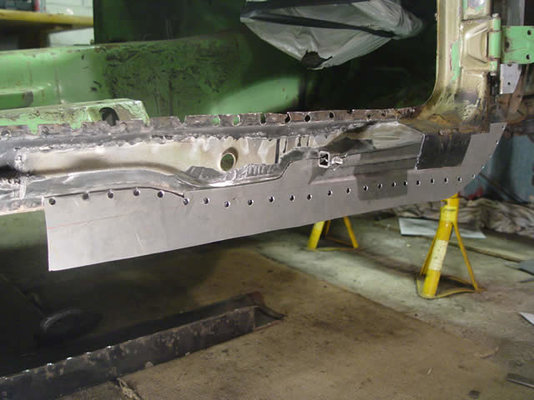
Test fit after I repaired the rotten parts, mainly on the bottom right side.

Tacked in place, just before I cut off the excess, with a 1mm disc through both layers in situe.

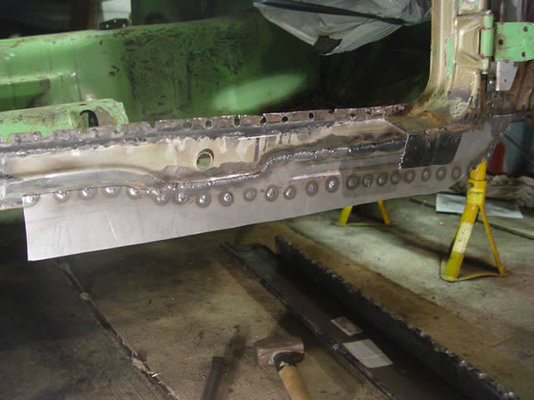
Most of the welding done

Cleaned up

Half of the inner arch was also missing since I pulled out the bodged repair. Now with a gaping hole I had a choice of trying to patch the 'tube' and buy an inner arch repair panel, although I'm not sure they cover the entire area that was missing. Or turn to the other 2002 I brought, I poked the arches which seemed solid, with a bit of rot at the bottom of each side.
My first plan was to remove the entire quarter panel and cut out the inner arch, thinking that I could sell the panel, they are just under £500 to buy new. That plan soon changed as I decided to use the panel to replace the wheel arch.
Enough waffle...
Note the missing 1/4 of the tube.
3/4 of a 1973 2002tii :'(
umm... a bunch of discs later
Test fit after I repaired the rotten parts, mainly on the bottom right side.
Tacked in place, just before I cut off the excess, with a 1mm disc through both layers in situe.
Most of the welding done
Cleaned up
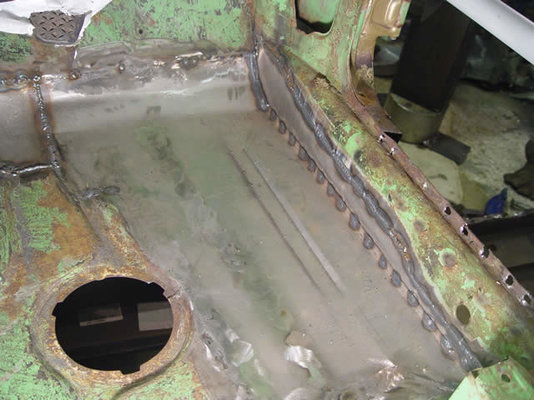
With the wheel arch back in I can start to rebuild areas leading into it. Its nice to start being constructive again, after many hours of grinding, cutting and removing etc
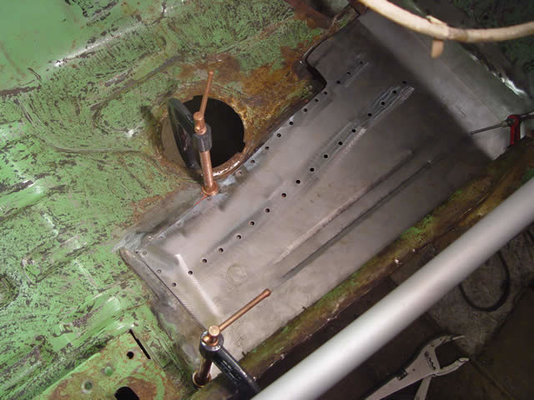
Over the last few days I tackled part of the boot floor...
Not to clear in the photo but they is a 1" gap along the side, underneath was a large dodgy patch. Part of it half blocking the hole towards the back.

Using the piece from the donor car I made a copy.


Over the last few days I tackled part of the boot floor...
Not to clear in the photo but they is a 1" gap along the side, underneath was a large dodgy patch. Part of it half blocking the hole towards the back.
Using the piece from the donor car I made a copy.
malcolm
& Clementine the Cat
- Messages
- 9,828
- Location
- Bedford UK
Proper job there - lovely to see. It's always a much more work to put things right when someone has botched the car beforehand. You have to cut their stuff and out and whatever they tried to attach it to.
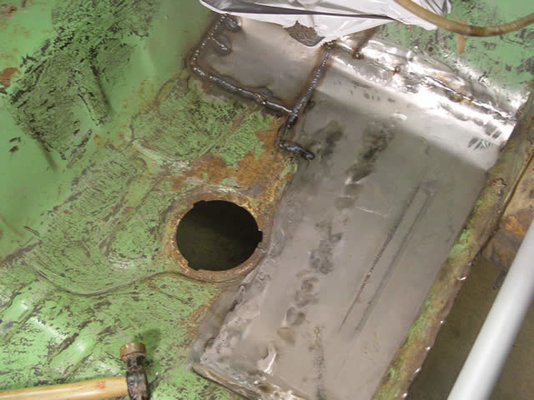
I like the swage in the boot panel. The bending looks neat too - how did you form the bends?
Looking forward to the next installment.
I like the swage in the boot panel. The bending looks neat too - how did you form the bends?
Looking forward to the next installment.
Thanks Malcolm and Rusty69bus.
I have cut out a lot more metal than should have been required to fix the initial rust, for the most part the previous repairs are a little more than tacked on leaving them as mud and water traps.
I formed the bends by hand on a home made anvil, see second pic from the bottom.
I have cut out a lot more metal than should have been required to fix the initial rust, for the most part the previous repairs are a little more than tacked on leaving them as mud and water traps.
I formed the bends by hand on a home made anvil, see second pic from the bottom.
Last edited:
rswinburne
Member
- Messages
- 69
Very good job m8. lots of work left. I would need alot of motivation to start something like this.. :P


