


I spent most of yesterday afternoon in the garage, making some progress with a couple of welds on my lathe table/cupboard (not shown) but also doing some other different welding with the TIG machine.
Apologies in advance - it might be a bit rambly (is that a word?) AND pics were taken on a phone (I bust my compact camera trying to fix it...)
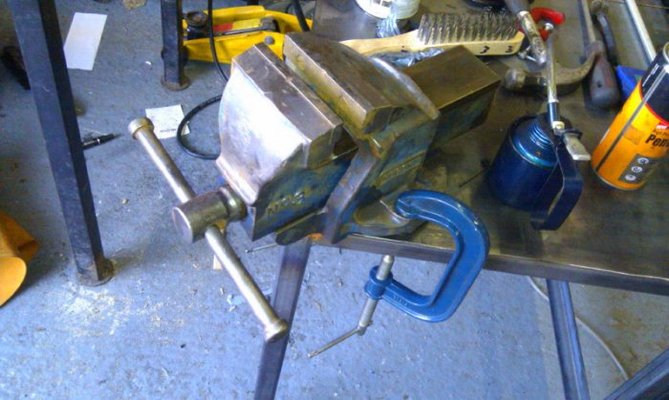
Pic 1 is a vice that's been in the family since, probably, before me. It had stood on a bench outside, albeit under a tarpauline, for a few years since the shed it was in fell down and got skipped. Needless to say, it was totally seized, and had liberal coatings of the brown dusty stuff. Cup brush in the angle grinder cleaned it up a treat, so did a load of penetrating oil. Now oiled with motor oil, (wanted something thick) it now spins with one finger, and may get a coat of blue paint, and of course nail it to the bench. (Sorry - not TIG that one)
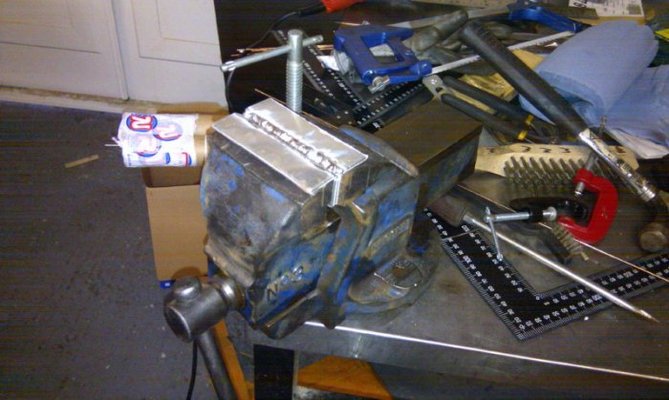
Pic 2 - same vice with ally vice guards - I decided to practice some aluminium welding, as for a stupid moment I thought the piece repaired at the bottom of this thread was aluminium. I prefer to have some sort of aim in mind even for the practice pieces.
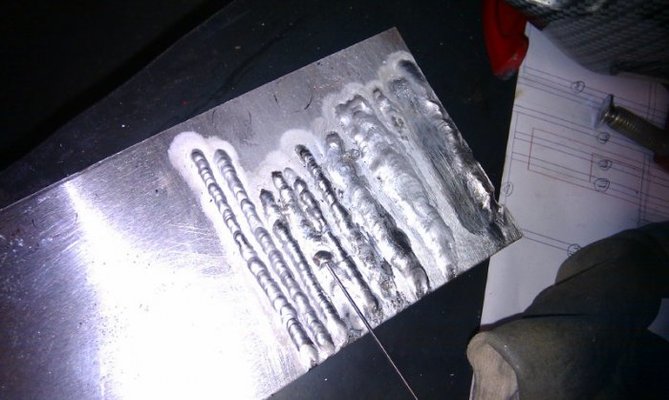
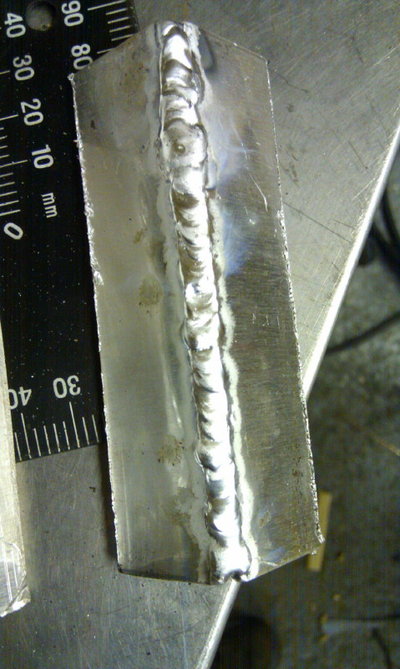
Pic 3 - shows some practice runs on aluminium. Wow, what a weird material to weld. I ws using 3mm sheet, with 1.6mm rods -- and do they need feeding fast. I sunk right through first attempt and learnt a lot. Toward the end I think I was starting to get the hang of getting a bead to sit on top, and phaving played with the settings a bit understand a bit more on frequency and cleaning settings. Also, travel speed/heat input - once you get that arc struck it really flies after a few seconds. Used the pedal to calm things down a bit. (FEEDBACK ON ANY OF THIS REALLY APPRECIATED!) Also, tungsten to workpiece distance far more critical on AC than DC. I did really note the reflection of the tungsten in the weld pool too - I thought it was some myth when I read about it first.
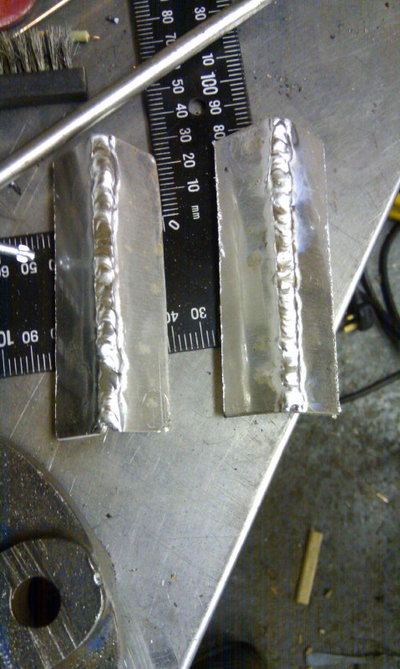
Pic 4,5,6 - thought I'd have a go at sticking two bits together, as practice and this created the vice jaw guards. Lot of learning over how the weld pool moves on aluminium. I needed filler rods in places to coax it along - I had heard that normally this type of weld can be done all autogenously, I couldn't achieve this. 3mm aluminium. - again any pointers fully appreciated.
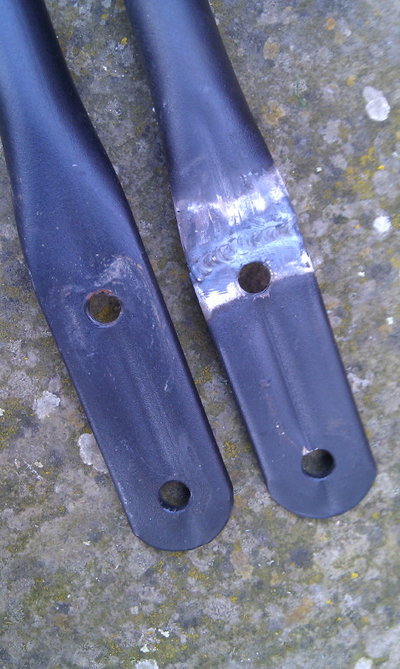
Lastly, 7 and 8 - just a repair I made to a mower handle part. I thought due to its lightness and lack of corrosion at the break/scratched parts it might actually be aluminium, and found it soft with my scriber. Forgot to do a test with a magnet until AFTER I'd tried to weld it as aluminium... I actually managed to lay about 10mm of bead down until it hopelessly blew a hole. Then found that the two pieces and the bead were, three pieces in total. So, grind off the contaminated pieces, back to a vee-prep (it's around 1.5mm-2mm thock tube flattened at the repair section) - then welded a repair down both sides. I had to redo one side as the first attempt was a little gash. The welds are nice and flush, handy for refitting, but people had given me previous feedback that my welds were undercutting, I've still yet to achieve the slightly concave welds that would be the strongest? Also - any tips for how to avoid the end of welds from necking in where they reach an edge?
If you've read this far - thanks very much !
Apologies in advance - it might be a bit rambly (is that a word?) AND pics were taken on a phone (I bust my compact camera trying to fix it...)
Pic 1 is a vice that's been in the family since, probably, before me. It had stood on a bench outside, albeit under a tarpauline, for a few years since the shed it was in fell down and got skipped. Needless to say, it was totally seized, and had liberal coatings of the brown dusty stuff. Cup brush in the angle grinder cleaned it up a treat, so did a load of penetrating oil. Now oiled with motor oil, (wanted something thick) it now spins with one finger, and may get a coat of blue paint, and of course nail it to the bench. (Sorry - not TIG that one)
Pic 2 - same vice with ally vice guards - I decided to practice some aluminium welding, as for a stupid moment I thought the piece repaired at the bottom of this thread was aluminium. I prefer to have some sort of aim in mind even for the practice pieces.
Pic 3 - shows some practice runs on aluminium. Wow, what a weird material to weld. I ws using 3mm sheet, with 1.6mm rods -- and do they need feeding fast. I sunk right through first attempt and learnt a lot. Toward the end I think I was starting to get the hang of getting a bead to sit on top, and phaving played with the settings a bit understand a bit more on frequency and cleaning settings. Also, travel speed/heat input - once you get that arc struck it really flies after a few seconds. Used the pedal to calm things down a bit. (FEEDBACK ON ANY OF THIS REALLY APPRECIATED!) Also, tungsten to workpiece distance far more critical on AC than DC. I did really note the reflection of the tungsten in the weld pool too - I thought it was some myth when I read about it first.
Pic 4,5,6 - thought I'd have a go at sticking two bits together, as practice and this created the vice jaw guards. Lot of learning over how the weld pool moves on aluminium. I needed filler rods in places to coax it along - I had heard that normally this type of weld can be done all autogenously, I couldn't achieve this. 3mm aluminium. - again any pointers fully appreciated.
Lastly, 7 and 8 - just a repair I made to a mower handle part. I thought due to its lightness and lack of corrosion at the break/scratched parts it might actually be aluminium, and found it soft with my scriber. Forgot to do a test with a magnet until AFTER I'd tried to weld it as aluminium... I actually managed to lay about 10mm of bead down until it hopelessly blew a hole. Then found that the two pieces and the bead were, three pieces in total. So, grind off the contaminated pieces, back to a vee-prep (it's around 1.5mm-2mm thock tube flattened at the repair section) - then welded a repair down both sides. I had to redo one side as the first attempt was a little gash. The welds are nice and flush, handy for refitting, but people had given me previous feedback that my welds were undercutting, I've still yet to achieve the slightly concave welds that would be the strongest? Also - any tips for how to avoid the end of welds from necking in where they reach an edge?
If you've read this far - thanks very much !
-
 Phone Pics FS_20110424_1079.jpg67.5 KB · Views: 705
 -
 Phone Pics FS_20110424_1080.jpg63.2 KB · Views: 694
 -
 Phone Pics FS_20110424_1081.jpg55.6 KB · Views: 685
 -
 Phone Pics FS_20110424_1086.jpg133.9 KB · Views: 712
 -
 Phone Pics FS_20110424_1087.jpg128.5 KB · Views: 701
 -
 Phone Pics FS_20110424_1088.jpg125.8 KB · Views: 712
 -
 Phone Pics FS_20110424_1089.jpg127.7 KB · Views: 702
 -
 Phone Pics FS_20110424_1090.jpg141.7 KB · Views: 697


