


I've had one of these

http://www.ebay.co.uk/itm/200472037005
for a while now so thought I'd best start tweaking it so I can use it for blasting small parts.
for many years Ive been using one of these blast guns (originally from Anglo Scot Abrasives)
http://www.frost.co.uk/car-autobody...sting/economy-gun-head-for-blast-cabinet.html
and they can be used with smaller compressors as they use 5-7cfm . so here is my old one, the white tube goes into a bucket of blast media, and the gate valve on a T connector is to allow air into the abrasive media, which stops it pulsing in the rubber tube, so works better.

and after seeing a few posts by @brightspark with his modifications to smaller cabinets (like on this thread)
http://www.mig-welding.co.uk/forum/...d-thoughts-and-ideas.30182/page-2#post-332370
I though I'd have a go with mine and adding an air valve
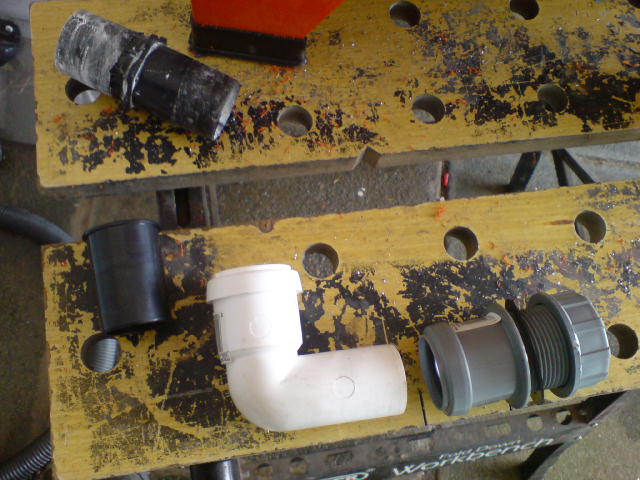
so I got some plumbing fittings and here they are with the original pick up for the grit(the silver coloured item)

machining the holes in the connector (just because you like pictures of things being made), it was just done on a rotary table as it was the easiest way to hold it,and was just centred by eye.

and the finished parts ready to be assembled.
there is a 15mm to 10mm compression reducer (the tube to the gun is a good fit over the 3/8 bsp thread. this is screwed into the connector with the holes in it, then under the cabinet is a 15mm compression elbow screwed into the connector with a very thin nut to hold it in place.

and from underneath with a copper tube to the front of the cabinet and lever valve to allow the air in.
When Brightspark increase the height of his cabinet, he welded on extensions to the legs, I would have done that, but the shelf my cabinet will stay on is too narrow and the front legs would be over the edge so a peice of wood solves both problems.
when not in use, I'll need to empty the grit out so I can move, but the tube in the middle gets in the way.

so the plumbing elbow was replaced by a T fitting and the grit hose was moved to the back of the cabinet (using a new connector with the 15mm to 10mm reducer.

not sure how long the brass and copper fittings with last with the abrasive grit, but only time will tell
and from inside the cabinet, it seems like it will be more useable with the grit hose at the back rather than in the middle.

I'll be using a wet and dry vacuum for dust extraction which was covered in this thread
http://www.mig-welding.co.uk/forum/...st-cabinet-dust-extraction.71045/#post-970897
but I'll copy it here
I got a cyclonic power filter for a vacuum cleaner
http://www.ebay.co.uk/itm/381438491108
no idea if it will work or not, but if it does its a neat answer to the dust problem.
so together with an earlex power tool adaptor, an adaptor that came with the filter, a 32mm 90 degree bend and a 32mm tank connector
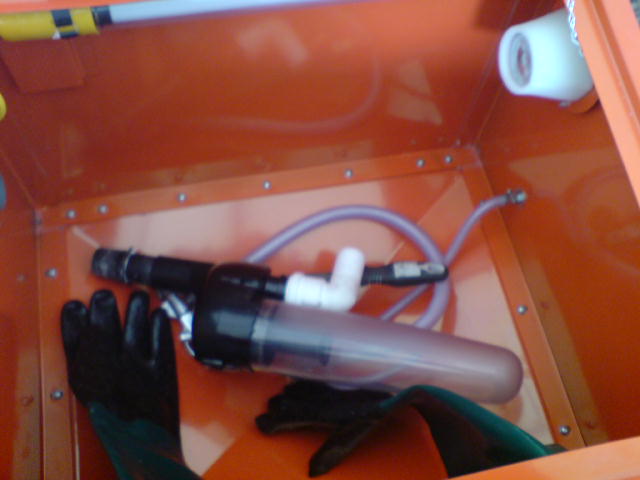
once you make a hole in the side of the blaster, its all goes together very easily
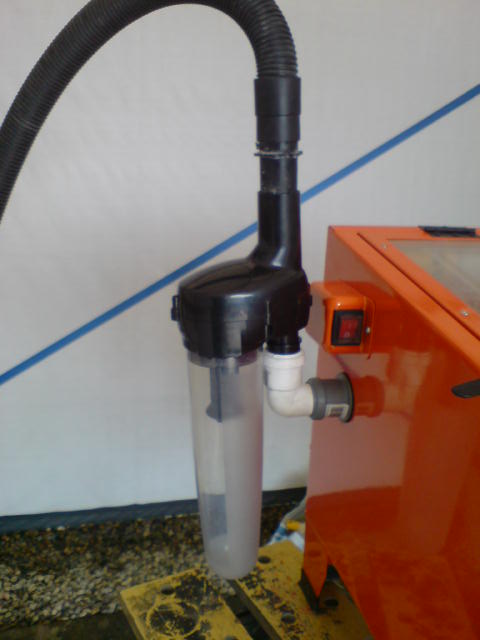
and is easy to keep in the blaster too for storage
so the vacuum cleaner appeared to work well, in fact too well, so I could have used a valve like this (which I used for a vaccum powered flowbench) to reduce the vaccum in the cabinet.

and after looking at @bigegg post about mains speed controllers
http://www.mig-welding.co.uk/forum/threads/mains-motor-speed-controller.70414/
I had the same controller for over a year but hadnt got round to using it, so here's my version


on the minimum speed there is still enough vaccum to extract the dust, but the real advantage is how much quieter the vacuum is when running at a slower speed
now all I need to do is sort the lighting out, I'm going for 12V led strips using 5630 LED's, then I'll be ready to go.

http://www.ebay.co.uk/itm/200472037005
for a while now so thought I'd best start tweaking it so I can use it for blasting small parts.
for many years Ive been using one of these blast guns (originally from Anglo Scot Abrasives)
http://www.frost.co.uk/car-autobody...sting/economy-gun-head-for-blast-cabinet.html
and they can be used with smaller compressors as they use 5-7cfm . so here is my old one, the white tube goes into a bucket of blast media, and the gate valve on a T connector is to allow air into the abrasive media, which stops it pulsing in the rubber tube, so works better.
and after seeing a few posts by @brightspark with his modifications to smaller cabinets (like on this thread)
http://www.mig-welding.co.uk/forum/...d-thoughts-and-ideas.30182/page-2#post-332370
I though I'd have a go with mine and adding an air valve
so I got some plumbing fittings and here they are with the original pick up for the grit(the silver coloured item)
machining the holes in the connector (just because you like pictures of things being made), it was just done on a rotary table as it was the easiest way to hold it,and was just centred by eye.
and the finished parts ready to be assembled.
there is a 15mm to 10mm compression reducer (the tube to the gun is a good fit over the 3/8 bsp thread. this is screwed into the connector with the holes in it, then under the cabinet is a 15mm compression elbow screwed into the connector with a very thin nut to hold it in place.
and from underneath with a copper tube to the front of the cabinet and lever valve to allow the air in.
When Brightspark increase the height of his cabinet, he welded on extensions to the legs, I would have done that, but the shelf my cabinet will stay on is too narrow and the front legs would be over the edge so a peice of wood solves both problems.
when not in use, I'll need to empty the grit out so I can move, but the tube in the middle gets in the way.
so the plumbing elbow was replaced by a T fitting and the grit hose was moved to the back of the cabinet (using a new connector with the 15mm to 10mm reducer.
not sure how long the brass and copper fittings with last with the abrasive grit, but only time will tell
and from inside the cabinet, it seems like it will be more useable with the grit hose at the back rather than in the middle.
I'll be using a wet and dry vacuum for dust extraction which was covered in this thread
http://www.mig-welding.co.uk/forum/...st-cabinet-dust-extraction.71045/#post-970897
but I'll copy it here
I got a cyclonic power filter for a vacuum cleaner
http://www.ebay.co.uk/itm/381438491108
no idea if it will work or not, but if it does its a neat answer to the dust problem.
so together with an earlex power tool adaptor, an adaptor that came with the filter, a 32mm 90 degree bend and a 32mm tank connector
once you make a hole in the side of the blaster, its all goes together very easily
and is easy to keep in the blaster too for storage
so the vacuum cleaner appeared to work well, in fact too well, so I could have used a valve like this (which I used for a vaccum powered flowbench) to reduce the vaccum in the cabinet.
and after looking at @bigegg post about mains speed controllers
http://www.mig-welding.co.uk/forum/threads/mains-motor-speed-controller.70414/
I had the same controller for over a year but hadnt got round to using it, so here's my version
on the minimum speed there is still enough vaccum to extract the dust, but the real advantage is how much quieter the vacuum is when running at a slower speed
now all I need to do is sort the lighting out, I'm going for 12V led strips using 5630 LED's, then I'll be ready to go.
 ) acting in the dust particles, but that's something that I'm not going to worry about.
 I bought the big bore hose kit for my Earlex and use it on the outlet with an Electrolux upright dust bag to catch anything that goes through the main filter. Doesn't stop the ultra fine dust but keeps the majority at bay. Plan is to duct it outside into a separate dustbin, one of those cyclone filters might improve that final filtration.