tom_uffington
New Member
- Messages
- 4
Hi, yet another wood burner I'm afraid!
I decided to learn to weld last year and used a lot of the information on this site to get started. I thought it would be best to learn by actually making something so decided to make a gas bottle wood burner for my Treehouse and to learn as I went along. It's a pretty big treehouse, 24feet long, 14feet wide with 2 floors, sofas, work bench etc so I needed a burner that could kick out a lot of heat as well as being reliable and safe.
This forum has been great for getting different ideas as well as learning about the technology behind efficient woodburners, baffles, air intakes etc.
I'm a student (doing Engineering) so everything was on a tight budget. In fact the only things I actually bought were the stove glass, rope and glue.
Here are some photos as well as a explanation of what I did, sorry if it's a bit long winded- I found when I was looking at some other projects it was really useful when people explained step by step how they'd done different bits.
I found an old bottle in a nearby hedge. Having read a lot of different things on here i took the valve off and filled the entire bottle with water before making the first cut (with the water still in):


Having cut the bottle down to size I marked it up and cut a hole for the door:


I wanted to have a baffle to increase heat output and to (hopefully) induce secondary combustion. I cut the baffle from a piece of 1mm steel (with hindsight probably too thin) so that it would cover over 3/4 of the area of the burner and positioned it approximately an inch above the top of the door hole:


I had been given most of the steel sheets I was using from the local MOD indoor test range, so a lot of the sheets had the occasional bullet holes in. This piece I used for the top plate and cut the 5inch hole for the flue to cut out the holes:

Frustratingly, the brushes of my grinder decided to wear out mid cut, causing a bit of a delay:

Initially I had planned to use an old motorway signpost for the chimney (5inch diameter) so, having used a bonfire to remove all of the old grey paint from the tube, I cut a short section, expanded it and welded an extra plate in with the idea that the tube would fit snuggly inside it. I then welded this onto the top plate:


I then cut a piece to from the left over section of gas bottle to make the base of the door. This was an inch and a half bigger than the hole in all directions and worked well because it had exactly the same curve as the burner itself. This would eventually be hinged to the burner with a pane of stove glass in:


I cut 2 curved sections from a piece of right angle to fit the curve of the door as well as 2 straight sections. I welded these onto the door base to make the frame for the glass to sit in. I wanted a smooth looking finish so smoother out all the welds using the grinder; initially with a grinding disk and then with a flap disk:


I then bent a couple of bits of steel in the vice, using a hammer to gradually shape them into circles to use as the hinges. I'd read about people using old door hinges but them rusting quickly so wanted something that looked good but allowed for a bit of rust without it stopping it opening and shutting easily.

Next I made the other part of the hinge. I cut a couple of inch long section of round steel bar and then drilled the same size hole in a small piece of steel for them to fit into. I decided it would be easier to weld the plates onto the woodburner first before welding the round pieces in because I could use my right angle magnets to hold them in place. I used a bench grinder to shape the plates to fit the curve of the burner body.

With a bit of adjustment with the hammer the door slotted nicely onto the burner and swung easily open and closed.


I'd been trying to work out the best way to close the door for a while, I wanted something that worked well but didn't look to bulky or cumbersome. In the end it was the door of my Grandma's Aga which gave me the answer. The hinges I'd made had enough 'play' in them that if I welded a slanted section onto the burner body and a handle on the door at a right angle I could lift the door slightly over the ridge and gravity would hold the door in place:

Having done some research into how wood burners work, I initially had planned to have a pre heating system whereby the air was sucked in right at the bottom of the fire, passing through the fire to pre heat it before being injected onto the underside of the baffle to encourage secondary combustion. However, the treehouse was cold and I wanted to finish the burner so decided to leave that for my next project.
Instead I decided on two simple air intakes at the back of the burner, one 4 inches above where I anticipated the fire bed to be and one 2 inches below the baffle. I wanted them to be fully adjustable so used exactly the same system as the burner door, just with only one hinge for each hole. I forgot to take a photo of the covers but they were also cut from the left over section of gas bottle to get the right curve to fit snuggly over the burner body and had a handle just like the one on the main door:

I wanted the burner to be supported by a single tube, like another design I'd seen on this forum. The only suitable pipe I had was an old galvanised scaffold tube. I'd been warned about the dangers of welding galvanised steel (flu like symtoms for a few days +) but having spoken to a couple of more experienced welders they suggested as long as I ground the outer layer off I should be fine. Easy to do on the outside with the grinder, more tricky on the inside with a round file. In the end I opened the garage door, tried to hold my breath and just did it.
The extra bits of wood and steel are to make sure I welded it on at the right angle:

Here's another angle with the door (and glass) in place:

I put a heavy base plate on the bottom before using flap disks to remove all the paint and weld splatter ready for painting:

I bought the stove paint, glass, rope seals and glue all from a shop on ebay. I had to get the glass custom cut to fit the door so could have probably saved a few pounds if I'd planned ahead and made the door a standard stove size. (for interests sake, it was about £20 for the glass alone).
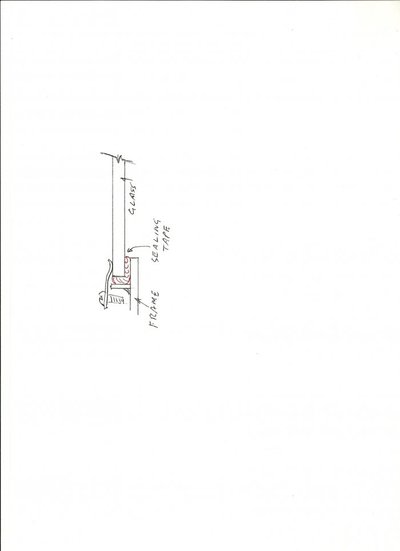
One problem I had, and wasn't happy with the solution I came up with, was how to hold the glass in place on the door. In the end I decided to weld a couple of thin strips of steel onto the inside of the pieces of right angled steel I'd used to make the frame of the door with the plan to put the glass in and bend them into place to hold it firm. However, this kind of worked but I managed to crack the glass when trying to bend them securely into place (using a screw driver, which slipped!). Any suggestions would be great...?
The burner seems to work really well. Closing up the front door and just having the bottom back vent open seems to really get it roaring. I got a meter section of the chimney glowing red hot last week!
In the end I needed a much longer chimney than I anticipated with two 60degree kinks in, so instead of using the motorway sign post as originally planned I used bought a 3m section of 5inch galvanised spiral piping from a local airconditioning contractor as well as two 45degree bend sections which I modified to 60degrees. The same issues with heating zinc galvanising applied to the chimney as did to the scaffold pole (this time from the fire itself as opposed to the welding) but I just made sure to have the treehouse door open for the first proper burn as the galvanising burns off. You can see where the heat has got to it because it changes from shiny to matt:

Heres a couple of photos of it in place in the treehouse (this was taken last friday, it was -1 and snowing outside but I was sat comfortably in a t-shirt):


Note: The rope seal had fallen off at this point due to getting wet but is now securely back on.
And a picture of the treehouse itself:

Thanks for looking/reading,
Tom
I decided to learn to weld last year and used a lot of the information on this site to get started. I thought it would be best to learn by actually making something so decided to make a gas bottle wood burner for my Treehouse and to learn as I went along. It's a pretty big treehouse, 24feet long, 14feet wide with 2 floors, sofas, work bench etc so I needed a burner that could kick out a lot of heat as well as being reliable and safe.
This forum has been great for getting different ideas as well as learning about the technology behind efficient woodburners, baffles, air intakes etc.
I'm a student (doing Engineering) so everything was on a tight budget. In fact the only things I actually bought were the stove glass, rope and glue.
Here are some photos as well as a explanation of what I did, sorry if it's a bit long winded- I found when I was looking at some other projects it was really useful when people explained step by step how they'd done different bits.
I found an old bottle in a nearby hedge. Having read a lot of different things on here i took the valve off and filled the entire bottle with water before making the first cut (with the water still in):
Having cut the bottle down to size I marked it up and cut a hole for the door:
I wanted to have a baffle to increase heat output and to (hopefully) induce secondary combustion. I cut the baffle from a piece of 1mm steel (with hindsight probably too thin) so that it would cover over 3/4 of the area of the burner and positioned it approximately an inch above the top of the door hole:
I had been given most of the steel sheets I was using from the local MOD indoor test range, so a lot of the sheets had the occasional bullet holes in. This piece I used for the top plate and cut the 5inch hole for the flue to cut out the holes:
Frustratingly, the brushes of my grinder decided to wear out mid cut, causing a bit of a delay:
Initially I had planned to use an old motorway signpost for the chimney (5inch diameter) so, having used a bonfire to remove all of the old grey paint from the tube, I cut a short section, expanded it and welded an extra plate in with the idea that the tube would fit snuggly inside it. I then welded this onto the top plate:
I then cut a piece to from the left over section of gas bottle to make the base of the door. This was an inch and a half bigger than the hole in all directions and worked well because it had exactly the same curve as the burner itself. This would eventually be hinged to the burner with a pane of stove glass in:
I cut 2 curved sections from a piece of right angle to fit the curve of the door as well as 2 straight sections. I welded these onto the door base to make the frame for the glass to sit in. I wanted a smooth looking finish so smoother out all the welds using the grinder; initially with a grinding disk and then with a flap disk:
I then bent a couple of bits of steel in the vice, using a hammer to gradually shape them into circles to use as the hinges. I'd read about people using old door hinges but them rusting quickly so wanted something that looked good but allowed for a bit of rust without it stopping it opening and shutting easily.
Next I made the other part of the hinge. I cut a couple of inch long section of round steel bar and then drilled the same size hole in a small piece of steel for them to fit into. I decided it would be easier to weld the plates onto the woodburner first before welding the round pieces in because I could use my right angle magnets to hold them in place. I used a bench grinder to shape the plates to fit the curve of the burner body.
With a bit of adjustment with the hammer the door slotted nicely onto the burner and swung easily open and closed.
I'd been trying to work out the best way to close the door for a while, I wanted something that worked well but didn't look to bulky or cumbersome. In the end it was the door of my Grandma's Aga which gave me the answer. The hinges I'd made had enough 'play' in them that if I welded a slanted section onto the burner body and a handle on the door at a right angle I could lift the door slightly over the ridge and gravity would hold the door in place:
Having done some research into how wood burners work, I initially had planned to have a pre heating system whereby the air was sucked in right at the bottom of the fire, passing through the fire to pre heat it before being injected onto the underside of the baffle to encourage secondary combustion. However, the treehouse was cold and I wanted to finish the burner so decided to leave that for my next project.
Instead I decided on two simple air intakes at the back of the burner, one 4 inches above where I anticipated the fire bed to be and one 2 inches below the baffle. I wanted them to be fully adjustable so used exactly the same system as the burner door, just with only one hinge for each hole. I forgot to take a photo of the covers but they were also cut from the left over section of gas bottle to get the right curve to fit snuggly over the burner body and had a handle just like the one on the main door:
I wanted the burner to be supported by a single tube, like another design I'd seen on this forum. The only suitable pipe I had was an old galvanised scaffold tube. I'd been warned about the dangers of welding galvanised steel (flu like symtoms for a few days +) but having spoken to a couple of more experienced welders they suggested as long as I ground the outer layer off I should be fine. Easy to do on the outside with the grinder, more tricky on the inside with a round file. In the end I opened the garage door, tried to hold my breath and just did it.
The extra bits of wood and steel are to make sure I welded it on at the right angle:
Here's another angle with the door (and glass) in place:
I put a heavy base plate on the bottom before using flap disks to remove all the paint and weld splatter ready for painting:
I bought the stove paint, glass, rope seals and glue all from a shop on ebay. I had to get the glass custom cut to fit the door so could have probably saved a few pounds if I'd planned ahead and made the door a standard stove size. (for interests sake, it was about £20 for the glass alone).
One problem I had, and wasn't happy with the solution I came up with, was how to hold the glass in place on the door. In the end I decided to weld a couple of thin strips of steel onto the inside of the pieces of right angled steel I'd used to make the frame of the door with the plan to put the glass in and bend them into place to hold it firm. However, this kind of worked but I managed to crack the glass when trying to bend them securely into place (using a screw driver, which slipped!). Any suggestions would be great...?
The burner seems to work really well. Closing up the front door and just having the bottom back vent open seems to really get it roaring. I got a meter section of the chimney glowing red hot last week!
In the end I needed a much longer chimney than I anticipated with two 60degree kinks in, so instead of using the motorway sign post as originally planned I used bought a 3m section of 5inch galvanised spiral piping from a local airconditioning contractor as well as two 45degree bend sections which I modified to 60degrees. The same issues with heating zinc galvanising applied to the chimney as did to the scaffold pole (this time from the fire itself as opposed to the welding) but I just made sure to have the treehouse door open for the first proper burn as the galvanising burns off. You can see where the heat has got to it because it changes from shiny to matt:
Heres a couple of photos of it in place in the treehouse (this was taken last friday, it was -1 and snowing outside but I was sat comfortably in a t-shirt):
Note: The rope seal had fallen off at this point due to getting wet but is now securely back on.
And a picture of the treehouse itself:
Thanks for looking/reading,
Tom
Last edited:

")