


rcx132
Philip
- Messages
- 2,705
- Location
- London, UK
My trusty Vitara was starting to show some serious rust problems last year so I thought I'd strip off the bits, repaint them, and weld up any holes. But after starting the work it's turned into a full restoration.
You might ask why restore a Vitara. Well I love this little car, I love how it handles like a go kart, how I can feel what every corner of the car is doing when I drift round corners, I love the high up feel of a 4x4, and I love how nippy it is. In my opinion, the Vitara is probably the best handling 4x4 there is.
Over the years the car has had some serious modifications, from suspension lift to gearbox and drivetrain mods, so I also want to save my investment.
So this is the little bugg'er shortly after I got it. It already had an American suspension lift kit fitted and I can't even remember what those wheels were from:

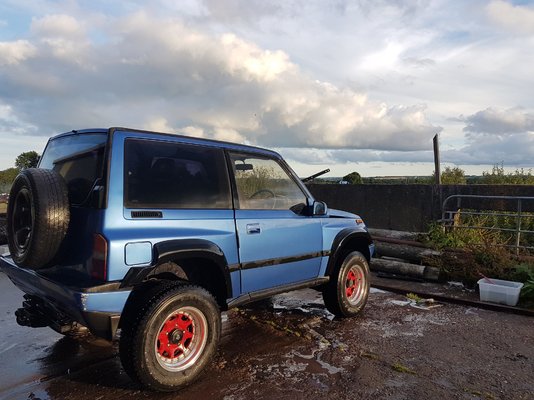
Over the years it got a lot of mods, some body work, full all round armour, drivetrain was strengthened, gear ratio mods, diff locks, and a whole bunch of small bits and bobs. This was it a few years ago:

The restoration started a few months ago with a total strip down to the chassis.
All the bracketry, wishbones, control arms, anything that could be removed was sand blasted or stripped with caustic soda and electrolytic. Both methods are good and have their advantages. Electrolytic will also clean cavities so some parts were better off in the electrolytic tank.
This time I preppared myself properly for painting with pole to hand things from, and back curtain to stop spray getting all over my garage. The parts are being sprayed with Jotun epoxy primer. For anyone considering using one part paint like hammerite, DON'T BOTHER ! I've had Hammerite fail after just a few months. The previous owner of this car had the suspension sand blasted, zinc primed and painted with several coats of industrial paint, and that only lasted 6 years. I'm hoping epoxy primer will last 15 years.

Meanwhile, waiting for the paint to dry, I start on the chassis.

First, check that it's still straight! Because this car has had some serious abuse, it's done jumps and worse. Thankfully it is straight! Everything is within a few mm. Long tape measure and measure in crosses to check it's all square.

Next, started drilling some access holes. These will be used to jet blast the mud out from inside the chassis and later to wax the inside. I decided against galvanising because it requires the chassis to be professionally cleaned for the zinc to stick to the inside, so it all adds up to a grand with transport. Waxing is supposed to be very effective but the cavities need to be re-waxed every three years. Once you have your access hole, waxing with probes is easy. Also I drilled drain holes in a few places that were trapping water (no photo).

Here I'm testing a furniture plug to see if it fits the hole. It does:

Before sand blasting, the underseal needs to come off. It comes off quick with a hot air gun and decent scraper. A wire brush for getting it off corners:

Only a few rust areas, the first one is the only bad one. The others are just holes.


That's it for now. Still got a lot of underseal to remove, more parts to paint, and then to start welding the rust holes.
You might ask why restore a Vitara. Well I love this little car, I love how it handles like a go kart, how I can feel what every corner of the car is doing when I drift round corners, I love the high up feel of a 4x4, and I love how nippy it is. In my opinion, the Vitara is probably the best handling 4x4 there is.
Over the years the car has had some serious modifications, from suspension lift to gearbox and drivetrain mods, so I also want to save my investment.
So this is the little bugg'er shortly after I got it. It already had an American suspension lift kit fitted and I can't even remember what those wheels were from:
Over the years it got a lot of mods, some body work, full all round armour, drivetrain was strengthened, gear ratio mods, diff locks, and a whole bunch of small bits and bobs. This was it a few years ago:
The restoration started a few months ago with a total strip down to the chassis.
All the bracketry, wishbones, control arms, anything that could be removed was sand blasted or stripped with caustic soda and electrolytic. Both methods are good and have their advantages. Electrolytic will also clean cavities so some parts were better off in the electrolytic tank.
This time I preppared myself properly for painting with pole to hand things from, and back curtain to stop spray getting all over my garage. The parts are being sprayed with Jotun epoxy primer. For anyone considering using one part paint like hammerite, DON'T BOTHER ! I've had Hammerite fail after just a few months. The previous owner of this car had the suspension sand blasted, zinc primed and painted with several coats of industrial paint, and that only lasted 6 years. I'm hoping epoxy primer will last 15 years.
Meanwhile, waiting for the paint to dry, I start on the chassis.
First, check that it's still straight! Because this car has had some serious abuse, it's done jumps and worse. Thankfully it is straight! Everything is within a few mm. Long tape measure and measure in crosses to check it's all square.
Next, started drilling some access holes. These will be used to jet blast the mud out from inside the chassis and later to wax the inside. I decided against galvanising because it requires the chassis to be professionally cleaned for the zinc to stick to the inside, so it all adds up to a grand with transport. Waxing is supposed to be very effective but the cavities need to be re-waxed every three years. Once you have your access hole, waxing with probes is easy. Also I drilled drain holes in a few places that were trapping water (no photo).
Here I'm testing a furniture plug to see if it fits the hole. It does:
Before sand blasting, the underseal needs to come off. It comes off quick with a hot air gun and decent scraper. A wire brush for getting it off corners:
Only a few rust areas, the first one is the only bad one. The others are just holes.
That's it for now. Still got a lot of underseal to remove, more parts to paint, and then to start welding the rust holes.


")


 what sort of pressure did you run it at?.