


Its been a while since I've had any non-work related projects to contribute, but recently I was asked by my parents if I could make a pond cover to help make their garden a bit more child friendly, now that my niece is just about to start walking and is into exploring everywhere.
As I was going to build it at theirs over the Easter bank holiday, I wanted to be able to do it in one hit and not worry about having to organise finishes such as galvanising and painting afterwards. For this reason and minimal maintenance thereafter, I went for 304 stainless bar (10mm) instead of mild steel.
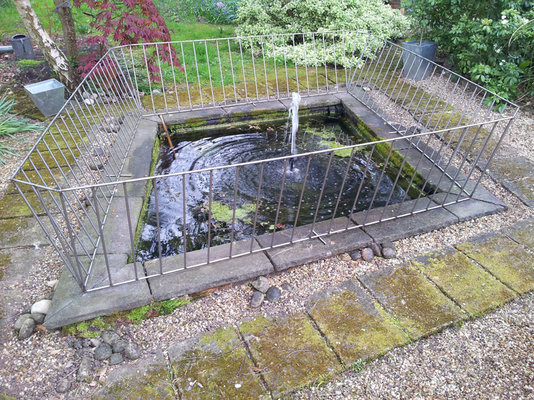
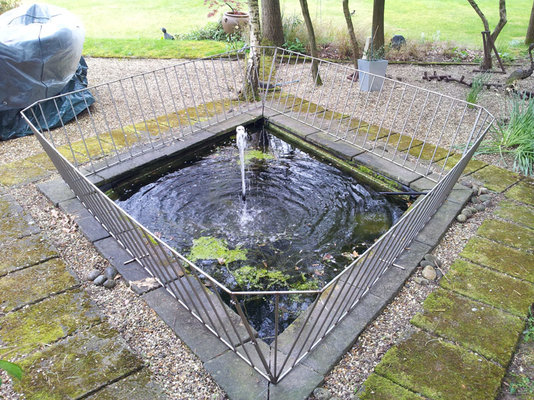
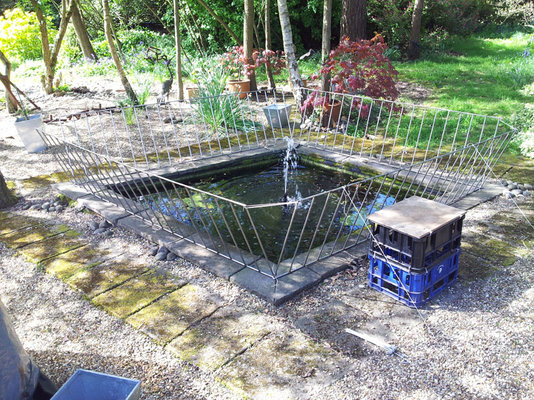
Originally I was thinking of a full on cover, but my parents wanted easy access to clean the pond without having to lift a heavy structure out the way. In the end we went for some mini railings instead, which should be tall enough until she understands the dangers of water etc..
I sloped the railings outwards for a few reasons:
- Makes them harder to climb over as she grows.
- Might have a nice visual dynamic with the diamond shape of the pond.
- Also leaves the pond more visually open instead encroaching on it.
Here’s a couple of pics of the finished item (with more pics / info further down the page):
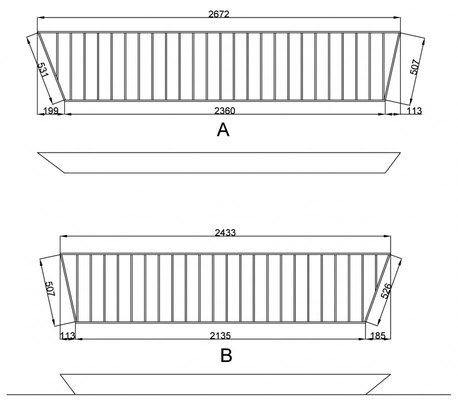
Rough fabrication drawings – which as usual went out the window even before the first bit of metal was cut. The four main panels were squared up allowing triangular infill panels at the corner. This simplified the whole build process and crucially removed the nasty outward pointing corners of my original design that would have been at the little’uns head height.
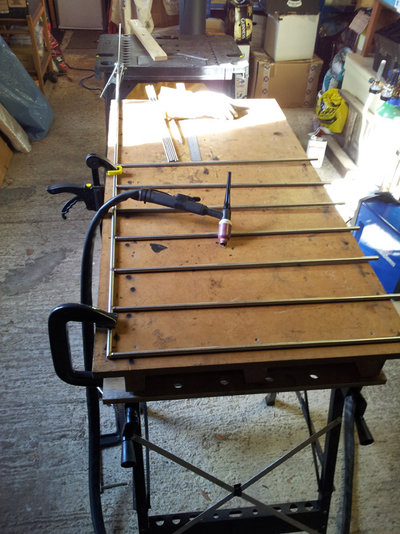
Start tacking together the first panel. Working on a small temporary bench made things a bit more challenging, but once I got a sequence going it was not too bad.
Setting out of the four main panels to get the desired outward lean and placement on the perimeter slabs. The four triangular parts were then made to fill the corner gaps left, and welded to two of the main panels.
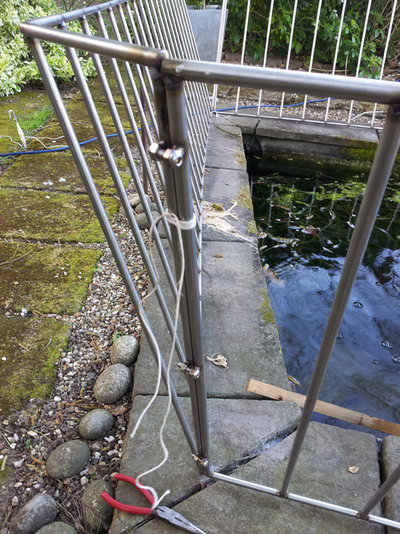
Ideally I would have liked to have drilled and tapped the stainless bar to connect the panels together and get a hidden fixing but I was running out of time/patience so I ended up going for a bit more of an agricultural solution. I used some stainless bolts which I tacked on whilst in situ (careful to avoid any elec / H2O interface), before welding back safely inside.

By the end it was starting to feel like a busman’s holiday so I didn’t try to tidy the railings up too much just knock of sharp edges etc.., luckily my parents seem to like the discolouration around the welds so I didn’t feel too guilty.
Cheers,
Mark
As I was going to build it at theirs over the Easter bank holiday, I wanted to be able to do it in one hit and not worry about having to organise finishes such as galvanising and painting afterwards. For this reason and minimal maintenance thereafter, I went for 304 stainless bar (10mm) instead of mild steel.
Originally I was thinking of a full on cover, but my parents wanted easy access to clean the pond without having to lift a heavy structure out the way. In the end we went for some mini railings instead, which should be tall enough until she understands the dangers of water etc..
I sloped the railings outwards for a few reasons:
- Makes them harder to climb over as she grows.
- Might have a nice visual dynamic with the diamond shape of the pond.
- Also leaves the pond more visually open instead encroaching on it.
Here’s a couple of pics of the finished item (with more pics / info further down the page):
Rough fabrication drawings – which as usual went out the window even before the first bit of metal was cut. The four main panels were squared up allowing triangular infill panels at the corner. This simplified the whole build process and crucially removed the nasty outward pointing corners of my original design that would have been at the little’uns head height.
Start tacking together the first panel. Working on a small temporary bench made things a bit more challenging, but once I got a sequence going it was not too bad.
Setting out of the four main panels to get the desired outward lean and placement on the perimeter slabs. The four triangular parts were then made to fill the corner gaps left, and welded to two of the main panels.
Ideally I would have liked to have drilled and tapped the stainless bar to connect the panels together and get a hidden fixing but I was running out of time/patience so I ended up going for a bit more of an agricultural solution. I used some stainless bolts which I tacked on whilst in situ (careful to avoid any elec / H2O interface), before welding back safely inside.
By the end it was starting to feel like a busman’s holiday so I didn’t try to tidy the railings up too much just knock of sharp edges etc.., luckily my parents seem to like the discolouration around the welds so I didn’t feel too guilty.
Cheers,
Mark


