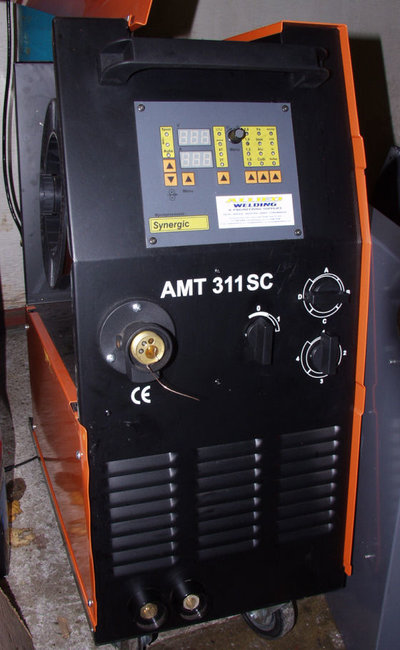
I have bought a Butters AMT311SC MIG, it is the new version of the classic 311 but with the syngeneic panel. Unfortunately the previous owner has lost the user manual so this machine is difficult to set-up without it. I have spoken to the retailer, they are waiting for more machines to be supplied from Butters so suggested I contact Butters. Butters old website now links to default blue and there new website butterswelding.com is incomplete to say the least!! I have written twice and emailed Butters several times in the last 6 weeks but have not had a single reply. I have previously found Butters to be very helpful but they have let me down over my request for a manual for this machine. Can anyone help please? Thanks Pete.


You are using an out of date browser. It may not display this or other websites correctly.
You should upgrade or use an alternative browser.
You should upgrade or use an alternative browser.
Butters AMT 311SC user manual wanted
- Thread starter Murgy
- Start date
English Steve
Senior Bumpkin
- Messages
- 1,127
I believe Butters AMT went squit recently, and are now busy re-inventing themselves hence the website situation. I think you may need to be a bit patient for a while - I am sure they will get back to their helpful ways shortly, but supplying a manual is probably not at the top of their priority list at the moment.
As Archie mentioned, DIYWelding may be able to help.
As Archie mentioned, DIYWelding may be able to help.
Thanks for your replies Archie and Steve. I did phone Butters initially but there was some confusion over the exact model thus the emails and letters with photos and serial number.
I hope you are right about Butters getting sorted soon they have been a fine example of customer service in the past.
I hope you are right about Butters getting sorted soon they have been a fine example of customer service in the past.
- Messages
- 21,548
- Location
- Birmingham
I think that one of the previous directors is going to start a new company.
Bob?
If Butters AMT has gone bust that is very worrying for all of us with their products and especially as many machines were bought because of the 7 year warrantee they offered. Does anyone know the facts behind the current problems they seem to be suffering? Has anyone else experienced recent problems obtaining spares etc? Any Butters AMT directors or staff care to comment as this confusion is bound to effect future sales?
matt1978
www.lorch.eu
- Messages
- 3,967
- Location
- UK, Cannock
As far as I understood it that 7 yr warranty only covered main items, such as transformers and rectifiers (which are not likely to break anyway) and the 7 yrs was only available providing you had the machine serviced annually by a Butters service centre anyway, so in my opinion you havn't lost much.
I must be careful with what I write as I dont want to get into trouble or offend anyone from Butters, but I am sure that they did go into administration last year.
I did hear that Bob Burns, the Managing Director of Butters AMT is going to go into business again so hopefully he will be able to provide spare parts for your kit.
- Messages
- 13,276
- Location
- England
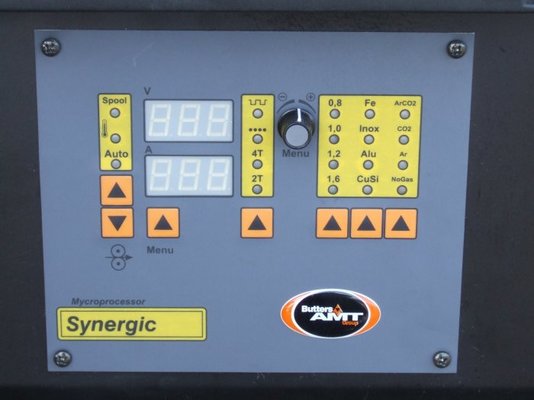
That looks like a nice and simple control panel anyway Murgy... i can make out some of the bits on it, but if you could do a close up picture thats clear im sure we can tell you just about all you need to know.
From what i can make out, youve a button to select gas, one for material, one for wire size, each button under each row.
You have a 2t/4t (trigger latch) button aswell as two other options i cant see on the middle row. The lefthand ones are wire speeds. Next one along might be to manually change voltage. The knob at the top is likely to be a wire trimmer.
Bottom two, high step and low step i would say.
Matt is correct. It is true, Butters AMT Ltd was put to liquidation early December 2008. A new company was also set up just prior to its liquidation (Butters AMT welding Ltd) ? A lot of the staff involved in customer service are not with the new company which could be an explanation to the seemingly suffering support.
The model you have is a pre-production machine, but a variant of the superb AMT311C, therefore no model specific manual would have been produced.
Being a previous member of Butters (up until Aug 08) and having the main involvement in the development of the 'SC' or 'Auto' series, which is what the eventual production models were to be called, I can help with an explanation of the controls. A full range of this SC model is actually available from the original manufacturer Iskra Varjenje, Slovenia....PM me.
Anyone needing any information on Butters equipment, parts, or just pointing in the right direction for equipment please do not hesitate to PM me.
Anyway...
Working vertically from Left to right (see attached panel)
1.
a. Spool - indicates machine ready for operation with Spool gun, if lit.
b. Thermometer - indicates machine overuse, if lit. will not function until extinguished.
c. Auto - if lit = Auto mode, if not = manual mode (as standard MIG machine).
d. UP arrow - cycles above indicators, if all out = manual mode.
e. DOWN arrow - cold wire feeding, to initially feed wire through welding torch.
2.
a. Volt meter
b. Ammeter - also indicates sub menus, when accessed
c. UP arrow - cycles through sub menus, for adjustment of pre gas, post gas, burn back, wire speed ramp up, spot and stitch timers etc...
3.
a. Stitch welding mode on indicator
b. Spot welding mode on indicator
c. 4T or Trigger latched mode on indicator
d. 2T or Normal Trigger mode indicator
4.
Wire trim - In Auto mode....set in central position (adjust left to decrease wire speed and right to increase as necessary)..note that one full turn gives very slight adjustment....also.. If knob pressed resets to zero
In manual mode....fully left is min wire speed..fully right max.
This dial is also used in conjunction with 'UP arrow 2c' to adjust the sub menu items.
5.
Use the UP arrow to cycle through the indicators for wire diameter being used..0.8, 1.0, 1.2, 1.6mm
6.
Use the UP arrow to cycle through the indicators for wire type/material being used..Fe (steel), Inox (Stainless), Alu (Aluminium), CuSi (Brazing)
7.
Use the UP arrow to cycle through the indicators for the type of gas in use..ArCo2 (mixed), CO2, Ar (pure Argon), No Gas
Note...The machine realises that certain combinations of 5. 6. and 7. cannot practically be achieved and some indicators will therefore be skipped in the cycles.
Note...The indicators do not illuminate, or have any function, when the machine is out of Auto mode.
The other controls are as a standard, step, MIG machine, EVEN IN AUTO MODE these have to be set for initial power settings.
0/1 = Off / On
A, B, C, D = Coarse power settings
1, 2, 3, 4 = Fine power settings
ie. lowest setting is A1 through A2, A3, A4, B1, B2 etc.to highest setting D4.
Any more help........PM me...
Gerronuvit
New Member
- Messages
- 1
Does anyone know where I can get a manual for a Butters 303 Mig?
bigdavesproule
Member
- Messages
- 102
Butters manual
IF YOU RING MARK KNOWLES ON 07775763582 I HAVE THIS Butters AMT311SC MIG user manual . OR ALL manual FROM NBC to BUTTERS AMT .
BRTWELD ? .
Hi mark, I tried calling you this morning, but the number is. It recognised, would you have. Schematic for a 411s machine?
I have a short somewhere and want to diagnose it
Thanks
- Messages
- 21,548
- Location
- Birmingham
Hi mark, I tried calling you this morning, but the number is. It recognised, would you have. Schematic for a 411s machine?
I have a short somewhere and want to diagnose it
Thanks
The post was nearly 8 years ago so his number may have changed?.
- Messages
- 17,006
Wow....there's a name from way back when!!Hi mark, I tried calling you this morning, but the number is. It recognised, would you have. Schematic for a 411s machine?
I have a short somewhere and want to diagnose it
Thanks
Welcome back Dave!

